Author: Shahina Mohamed Ashraf
Altenew: With A Twist
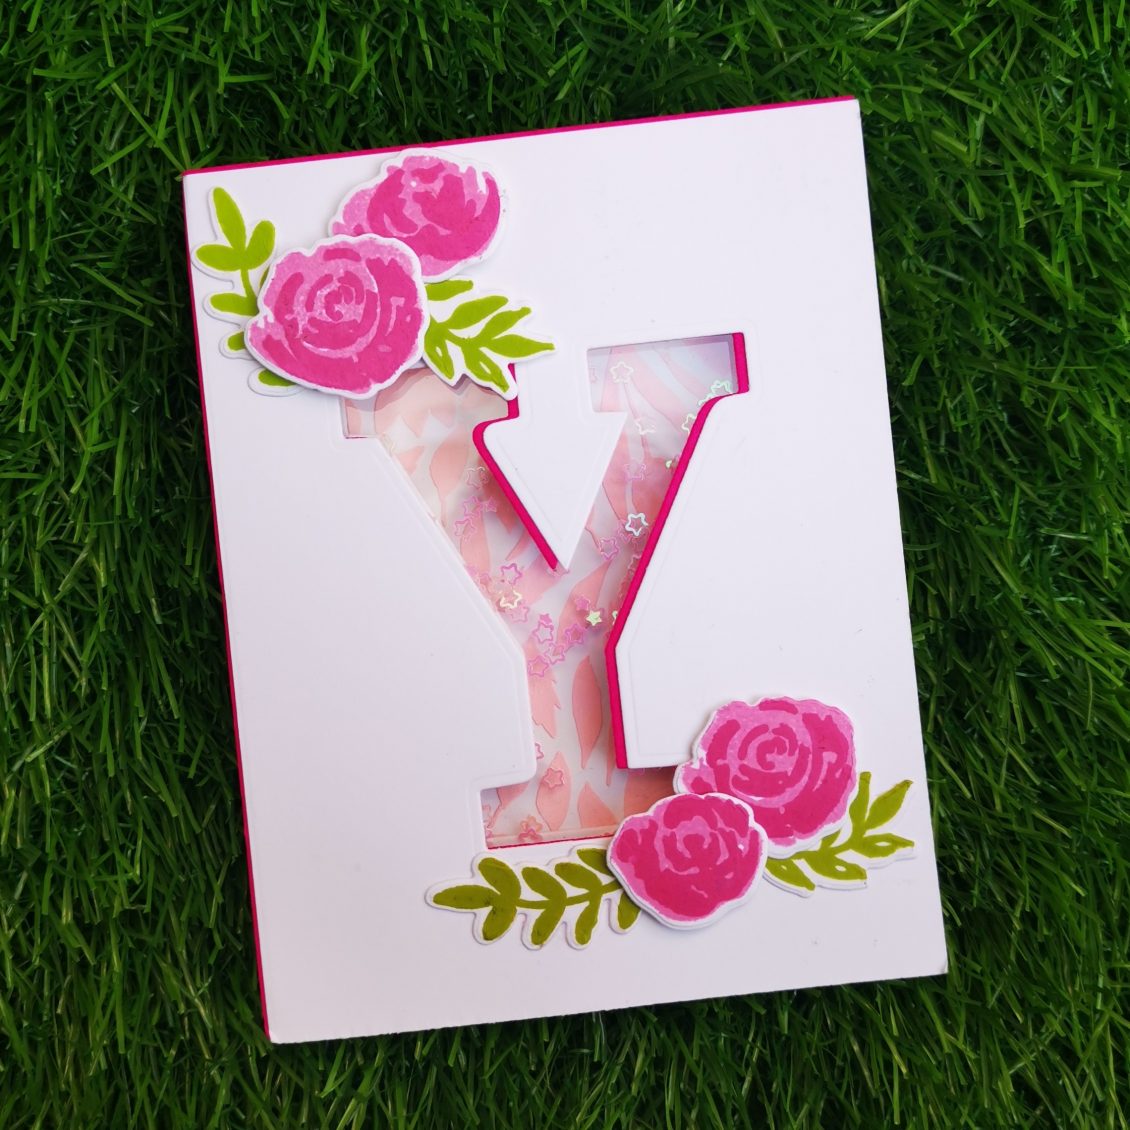
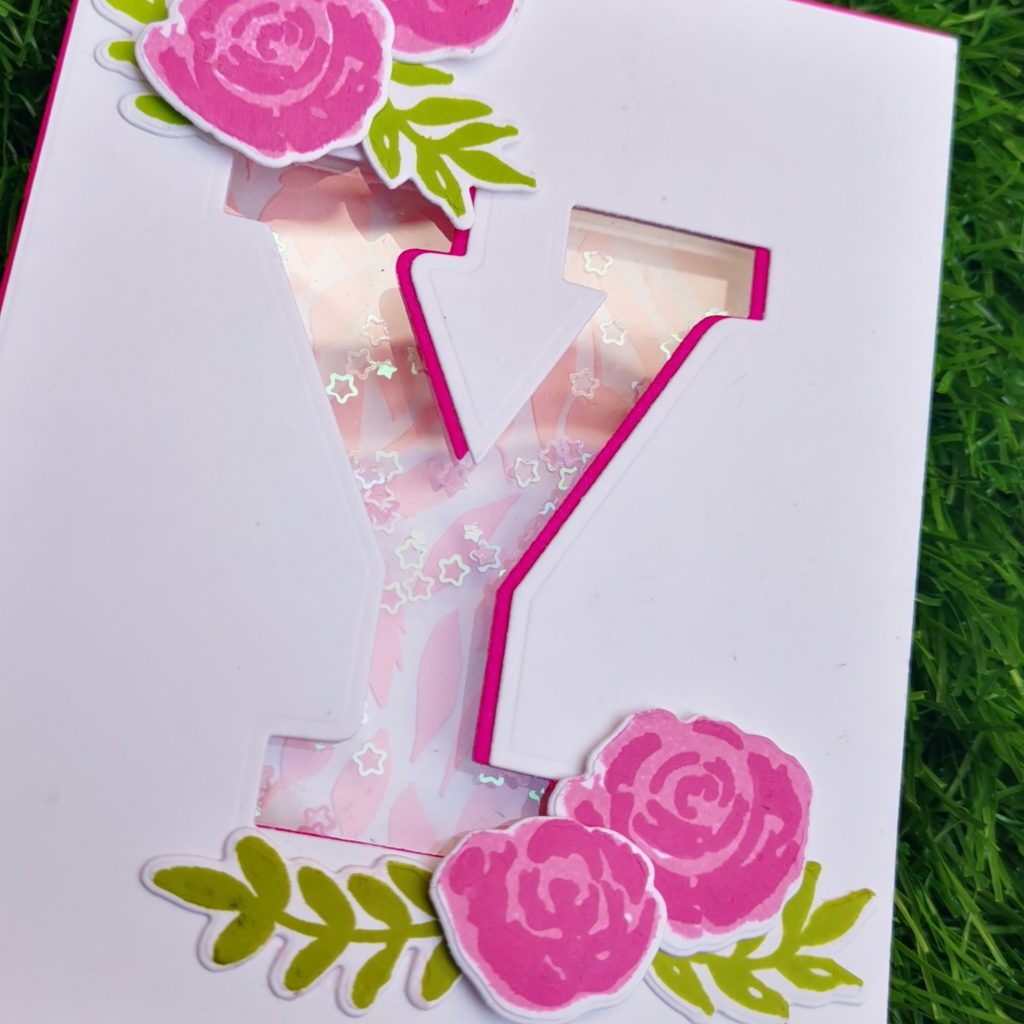
Hi, my dear crafty friends, and welcome to my blog. I made today’s card for the With a twist Course by Altenew Academy. I’m someone who is in love with interactive card. We all love a bit of acetate on our cards and there are so many wonderful ways that we can use this fabulous product to create some WOW. Shaker card is just one among it. I truly loved making this card. If you are someone like me who is passionate about various new methods to use on your card, then don’t hesitate . This course is definitely for you. Therese Calvird has really done a great job by explaining us the things in detail. Here she is taking us one step further and shaking it right through to the inside of the card.
INSTRUCTIONS
- Create a “4 1/4 x 5 1/2 ” card base from Classic Crest Solar White Cardstock (layer 1) and a pink cardstock (layer 2)
- Place the mega alphabet die over both the cards and die-cut it
- Hold the die in place with washi tape and die cut it.
- Create a “4 1/4 x 5 1/2 ” top folding card base from Classic Crest Solar White Cardstock (layer 3)
- Trace out the previous die cut image into this card stock.
- Place the die on this panel and die cut the shape.
- Open the card right up and place it on the die cutting machine so that it only cuts the front side.
- Slightly trim down the front panel of the white cardstock (layer 1) from 2 adjacent sides
- Place and stick the pink cardstock paper below the front panel of the Classic Crest Solar White Cardstock (layer 1)
- Position the White cardstock towards the right corner over the pink .
- Stamp watercolor flowers and leaves on another Classic Crest Solar White Cardstock and die cut them out.
- Using double sided tape stick them on the corner of the alphabet.
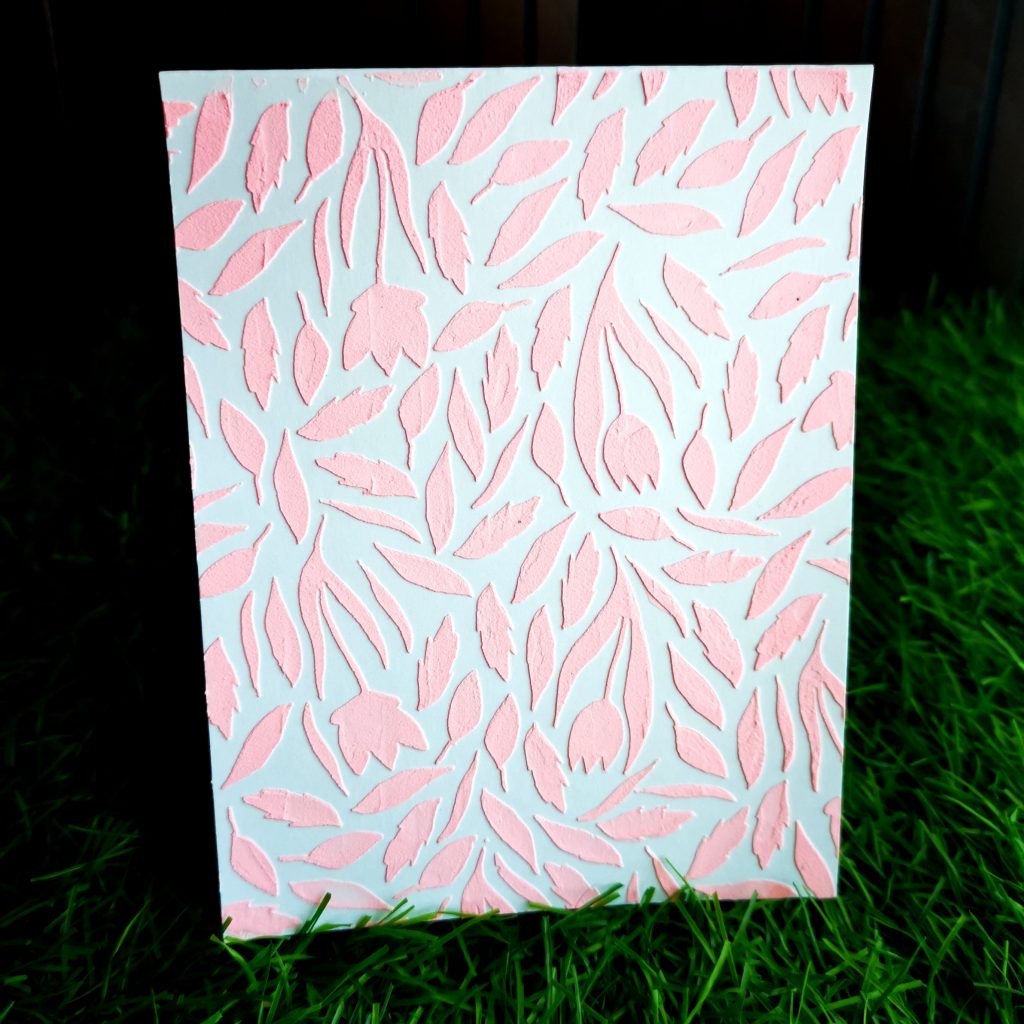
- The inside part of the Main card (layer 3) can be used for our custom design or background.
- Place Spring Garden Stencil over card base and mask outlines with masking tape.
- Take some embossing paste on the watercolor palette and add few drops of Cotton candy Alcohol Ink and blend it well
- Apply the paste on the cardstock over the stencil.
- Wait until the paste dries
- Now Reverse the front card (layer 1) facing the pink card up.
- Take a clear acetate sheet and stick it over the pink cardstock.
- Trim the excess.
- Stick the double sided tape around the border of the mega die cut ,leaving the center space empty.
- Create a well using the double sided foam tape to pour in your shaker elements.
- Make sure that there is no open edges.
- Pour in your fun shaker elements that you have on hand, sequins or even small die cut shapes look fabulous. I have used pink stars here.
- Tape down the acetate sheet over the foam tape.
- Stick this over the Main cardstock.
- Position it according to the die cut.
- Thus the inner background can be visible from the front
TIPS
- Trimming and positioning the front panel card pops up the color panel card . This highlights the alphabet die.
- Tack the stencil down with masking tape on either sides, so that it would keep the stencil intact.
- Before stamping, use an Anti-Static Pouch tool to remove static from your paper so the powder doesn’t stick where you don’t want it.
- The inside part of the card can be used for our custom design or background.
- Stick the flowers in various heights using double sided tape to create a better dimension
- Make sure that there is no open edges. If not sealed properly the pop up elements might go out.
- If you are in a hurry you may use, design paper on the inside of the card to make it easier and faster to create.
- Use any fun shaker elements that you have on hand, sequins or even small die cut shapes look fabulous.
SUPPLIES
- Bamboo Crisp Dye Ink
- Parrot Crisp Dye Ink
- Pinkalicious Crisp Dye Ink
- Rubellite Crisp Dye Ink
- Cotton candy Alcohol Ink (Artistic marker refill)
- Y mega alphabet dies
- Watercolor stamp
Altenew: Beyond Basic Background
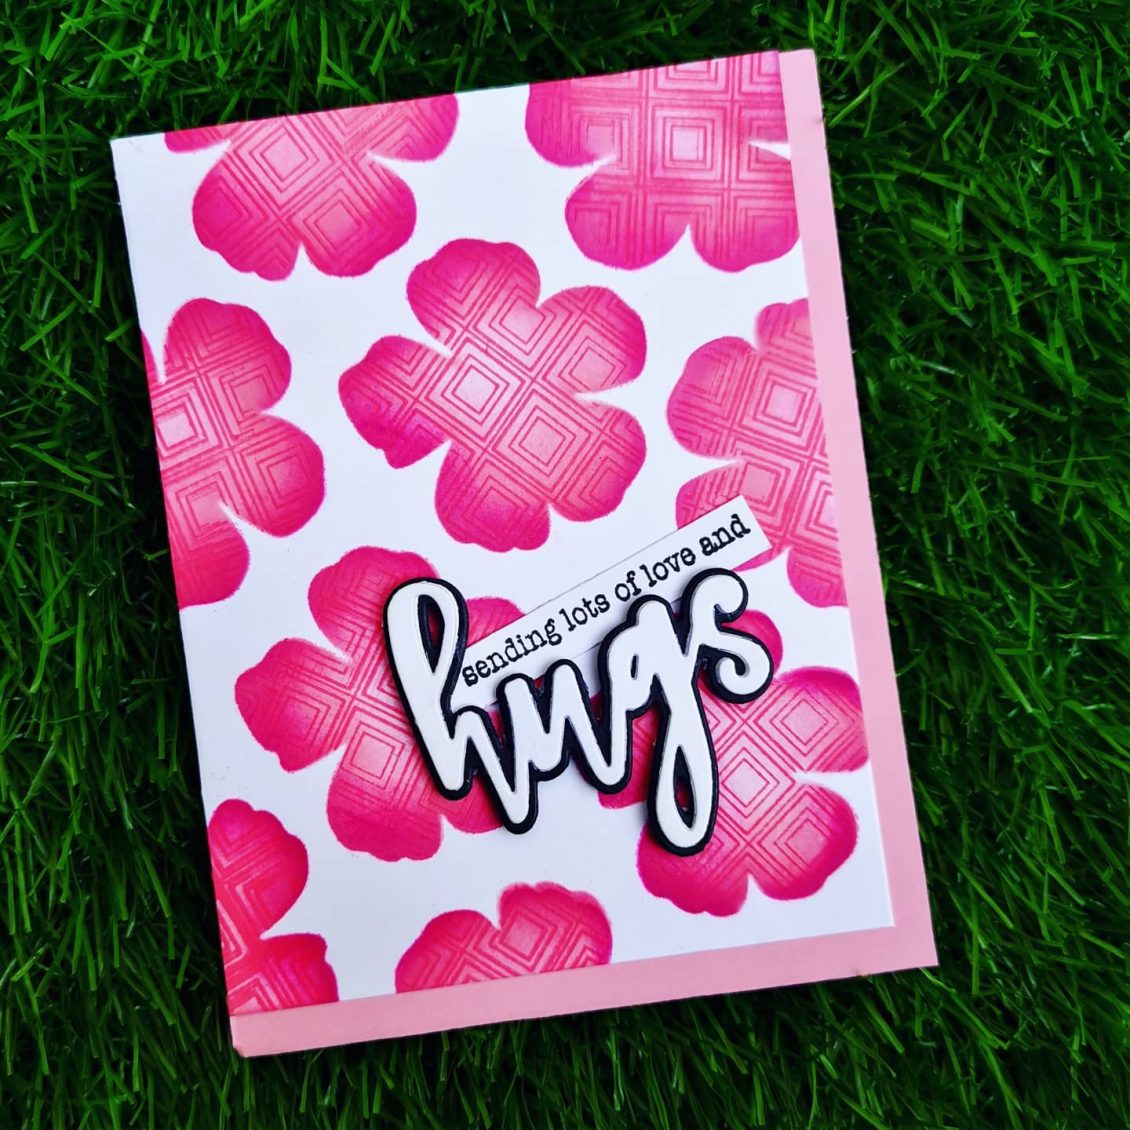
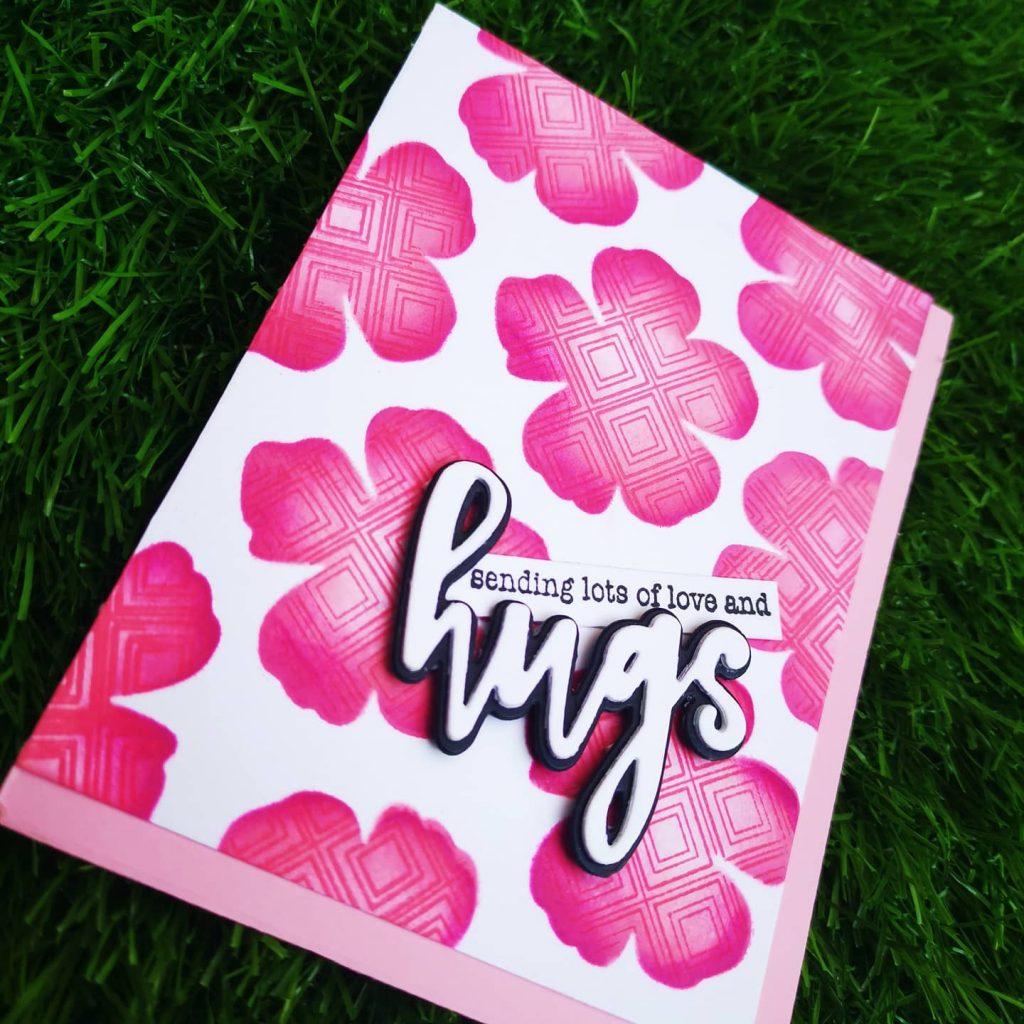
Today I would like to share a card I made for the Beyond Basic Backgrounds by Altenew Academy. I loved the gorgeous cards and the amazing tips that Lydia Evans shared in this course. I found the Beyond Basics Background class really interesting. There are so many interesting ways to create backgrounds on cards that you just don’t think of! This is something which I have never tried doing it before. And I loved how it came out. I have dedicated this cards to all the strong and inspiring women on women’s day on my IG page.
Once again.. Here I am…Sending out lot of love and hugs to all the wonderful women out there 💖
INSTRUCTIONS
- Create a “5 x 6 ” card base from Classic Crest Solar White Cardstock.
- Place the die over the card and die-cut it
- Cut numerous pieces and create a DIY stencil.
- Create a “4 x 5 1⁄4 ” card base from Classic Crest Solar White Cardstock.
- Place the DIY stencil over the blank card stock and stick the sides with masking tape.
- Blend the Die ink over each flowers
- The ink should be lighter towards the center thus giving an Ombre look to the flowers
- Then ink the large background stamp with the darker ink and stamp it over the stencil.
- Then remove the DIY stencil
- Then die cut the sentiment various times to create a thinker dimension
- Stamp the other sentiment on a thin strip of cardstock
- Stick both the die cut sentiment and the sentence sentiment towards the bottom right corner of the card.
- Trim a pink cardstock into 4 1/4 * 5 1/2 and place it behind the cardstock.
- Place the main card towards the top left of the pink card.
TIPS
- Cutting the piece for your stencil larger than your card blank will help you cover the whole area you want covering
- Tack the stencil down with masking tape on either sides, so that it would keep the stencil intact.
- Choose the same shade of color, start blending with the darkest color on the edges, blend this out and then blend the lighter color over the middle
- Try creating an Ombre effect it makes the flowers stands out as it is the slow melting effect of a lighter shade gradually getting darker towards the ends .
- Die cut the sentiment various times to create a thinker dimension
SUPPLIES
- Jet Black Crisp Dye Ink
- Cherry Blossom Crisp Dye Ink Set
- Hello and Hugs Dies Set
- Flowering Cistus Stamp Set
- Shine Like a Diamond Stamp Set
Hope you liked my card. Have a wonderful day and I hope to see you all soon with another project from AECP. Until then happy stamping and thanks for stopping by!
-shahi
Altenew: Magic Marker Techniques
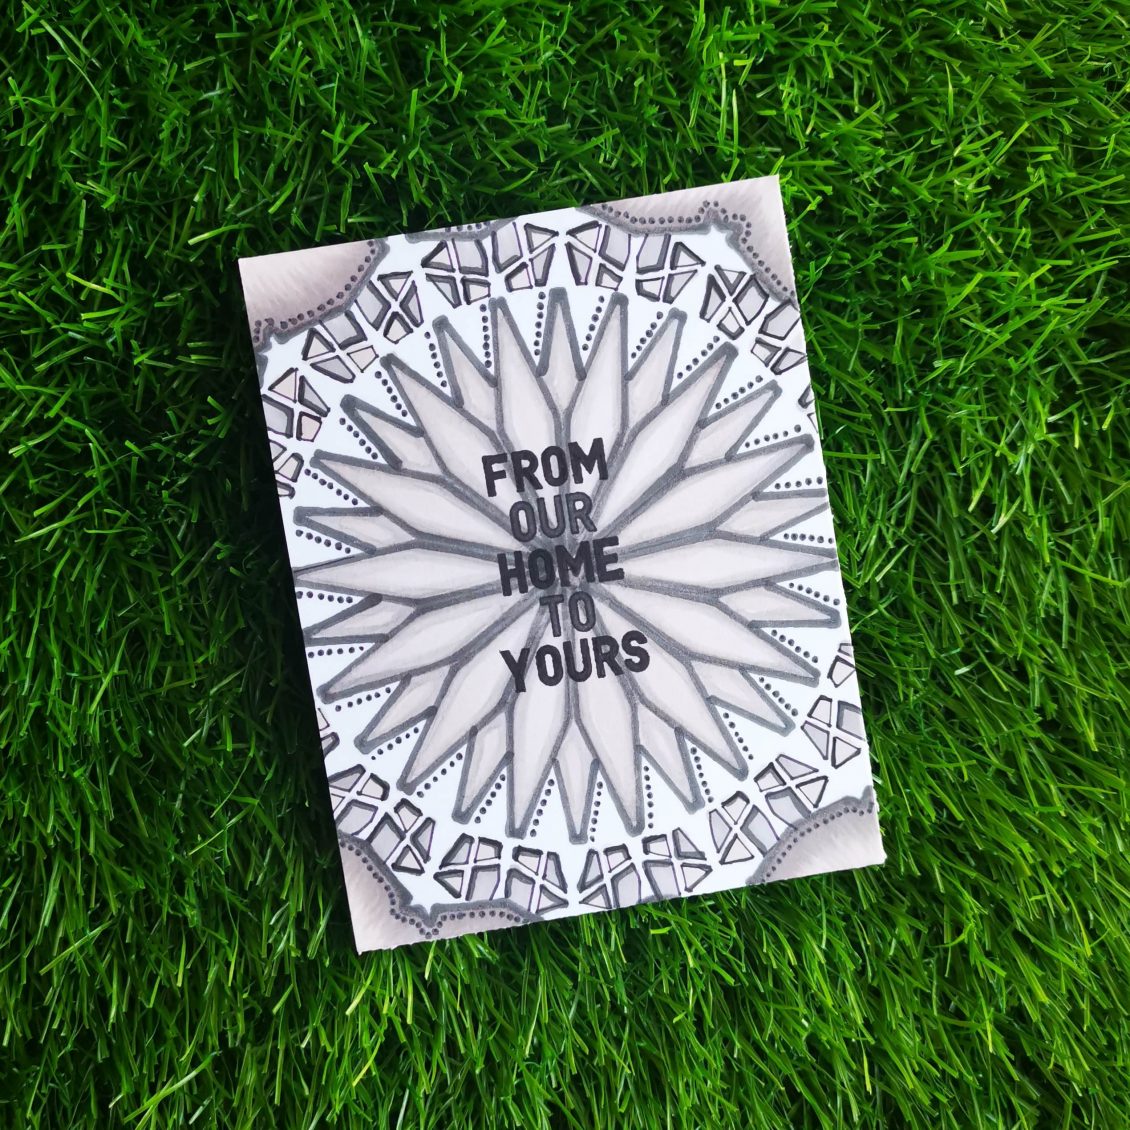
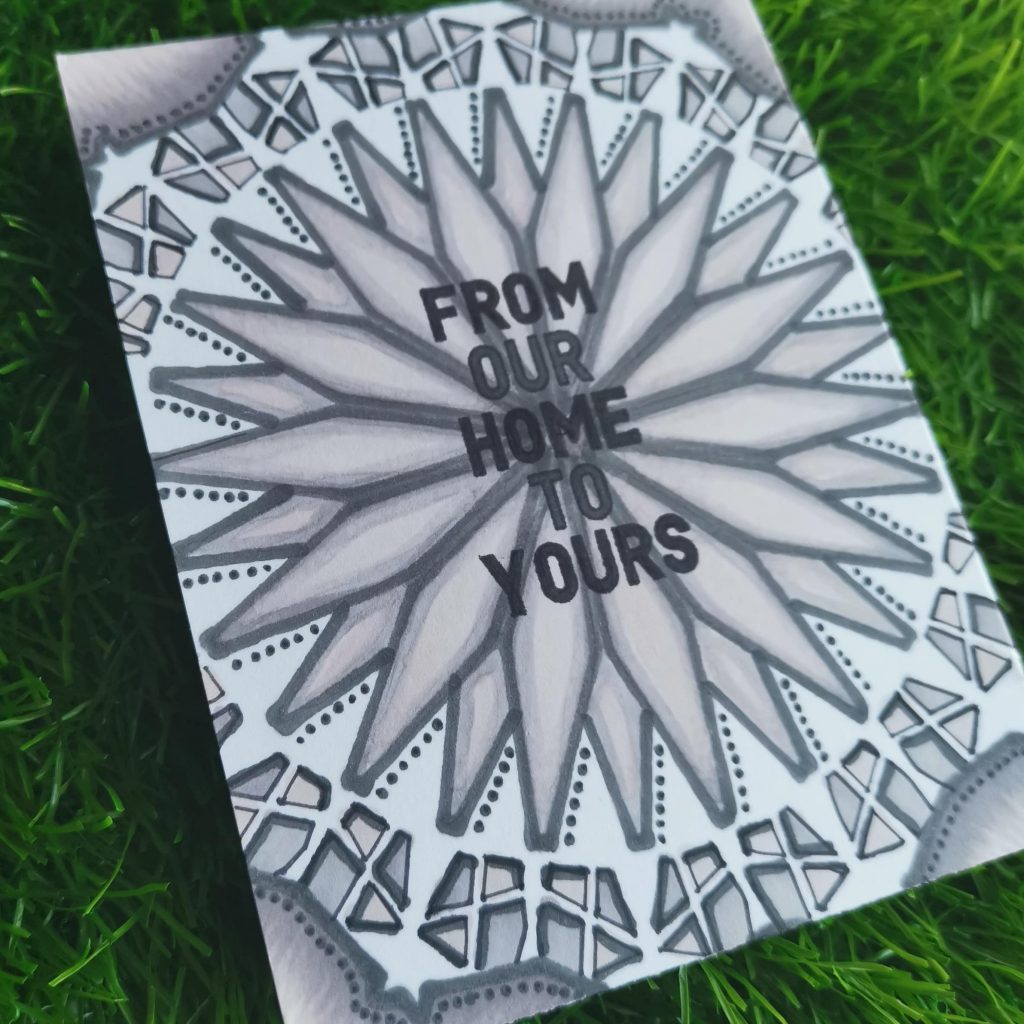
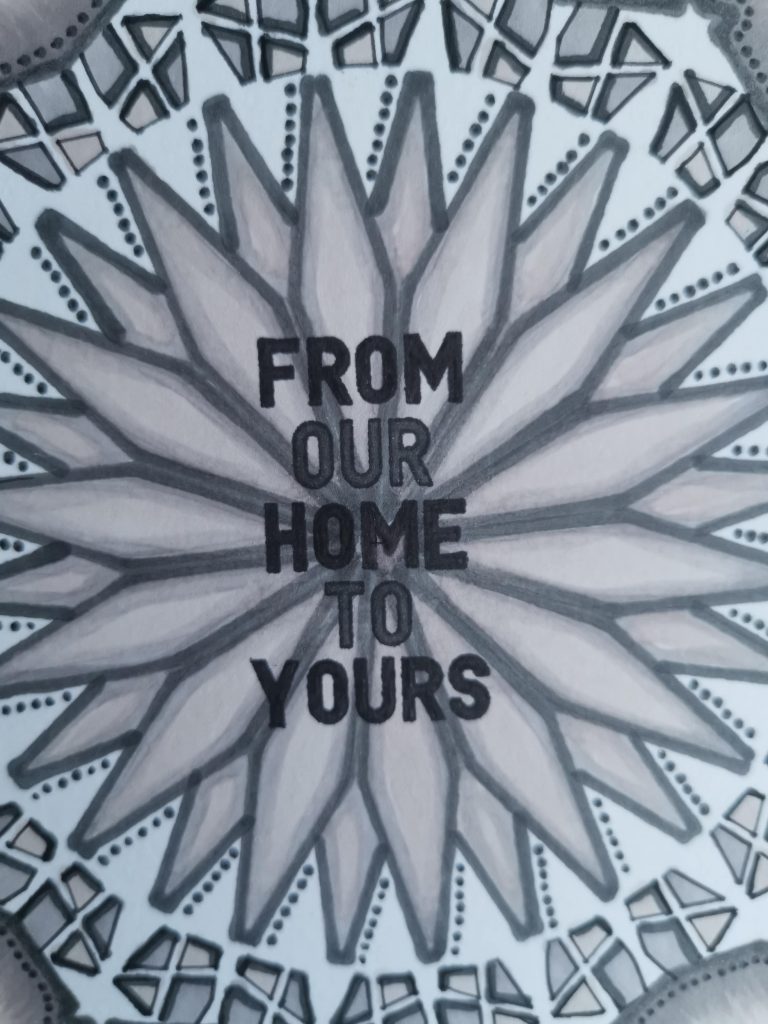
The next AECP class I tackled was “Magical Marker Techniques”, by Sara Naumann. I enjoyed the fact that Sara uses her markers for more than just coloring in stamped images, in fact, I liked that a lot. I would recommend this class to anyone who is looking for ideas on how to stretch their supplies . I used my artistic markers just for coloring, but through this class, I did explored a new way of using it.
INSTRUCTIONS
- Create a “4 1⁄4 x 5 1⁄2 ” card base from Classic Crest Solar White Cardstock.
- Place linear Stencil over card base and position it to the center of the card.
- Tack it down with masking tape.
- Remove the stencil and retrace the diamonds so they’re heavily outlined, then color in the diamond shapes
- Draw the outline using darker shade of artistic marker and fill them with lighter shades.
- Slightly rotate the stencil and move over to the second layer.
- Fill in the smaller parts according to your creativity and color choice
- Add small dots using the fine tip of the artistic marker
- You’ll have a cool dimensional effect by darkening the outline of the small parts of the stencil.
- Stamp a sentiment from the Holiday Tag sentiment.
- Fill in the sentiment with artistic marker
TIPS
- Tack the stencil down with masking tape on either sides, so that it would keep the stencil flat.
- Choose a color theme to bring up a mandala effect.
- Draw the outline using fine tip of the marker
- Slightly rotate the stencil and move over to the next layers.
- Take advantage of the fine tip of the marker to add dots and dimensions to the card
SUPPLIES
- Jet Black Crisp Dye Ink
- Morning Frost Artistic Marker
- Evening Gray Artistic Marker
- Industrial Diamond Artistic Marker
- Linear Stencil
- Holiday Tag Sentiments
For my card, I followed the techniques from lesson 6 of this course – using Markers with Stencils. I really encourage you taking this class taught by Sara Naumann, it will help you a lot more to understand color and color usage on projects. Hope you liked my card.
Have a wonderful day and I hope to see you all soon with another project from AECP. Until then happy stamping and thanks for stopping by!
-shahi
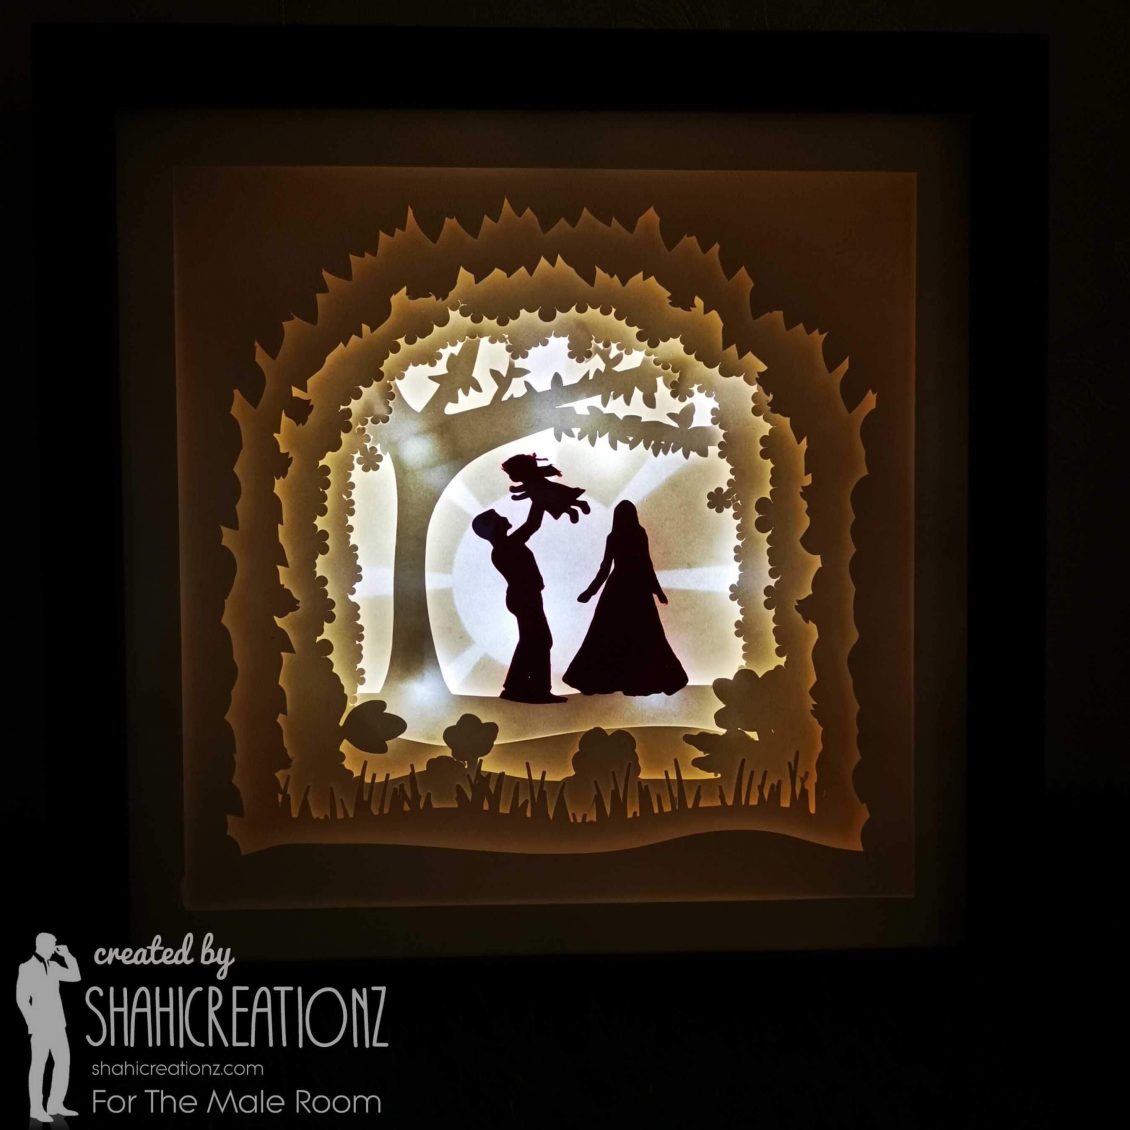
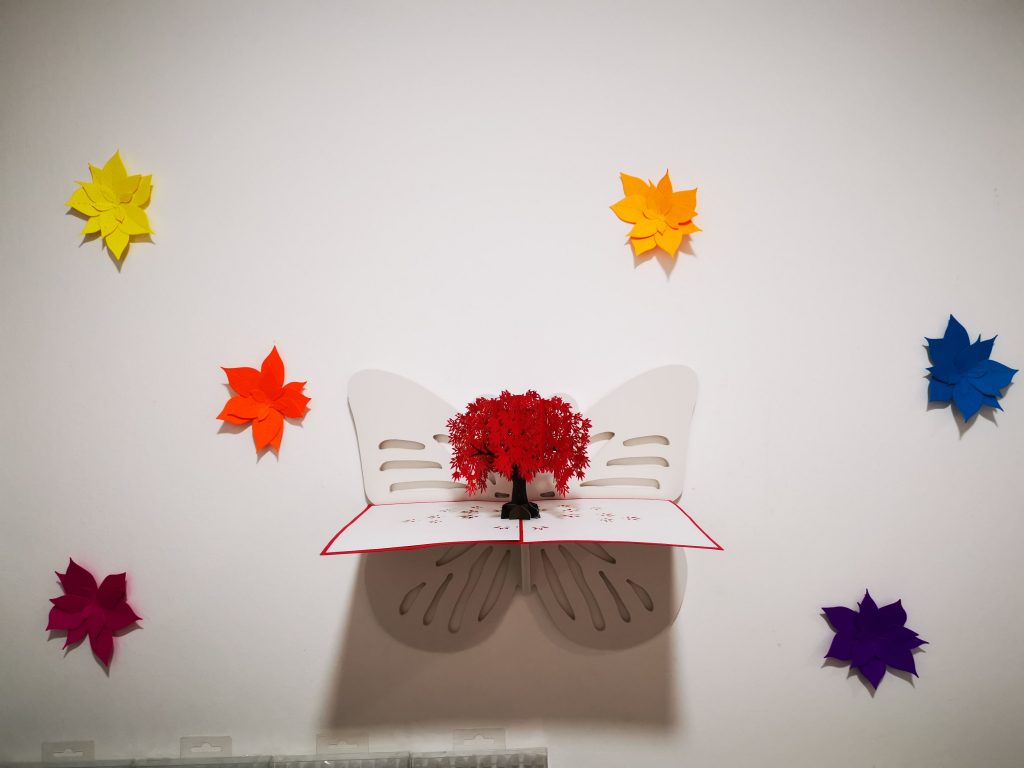
3D Paper Cut Light Box
A new month and therefore a new task to begin with. For The Male room challenge, this month we have an interesting task ahead of us., But this month we’re shaking things up a bit and asking you to forget about cards and show us your creativity in a different way. So scrapbook layouts, tags, art journal pages, 3D, ATCs will be the order of the day. Inspired by the artist, Jennifer Maker and her beautiful artwork I decided to create a 3D paper cut light box this month.
A lightbox can be used as a wonderful home décor, or a unique birthday or wedding gift. You can mount it on a wall, or place it on a desk and enjoy its charming beauty. Basically, this light box consists of paper cut outs layered on each other in a box with a glass panel. LED lights are placed behind all the layers, which makes each layer glow, giving this 3D look.
After referring to Jenifer Maker’s videos , I created my custom design for this light box on Cricut space. And cut them I using 130 grams white card stock, because it’s stiff enough to stand up and thin enough to let the light pass through. The layers are reassembled with foam spacers in between each one. This gives the image the appearance of depth and creates a 3D effect. It was placed inside a shadow box frame sized 9*9 .
If you put your custom shadow box design in a display frame, you can add LED lights to the back to light it up and see all of those layers and shadows so much better! I prefer to use LED light strips, but some people just use fairy lights. Either way, they go behind your layers of cardstock. I usually put my LED light strips around the edge of the frame for a nice even glow. You’ll want to position the lights so your cord can hang out one corner — if necessary, cut a small notch in the corner of the frame for the cord. Now just replace the back of your display frame, plug in your light, and enjoy the magic!
Hope you liked my 3D Paper Cut Light Box. Now have a look at the challenge blog here for all the challenge details and to see the cards from the rest of the Design Team. https://themaleroomchallengeblog.blogspot.com/2021/03/challenge-148-not-card.html.
Altenew: In The Mood For Color
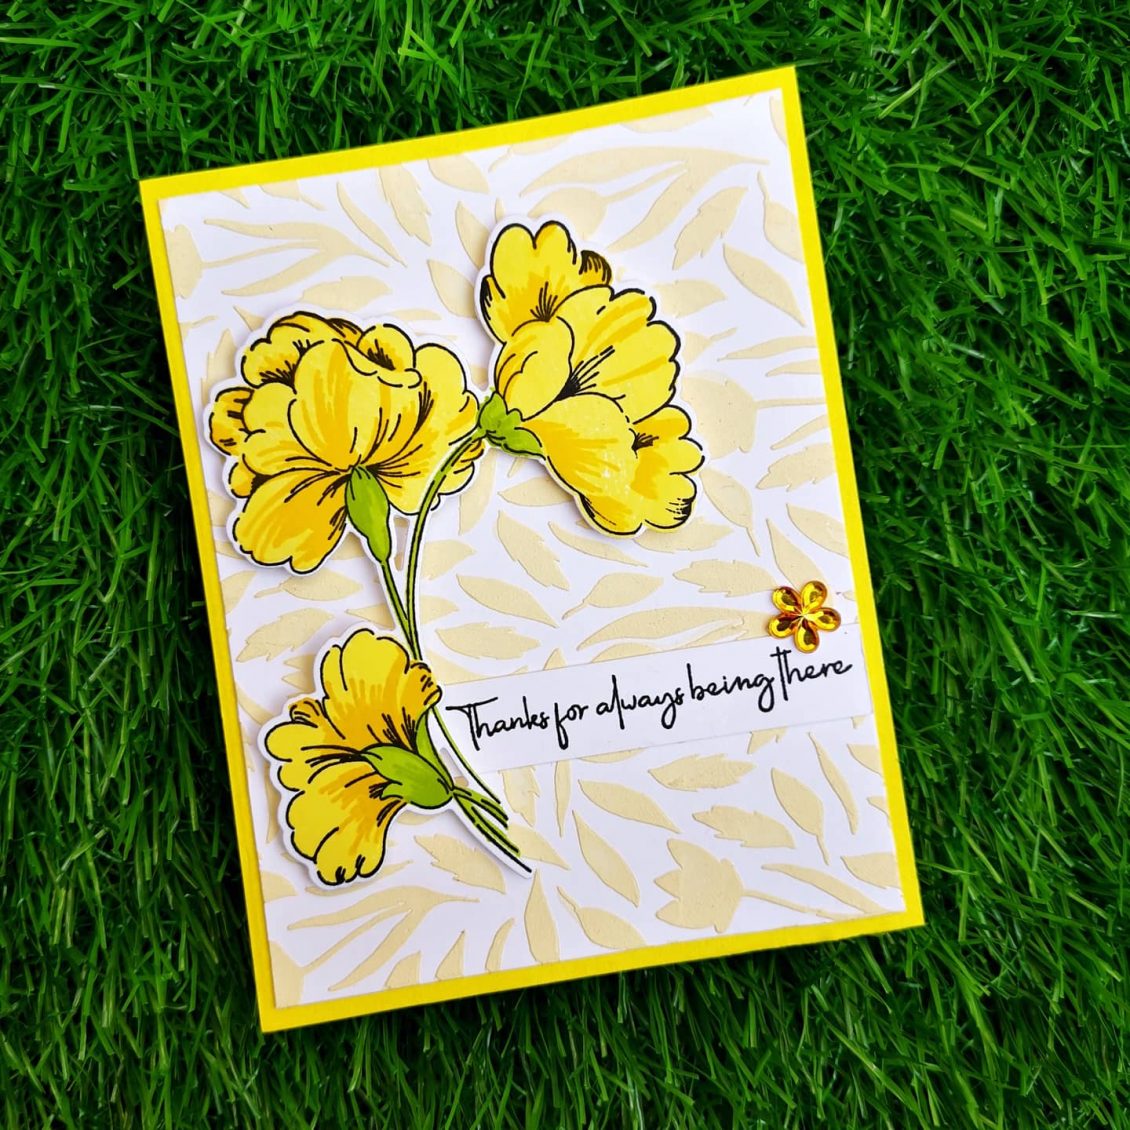
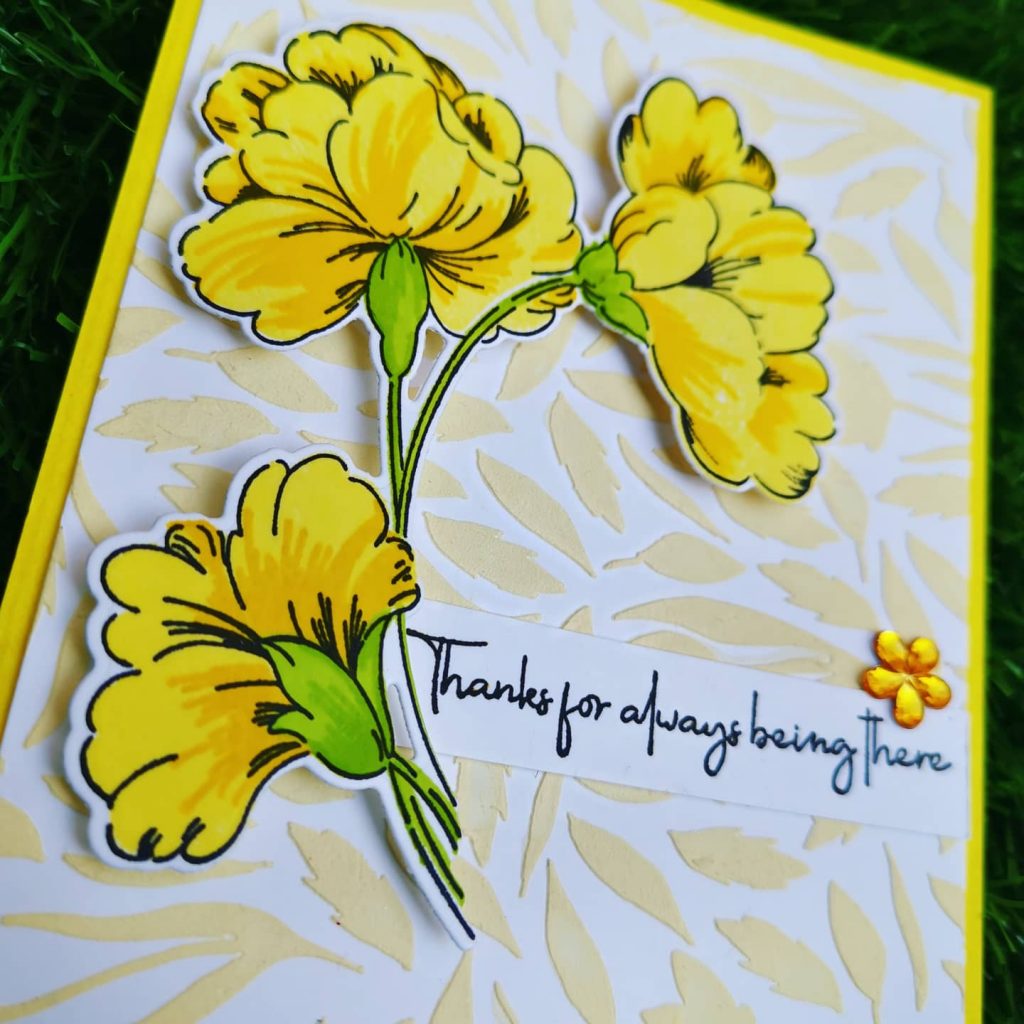
Hi, Thanks for stopping by… It’s so great to see you here! I was very excited to have graduated from Level 1 of the AECP program! That last project was HUGE and took me forever to get completed. After a long gap, I’m now onto my next level of the program. The first class I choose in level 2 is “In The Mood For Color” . In this class Stephnie Klauck shares the impact of colors on ones mood. Here I have focused on the color Yellow . It is the most luminous of all the colors of the spectrum. It’s the color that captures our attention more than any other color. It’s the color of happiness, and optimism, of enlightenment and creativity, sunshine and spring.
INSTRUCTIONS
- Create a 4 ” x 5 1⁄4 ” card base from Classic Crest Solar White Cardstock.
- Place Spring Garden Stencil over card base and mask outlines with masking tape.
- Take some embossing paste on the watercolor palette and add few drops of Buttercream Alcohol Ink and blend it well
- Apply the paste on the cardstock over the stencil.
- Wait until the paste dries
- Stamp the biggest stamp from Sweet Flowers Stamp Set using Obsidian Pigment Ink on a Classic Crest Solar White Cardstock
- Then, stamp in the layers of the flowers with Fresh Lemon and Maple Yellow.
- Then, stamp the floral stem details using Bamboo and Parrot
- Finally, die cut and adhere the florals onto your card base using double sided foam tape.
- Stamp a sentiment from Friends Forever Stamp Set onto a white cardstock strip using Obsidian Pigment Ink
- Stick it near to the floral die cut
- Add your favorite embellishment to enhance the look of the card.
- Finally, add this panel to your yellow card base
TIPS
- Choose the right colors , it allows you to let the sentiment say what you’re feeling, and help the person you’re giving the card to, feel what your feeling.
- Use a stamping tool to stamp your florals. It makes stamping large solid images so much easier since you can double and triple stamp. the included bar magnet can be used to quickly and easily position your cardstock, and the included grid paper makes it easy for you to lay out and align your card’s design.
- Before stamping, use an Anti-Static Pouch tool to remove static from your paper so the powder doesn’t stick where you don’t want it.
- When doing stamp layering, start with the lightest ink color first and then build up to the darkest.
- Add your favorite embellishment to enhance the look of the card.
SUPPLIES
- Obsidian Pigment Ink
- Fresh Lemon Crisp Dye Ink
- Maple Yellow Crisp Dye Ink
- Bamboo Crisp Dye Ink
- Parrot Crisp Dye Ink
- Friends Forever Stamp Set
- Sweet Flowers Stamp & Die Bundle
- Spring Garden Stencil
- Embossing Paste
- Buttercream Alcohol Ink (Artistic marker refill)
- Watercolor palette
I really encourage you taking this class taught by Therese, it will help you a lot more to understand color and color usage on projects. Have a wonderful day and I hope to see you all soon with another project from AECP. Until then happy stamping and thanks for stopping by!
-shahi

CASE your fellow AECP Crafter
Hello and welcome to Case your fellow Crafter Blog Hop!
You must be here from Sandhya Iyer ‘s blog
We fellow crafters at AECP are here with our first AECP Participant/Educator Hop! We thought it would be really fun to do a CASE your fellow crafter hop, which is an awesome way to get to know each other! All the credit goes to Natasha. she is the one who helped us the most in making this happen today.
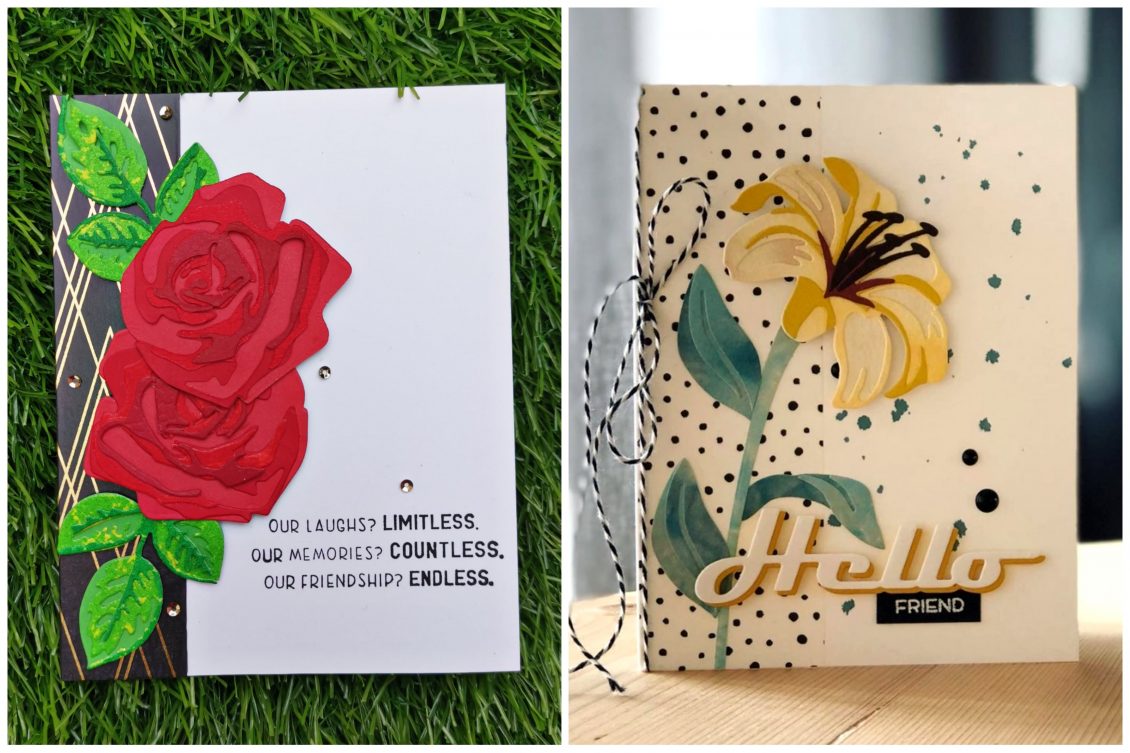
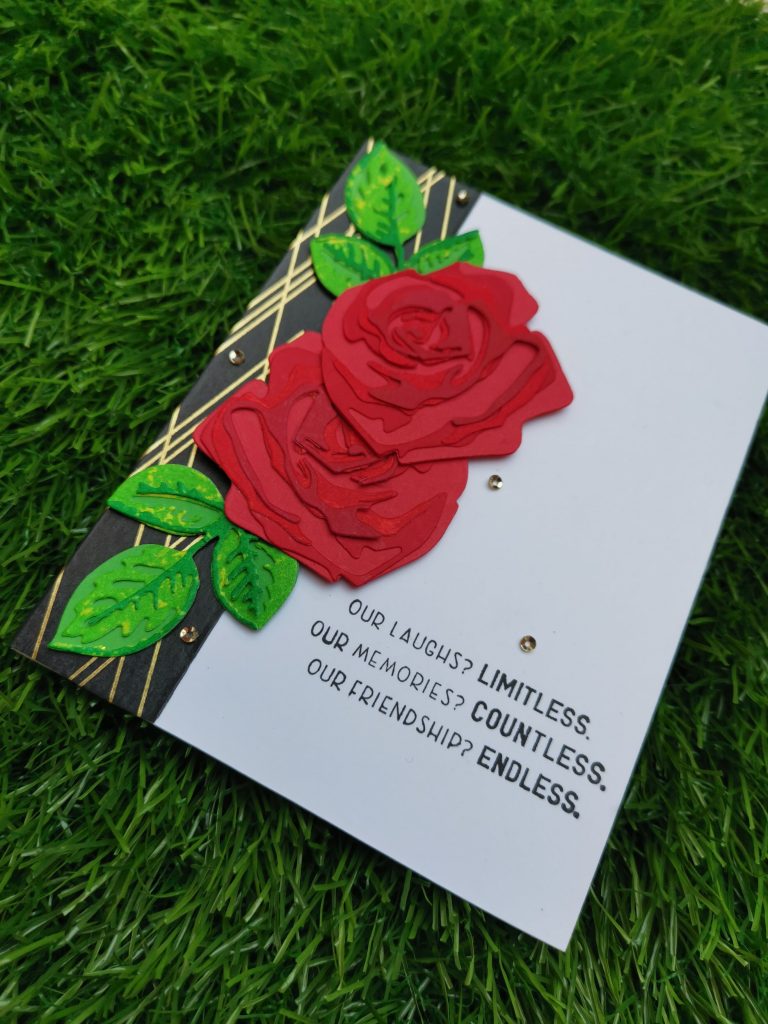
Today I’m going to CASE Berit Kyllo-Steinmoen . She is such a talented artist. A fellow AECP participant who has got real talent of playing with colors. The card I chose to CASE is
As I was scrolling through her IG ,I noticed that this was her first trial on layering dies. That when I realized that I haven’t given it a try yet. Switching from layered stamping to layered dies was something really new to me. But I’m totally loving it. So here is my version of her card.
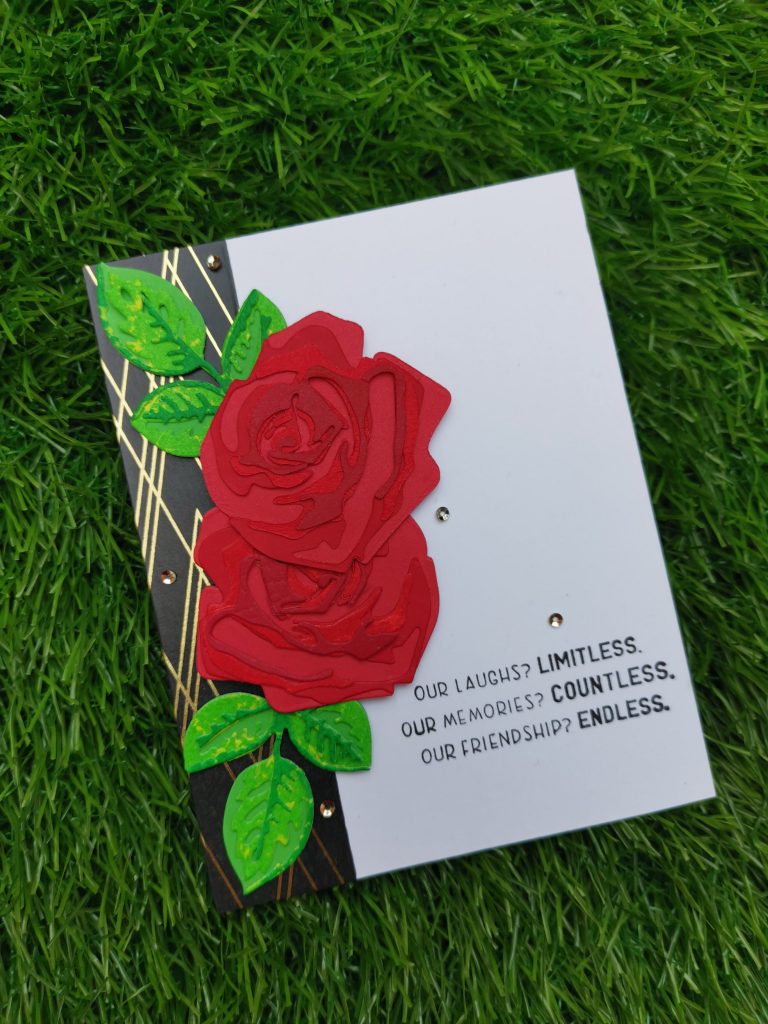
Coming to the details, CASE means Copy And Share Everything. but it can be interpreted in many ways. Basically, we would each choose one of the AECP/Educator creations someone has shared that inspires us. Then we would create something ourselves; it could be a recreation of the exact card, we could take certain parts of the design and make it our own. It could be that a specific technique or color choice inspires you. The possibilities are endless! Today I have focused on the techniques and the layout used by her. She has given a vertical border at the left side of the card with the layering flower covering part of it. The sentiment is placed on the right bottom of the card. As add-ons she has also used some sequences near the sentiment.
To begin with I trimmed a 5 1/4 * 4 1/2 Neenah classic crest cardstock. Then stuck altenew’s deco lines washi tape on the left side. Then I die cut Craft a Flower Rose layering die set from Altenew. I used 4 different gradients of red for the flower and green for the leaf. To give a unique look I splashed some yellow paint on the green leaves. The sentiment I used was from friends forever stamp set from Altenew. To have a extra look .I used some Antique gold sequins from Altenew. Here are some detail look to my card. Hope you liked it.
Thank You!
I really appreciate you stopping by. If you like what you’ve seen from me, please comment your feedbacks and do give me a follow over on my Instagram (@shahicreationz) and/or subscribing to my vlog and YouTube if you haven’t already.
Your Next Stop is Nandini Karmarkar ‘s Blog!

Setting up my passion
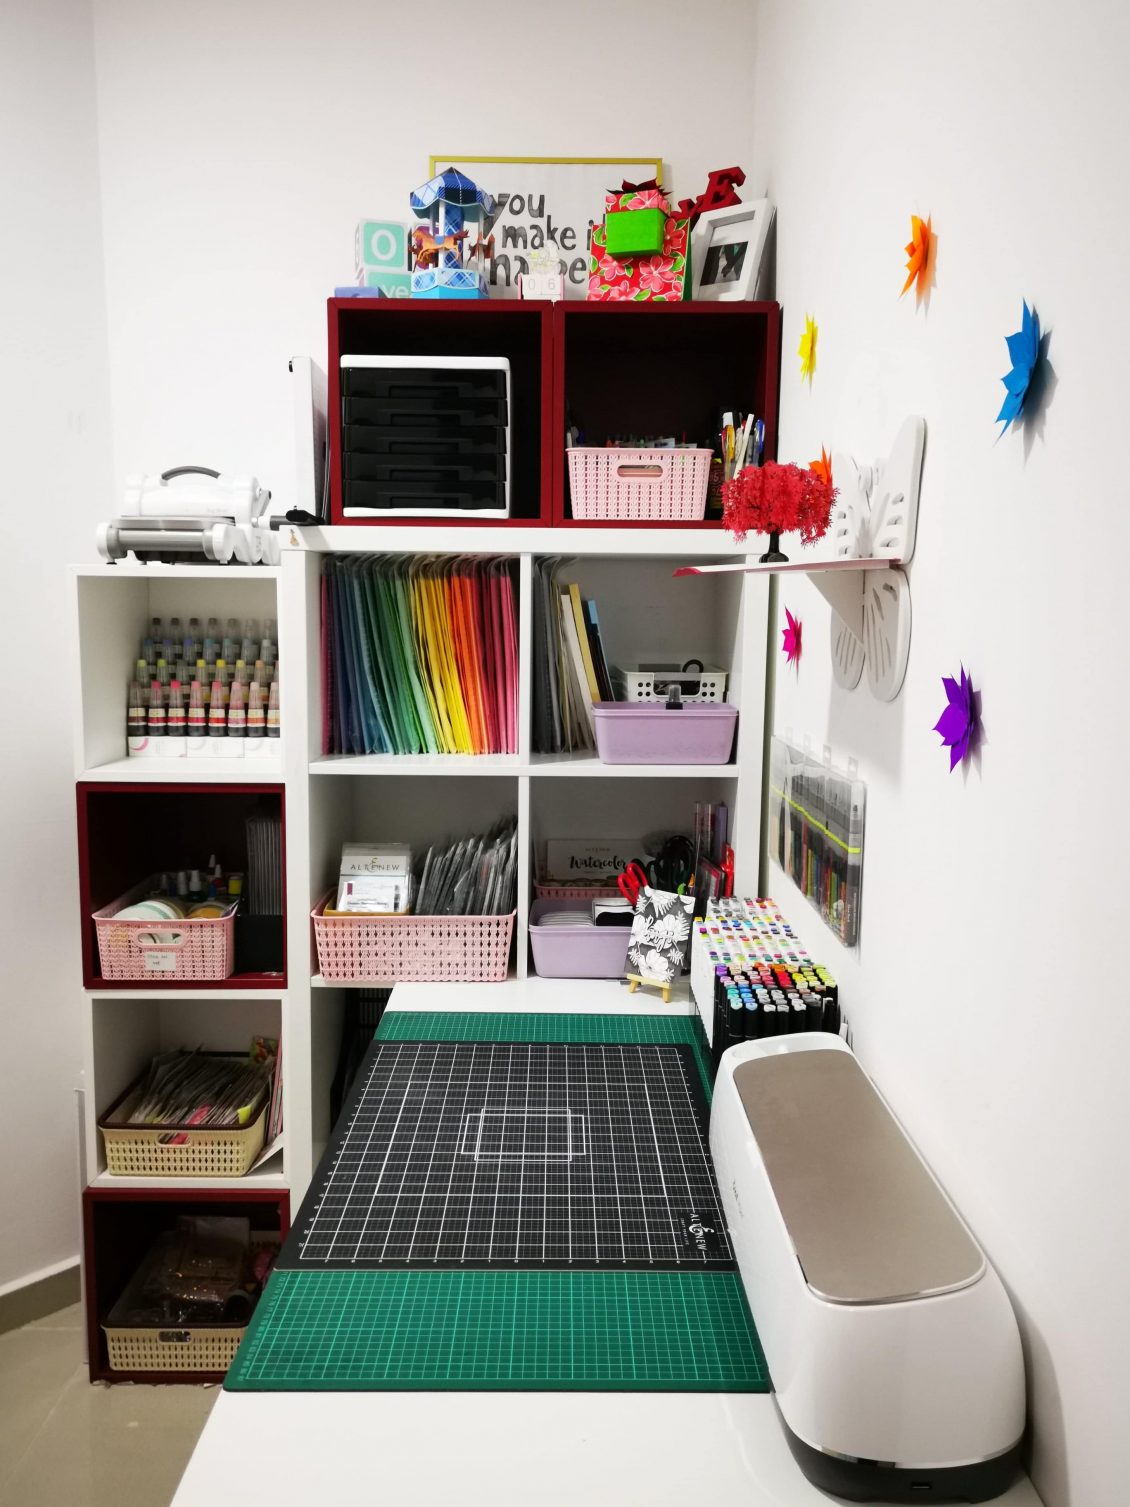
Setting up a space where I can call it a craft room was always a dream for me. I’m someone who thinks that, “For a craft room to look good, it should be organized well” . Organizing your craft room is essential to your creativity and sanity. A craft room can truly get messy once you’re in the works of creating something truly beautiful or practical.That’s why keeping it organized is very important. There is nothing better than feeling inspired in a place where you feel safe.And the organization can give you a sense of safety!
Today I’d love to share some of my craft room organization ideas that will keep you organized and hopefully inspired. First one is pretty simple but absolutely essential to keeping your room organized. Get tall shelves, the taller the better. The more shelving you have, the more space there is for all the supplies. The more supplies, the bigger the inspiration to get things done every day.
The truth is, you can get your craft room organized with a very small budget. All you need to do is go to the Dollar Store, get whatever seems proper for storage, and arrange something of your own.
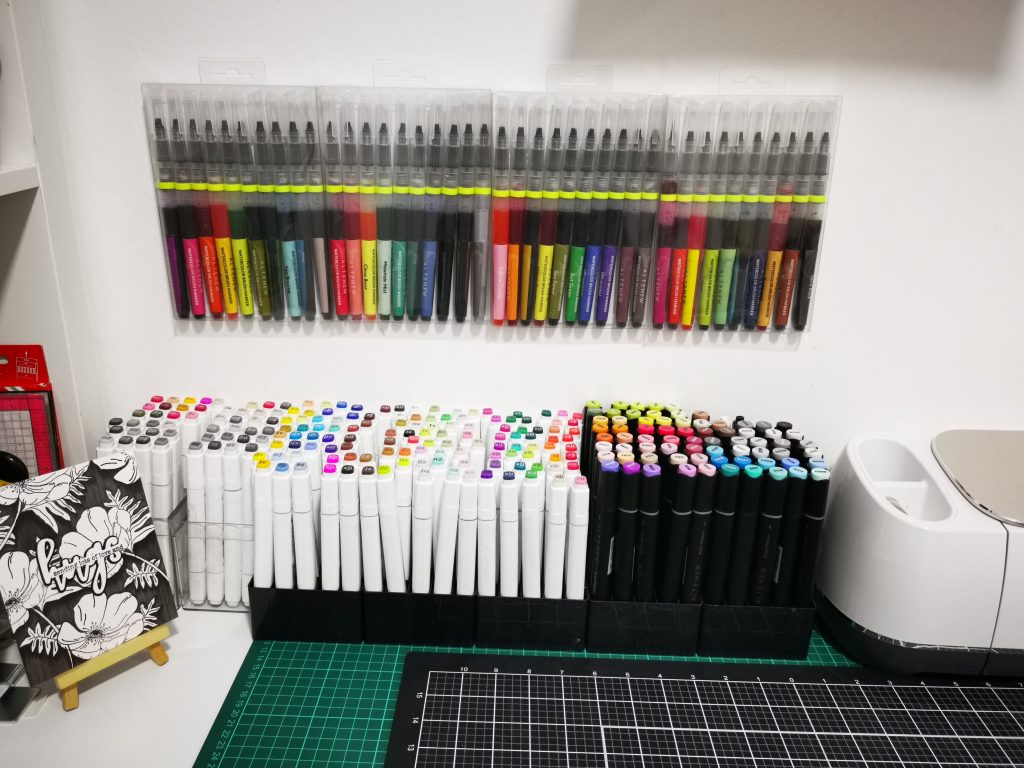
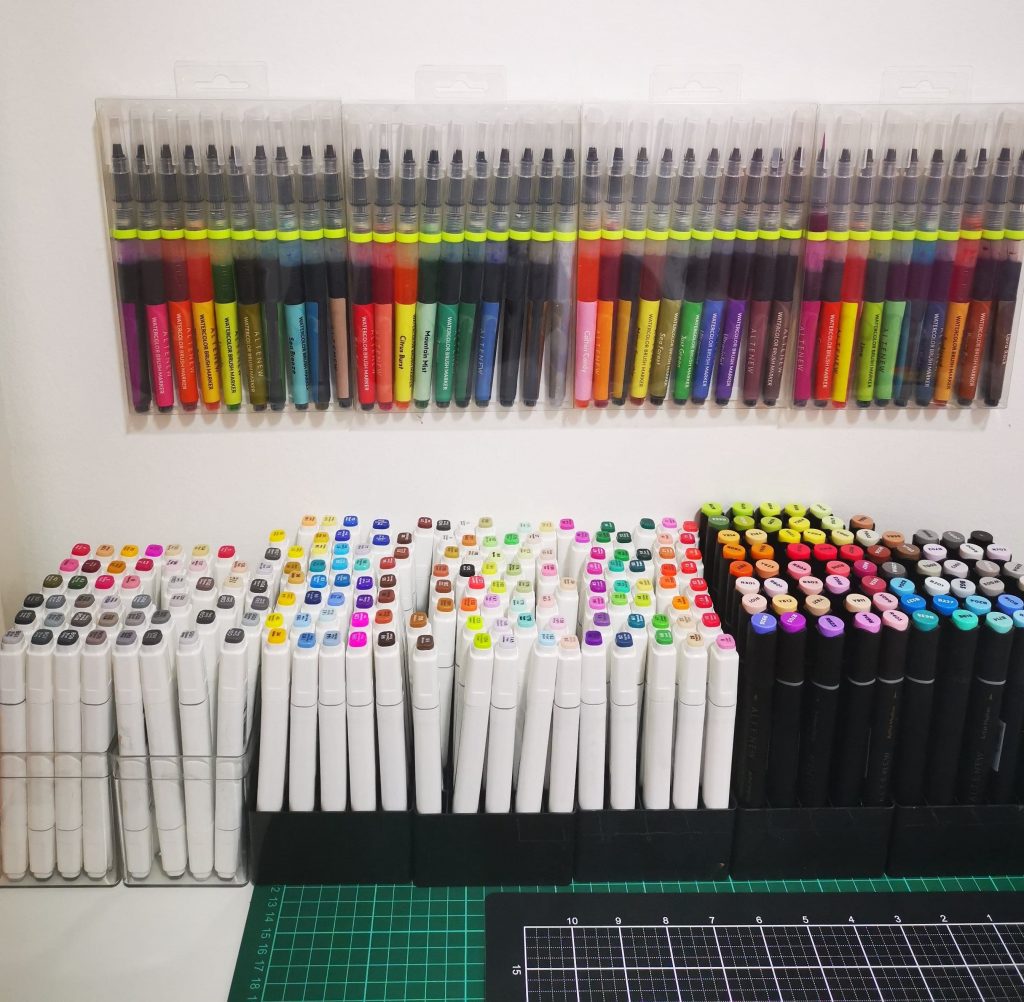
If you love to display your supplies on the table, get a display rack stand. These are great for threads, nail polish, paint, glitter, etc. Every inch of your space is precious. So, you might want to use the space on your table to keep some of the supplies. Obviously, make sure it doesn’t get too messy. You know how easy it is sometimes to just throw everything on your desk! If you just want to display your inks You may arrange them on a pen holder and then assemble them according to your taste. I would always want my artistic markers in hand. So I have arranged them in front on the top of the table. Lately I’m obsessed about water color brush markers. So I have arranged them on the wall.
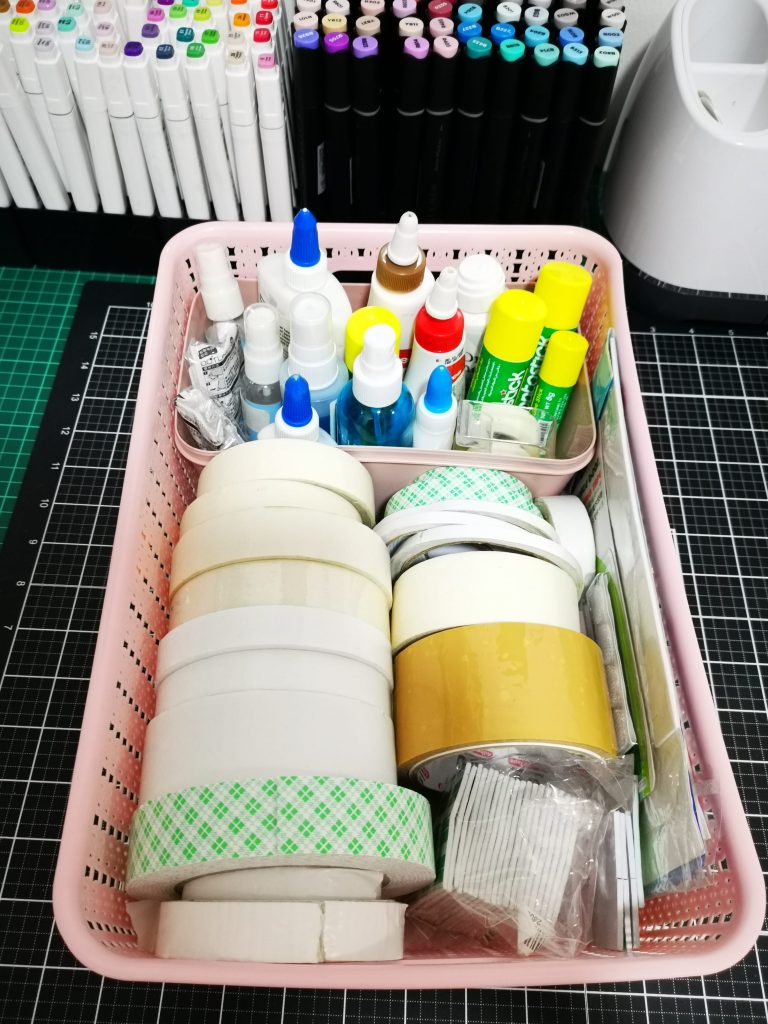
You can choose various methods for hanging them vertically. 1) using a pegboard 2) hang them on a clip or nail or a holder 3) stick it on the wall using a magic tape. I am someone who keep changing my stuffs according to the project I’m working on. So I never wanted to create a mess on my wall. So I always rely on magic tape. It comes out very easily. It’s really easy to reuse or stick it back on place. You’ll have everything in one place and you’ll finally start using some of the vertical space. All of it will come in super handy especially if your craft room is very small.
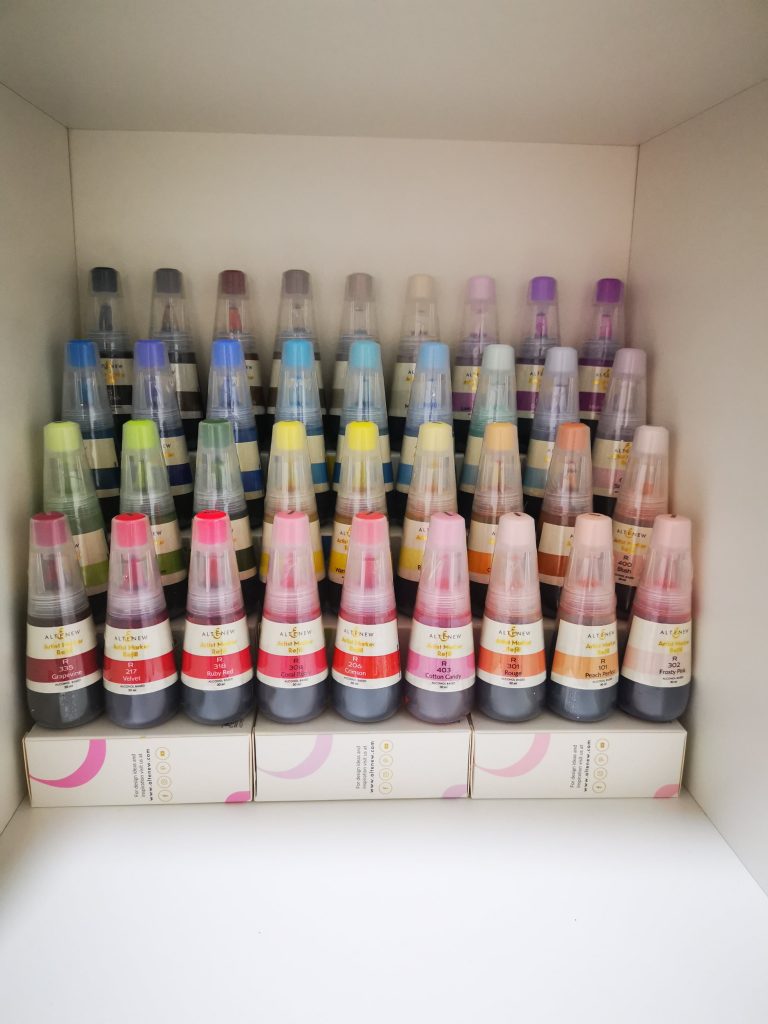
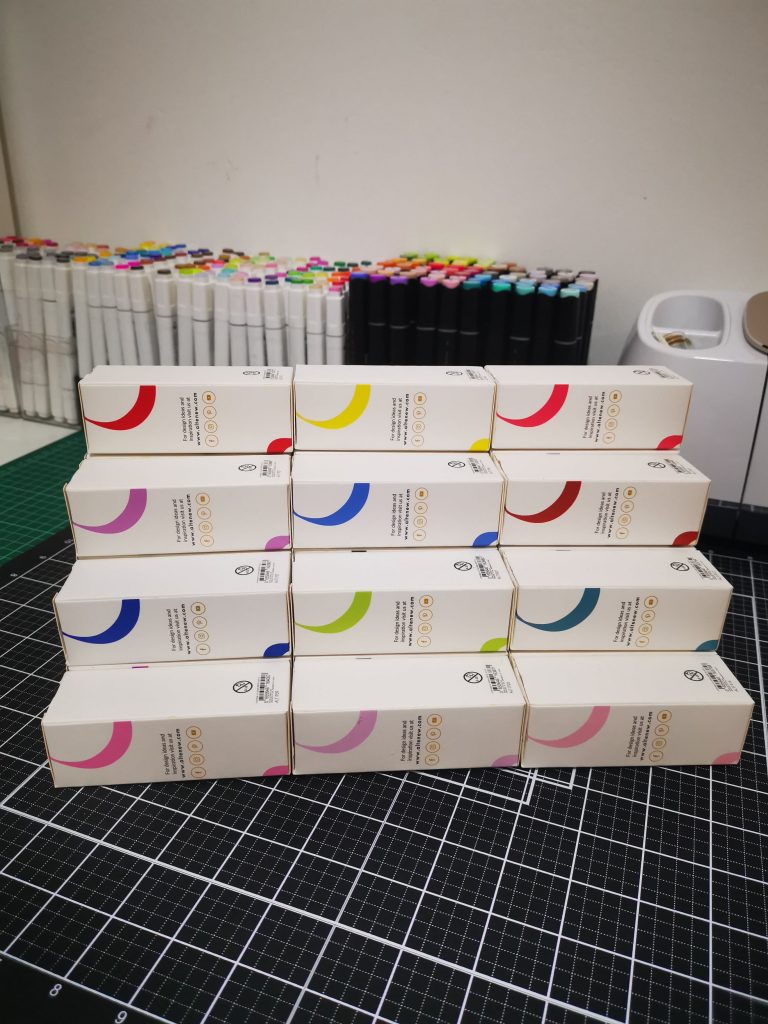
Coming to watercolor brush markers refills. It’s something that you should definitely catch hold of. But organizing them was kind of tricky for me. I wanted to see all the colours in a single sight. It helpes me to choose the right one. That’s why I choose to create my own stand for that. Altenew is always best for its products. Buy it once, you can never stop buying things from them. It’s not just their products, their packaging is also always on my favorite list. So I decided to create a stand for my refills, using their own boxes. And it definitely came out great. Do give a try for yourself.
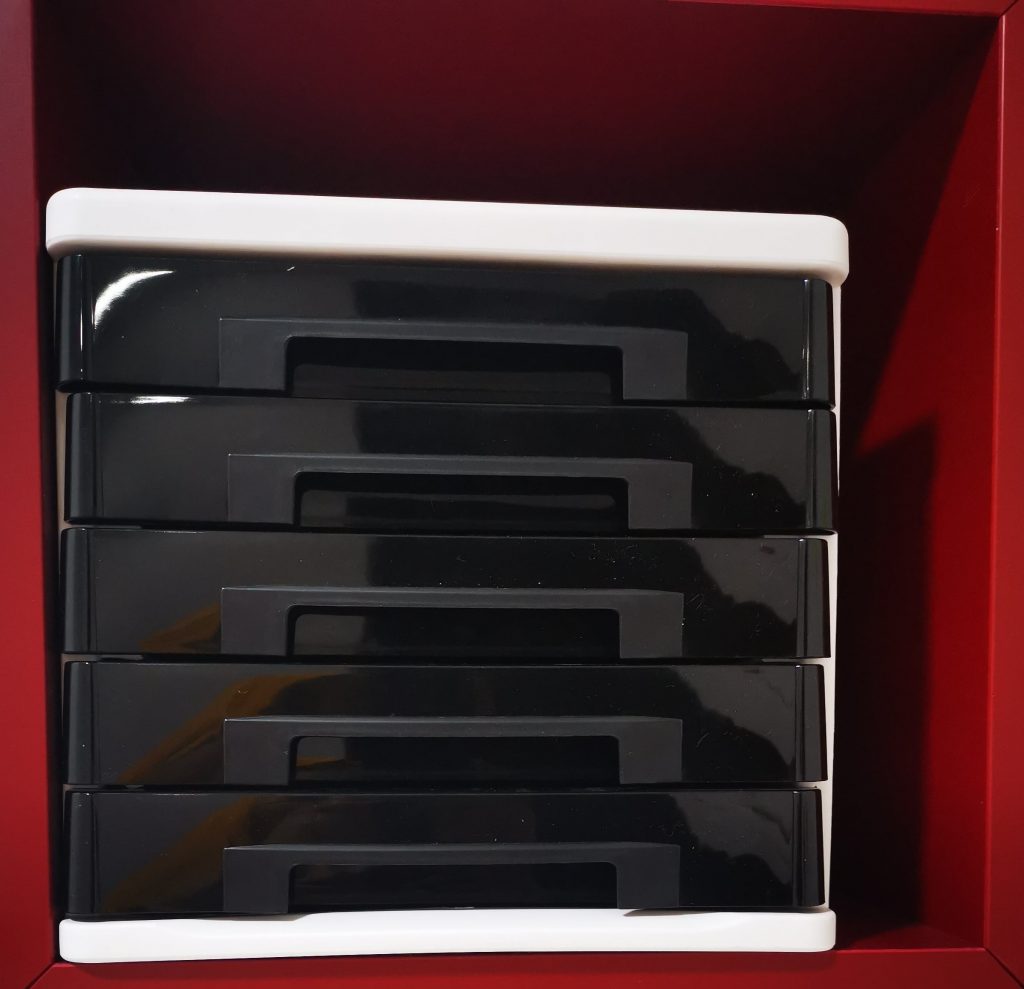
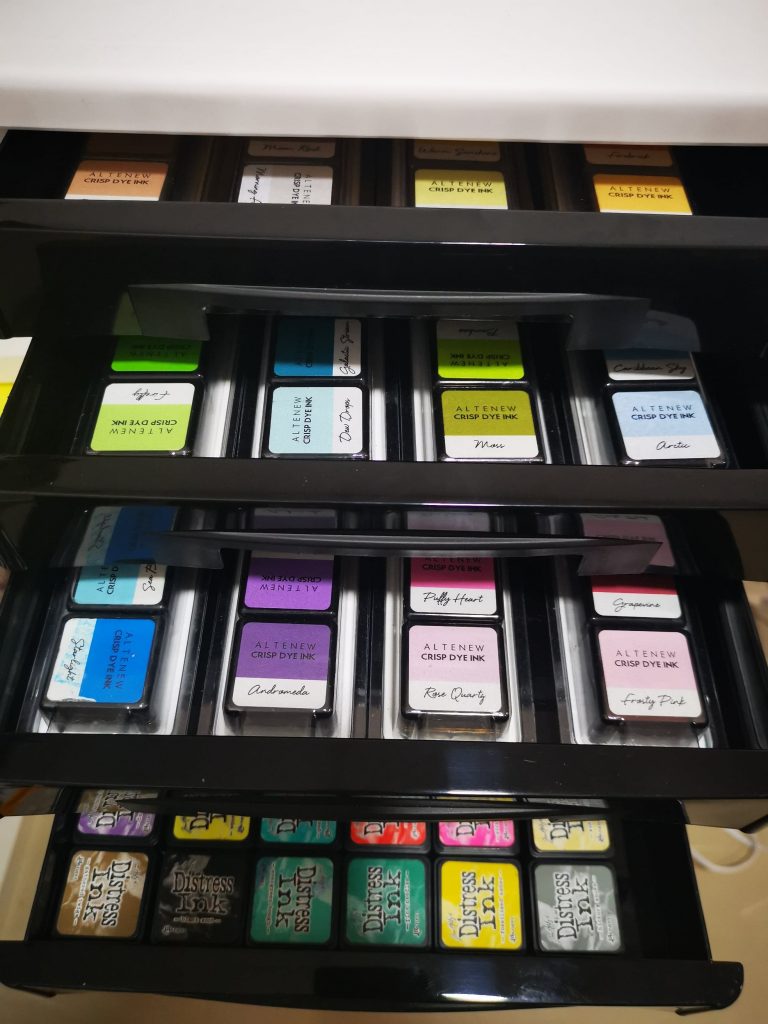
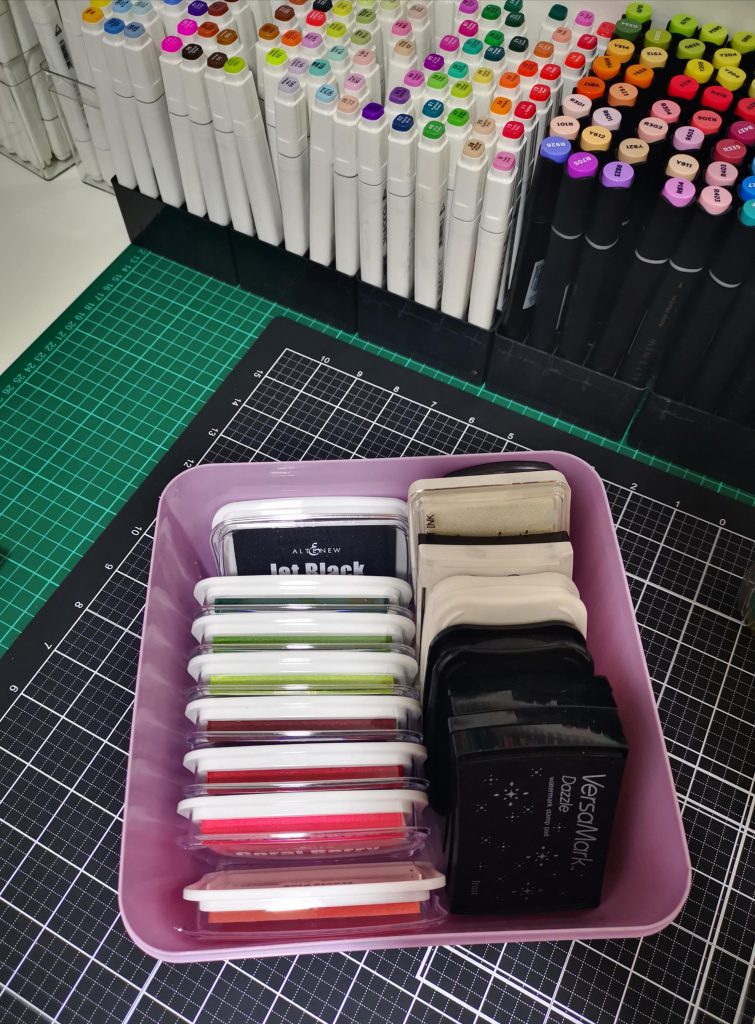
Next having a craft cabinet with smaller sized drawers can get very handy. If you have a bunch of buttons, needles, small decorations lying around, it might be a good idea to organize them. But I have used to set up my mini ink pads. I have a collection of mini distress ink and Altenew crisp die ink. I have loosely arranged my distress ink pads on one shelf. While altenew has a collection of various bundles. I have set them as it is. It helps me to choose color especially while using layering stamps. This plastic container is just for that.
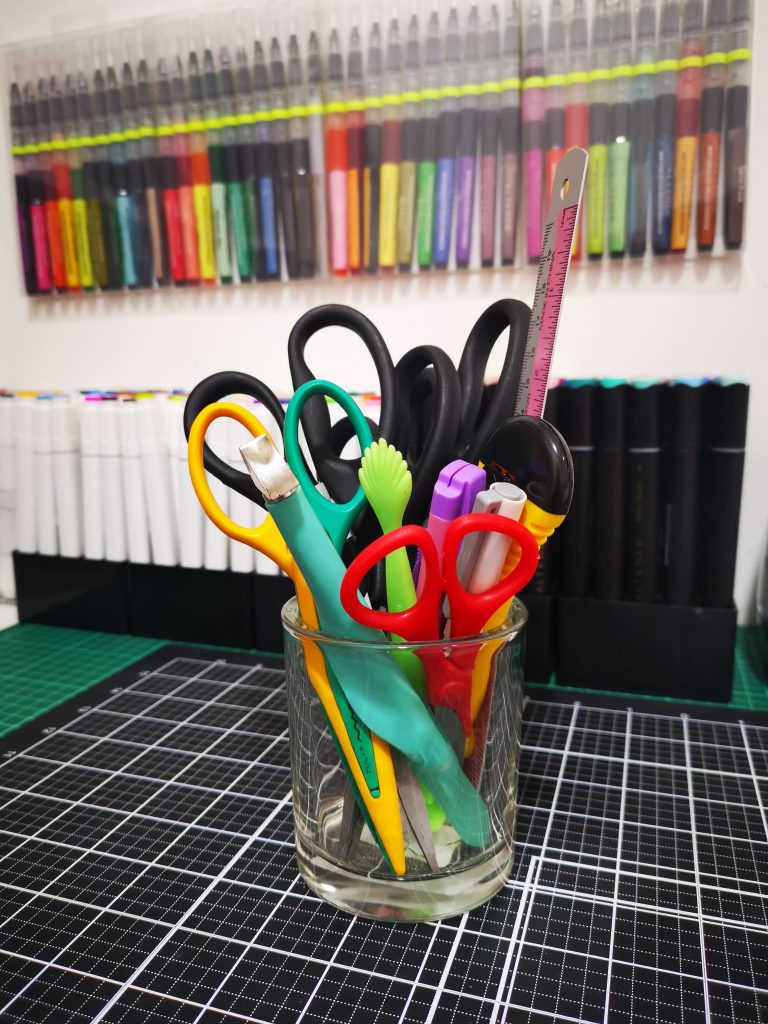
Pencil holders are great for not just pencils. Use them to store brushes, markers, sticks, or anything else that would get lost otherwise. I have used it to hold my scissors and blade. Get creative, introduce a few colorful objects here and there, and make the whole room livelier. Small details like that do matter.
The truth is, you can get your craft room organized with a very small budget. All you need to do is go to the Dollar Store, get whatever seems proper for storage, and arrange something of your own. This little organizer is a perfect example of a cheap way to get things organized. Keep it on your table or on shelves.
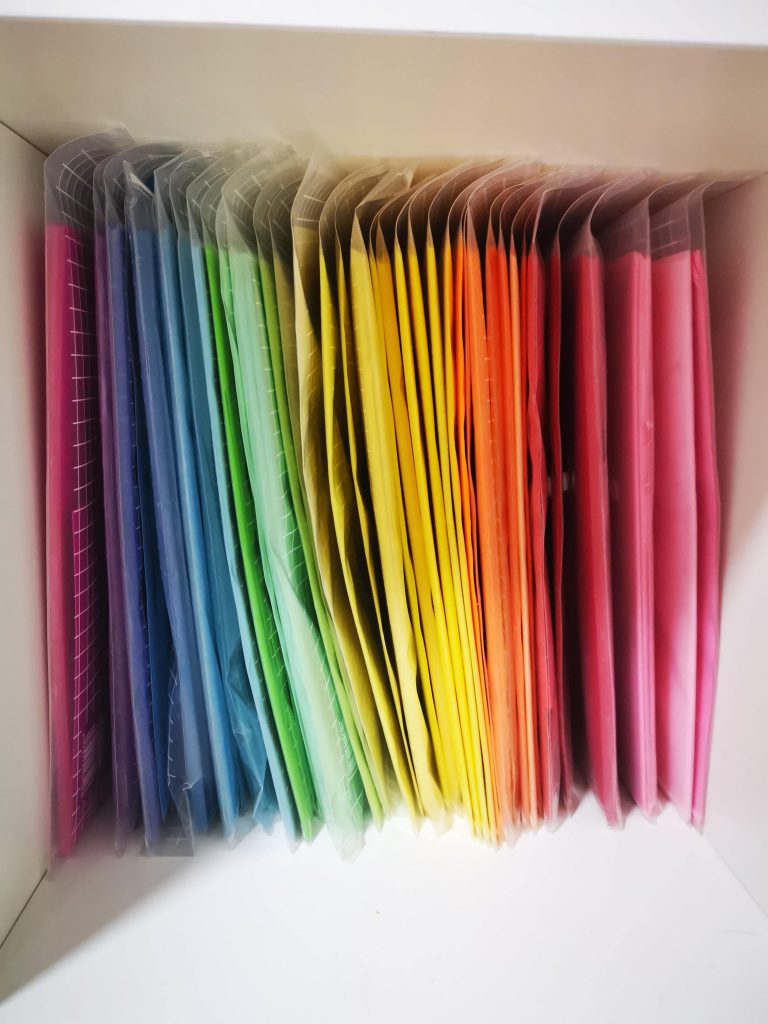
Organizing papers is a hectic task for many. I choose to keep them in clear bag. Sorting them in color helps us to choose the correct one needed for our project. For a crafter there is no piece called waste piece. So I sort the extra cut pieces and place them in the same clear bag . So that they can be used for future use
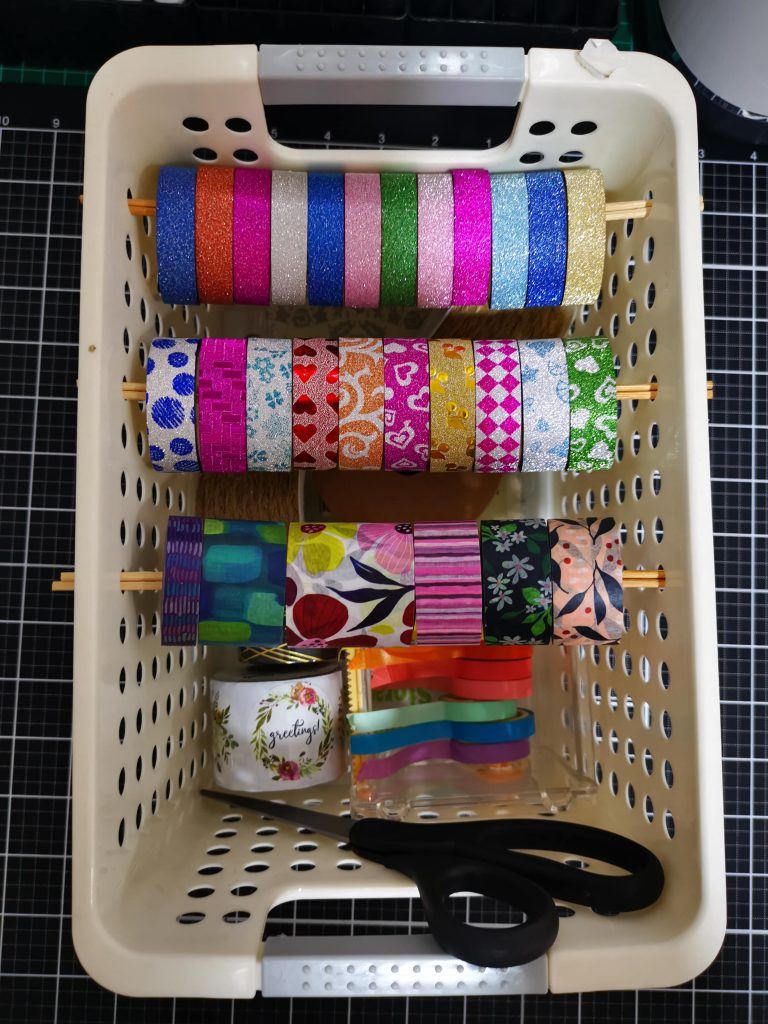

Coming to washi tapes, Organizing them can be done in various ways. I choose to hold them in 2 ways. 1) storing in it’s own containers. Altenew has some awesome containers for its washi tape bundles. try them. 2) Grab a container with holes on the sides from a dollar store. I have inserted them on a stick and placed it in-between the holes. I have also placed a washi tape organizer inside the same basket. along with a pair of scissors.
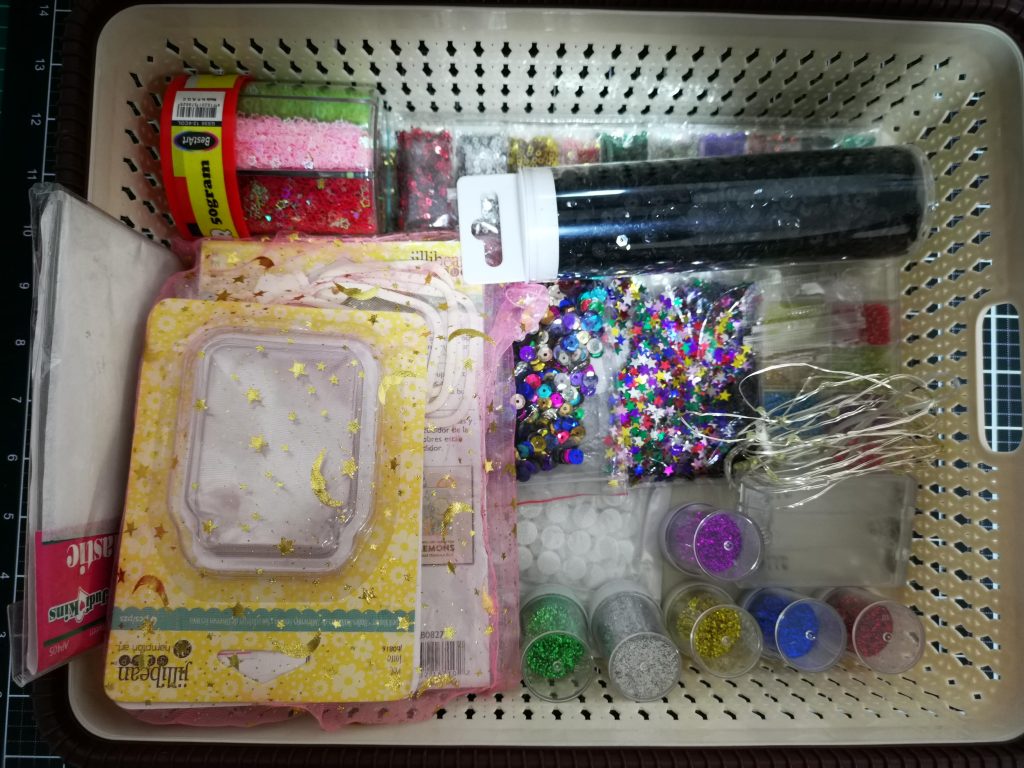
Another way of classifying your items is to grab a basket and sorting them according your criteria. I have kept all my interactive card accessories in one basket. while watercolor items are being kept in other. Thus it make things more easy and helpful for us while making a card.

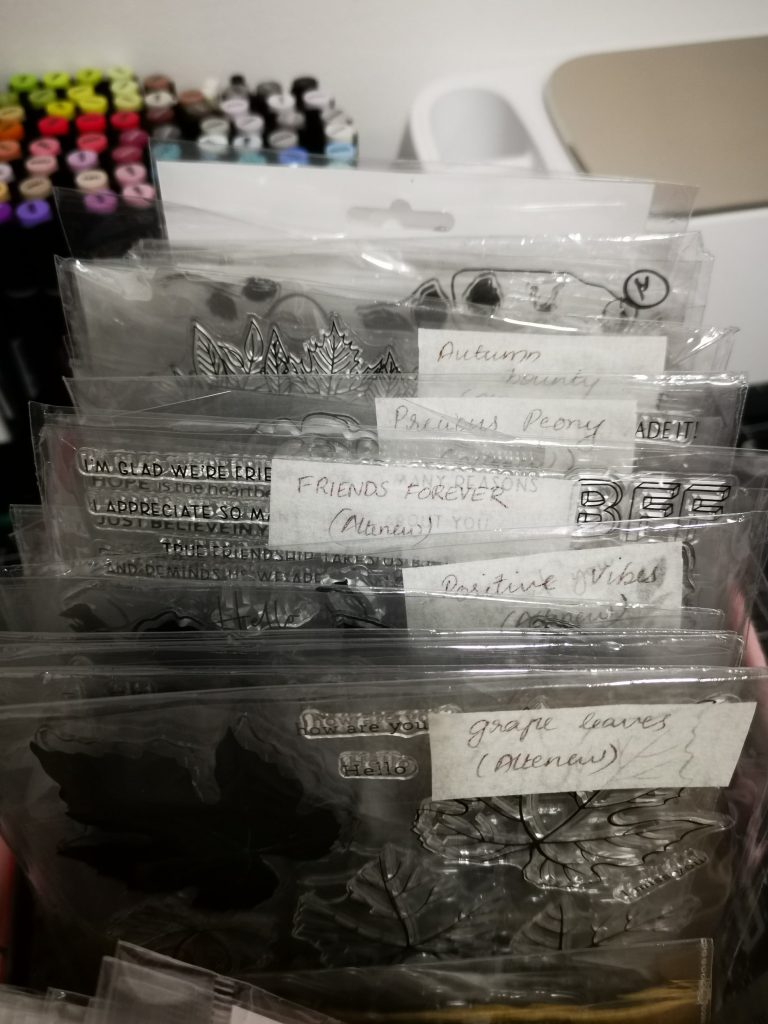
Stamps can also be stored in containers or baskets. I have divided into two and stored the smaller ones in a smaller card box. While bigger stamps where put in clear acetate bags got from the dollar tree. a piece of white tape was stuck on the top of it and the name of the stamp set and its corresponding brand name was written on it. I have also placed the coordinating die set in the same bag.
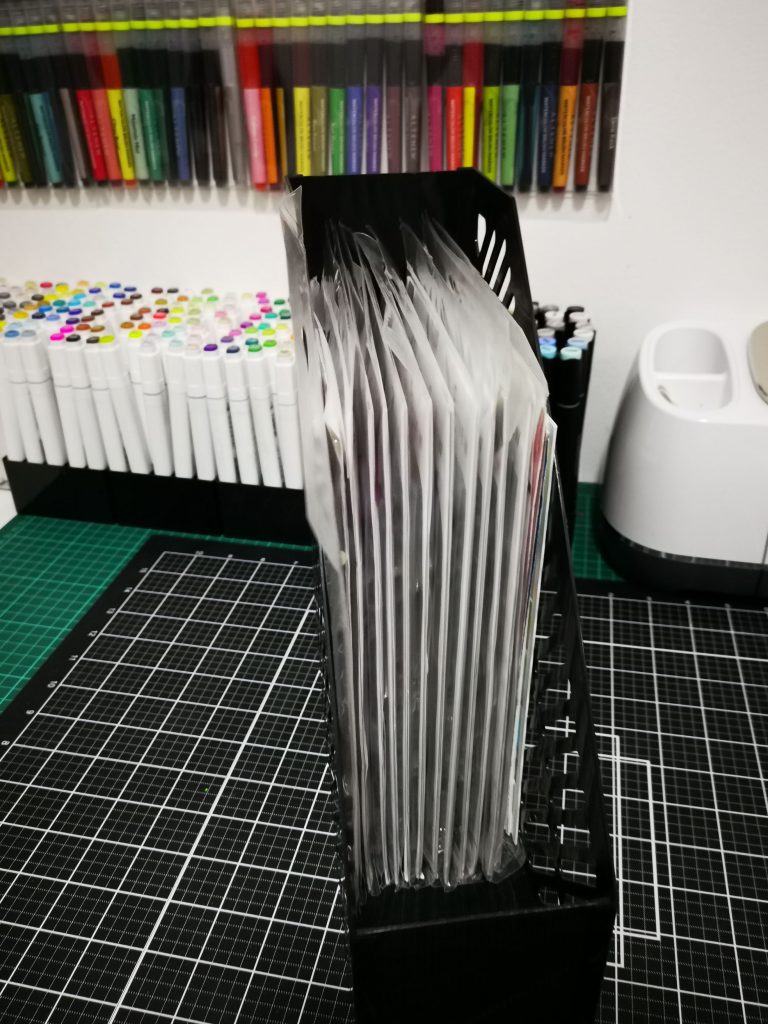
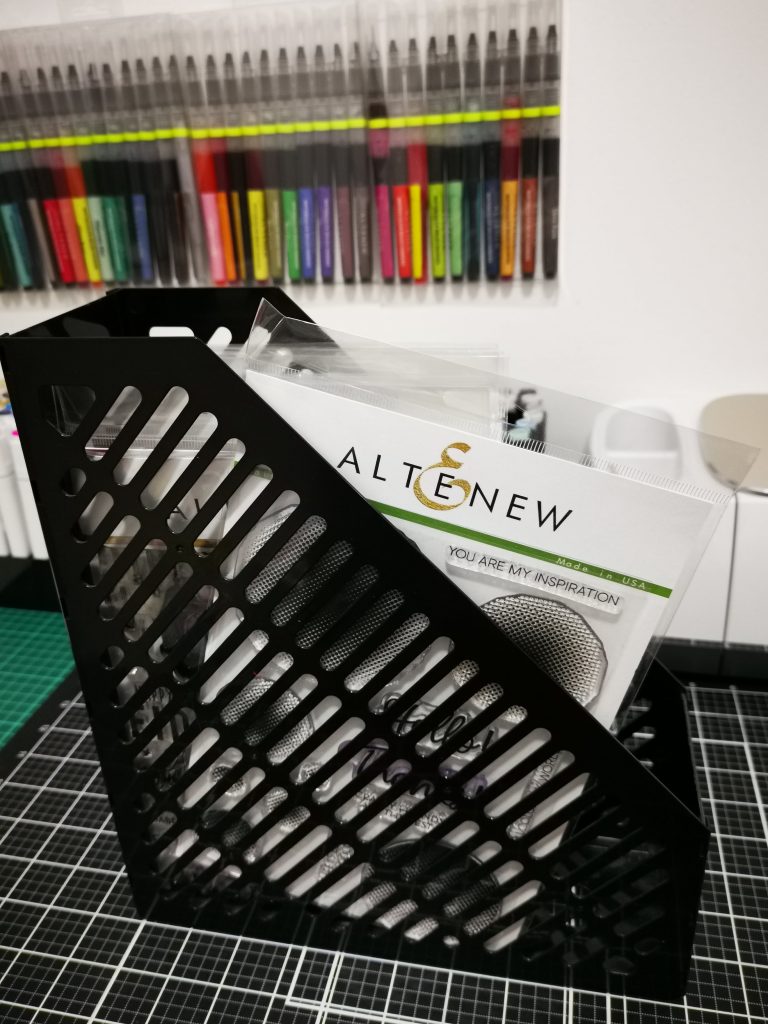
Stamps can also be kept in table holders like this. Here I have kept the stamps as it is. All of the above stamps are from altenew so they have same package sizes. which makes things easier to organize.
I have used similar holders to keep my nesting or stand alone dies . My stencils are also being organized the same way. Another way to organize dies are using magnetic sheets. Unfortunately my shipment got delayed, so cant feature it in the blog.

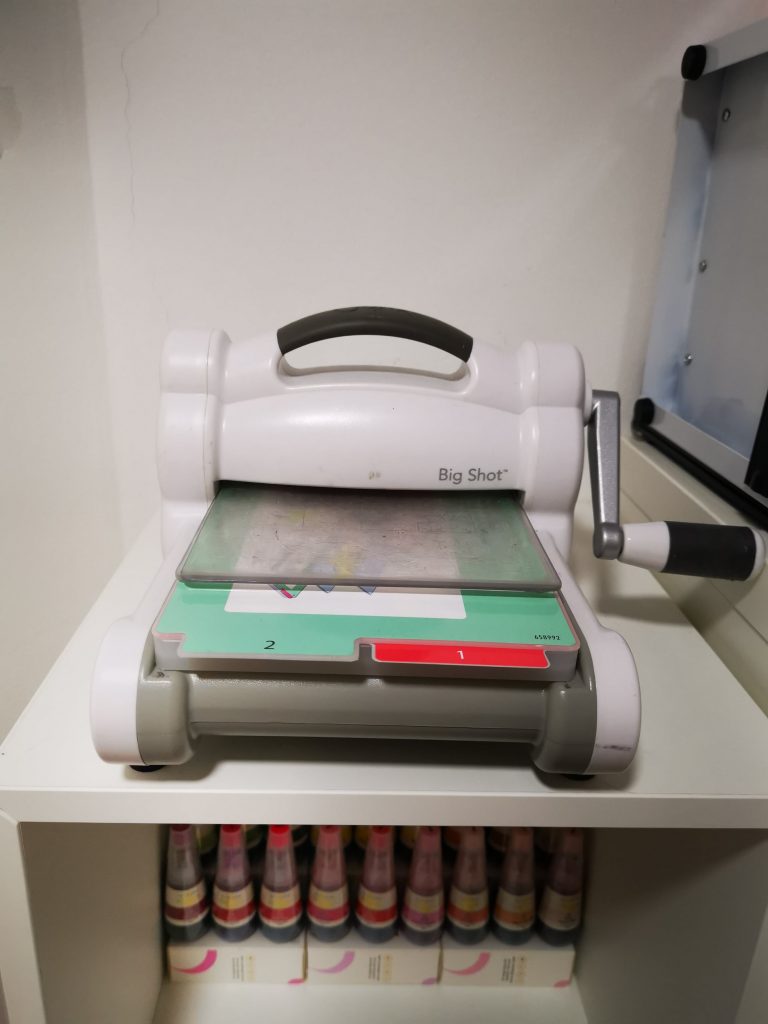
Keeping your machine handy is another tip while organizing your stuffs. I have kept my cricut Maker on the table, while my sizzix Big shot is being placed on the top of my shelf.
I have also put up a floating shelf on the wall, where I usually place my latest or most favorite works. It in fact ,motivates you to do much better. So what are you waiting for, Start crafting, let your creative juices flow, and create a space that encourages you to feel more like yourself.
I would like to use this opportunity to thank Karo Tries ( craftsy hacks) for being such an inspiration. And Yess … I’m participating in the Creativity Inspired: Simply Organized Craft Room Makeover Contest! by Altenew.
Go give it a try. No matter how small your craftroom is. I know that definitely going to be your HAPPY PLACE.

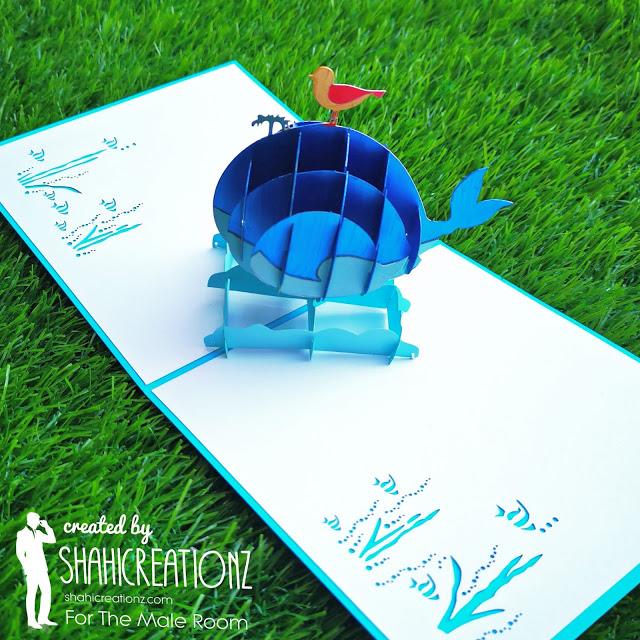
The whale and the bird Pop up card
Hi friends, I’m back with an another pop up card. But this time it’s based on a poem. The whale and the bird. The theme at the male room craft challenge this month is Animals. So I thought this one is perfect for it.
Once there was a bird who fell in love with a whale. And a whale who fell in love with a bird.
The bird loved the whale’s beautiful smile. He loved the way she swam through the water so gracefully.
The whale loved the bird’s handsome white feathers. She loved to watch him soar through the sky.
And they both loved to eat lots of tiny fish.
All summer, the bird and the whale met in the bay. They talked and talked.
They talked about the moon, and the tides, and the ships in the ocean.
The bird told jokes and made the whale laugh. The whale sang beautiful songs that made the bird cry (even though he didn’t know why).
“One day, you could meet my family in the ocean,” said the whale.
“And you could meet my friends on the land,” said the bird.
Everything was perfect.
But the world does not stop turning just because a bird and whale fall in love. Summer turned into autumn, and autumn turned into winter. The ocean turned cold, and all the other whales left for warmer waters.
“Come with me to warmer waters,” said the whale. “It’s a wonderful place. It’s always warm, and there are so many fish to eat.”
“I love to eat fish,” said the bird. “And I love you. I will follow you anywhere. But first, teach me to be a whale?”
“Like this!” said the whale, “follow me!”, and she dived deep into the water.
“OK!” said the bird, and he also dived deep into the water.
Deeper and deeper he went. “I’m swimming!” he laughed. “I’m a whale!” But soon he couldn’t breathe. He returned to the surface, gasping.
He tried and tried and tried again, but he ran out of breath every time.
“I don’t think a bird can become a whale,” said the bird. “Come with me instead. I live up on the cliffs. It is a wonderful place. It’s warm and cosy, and every morning you can watch the sun rise.”
“I love to watch the sun rise,” said the whale. “And I love you. I will follow you anywhere. But first, teach me to be a bird?”
“Like this!” said the bird. “Follow me!”, and he flapped his wings and soared into the sky.
“OK!” said the whale. She squeezed her eyes shut and flapped her fins, just like the bird. She flapped and flapped, up and down. Water splashed everywhere. “I’m flying!” she laughed. “I’m a bird!”
But when she opened her eyes, she wasn’t soaring in the sky. She was still in the water.
She tried and tried and tried again, but she could not fly.
“I don’t think a whale can become a bird,” said the whale.
“But if you can’t fly, and I can’t swim, where can we live together?” said the bird.
“We will stay here — in the waves!” said the whale.
But the bird shook his head sadly.
“You love to swim deep in the ocean,” he said. That is your favourite thing to do. You would never be happy here.”
The whale sighed.
“And you love to fly and soar into the sky,” she said. “That is your favourite thing to do. You would never be happy here either.”
And so, because the bird and whale loved each other so much, they said goodbye.
Have a look at the challenge blog here for all the challenge details and to see the cards from the rest of the Design Team. https://themaleroomchallengeblog.blogspot.com/2021/01/challenge-146-animals-dt-call.html?m=1

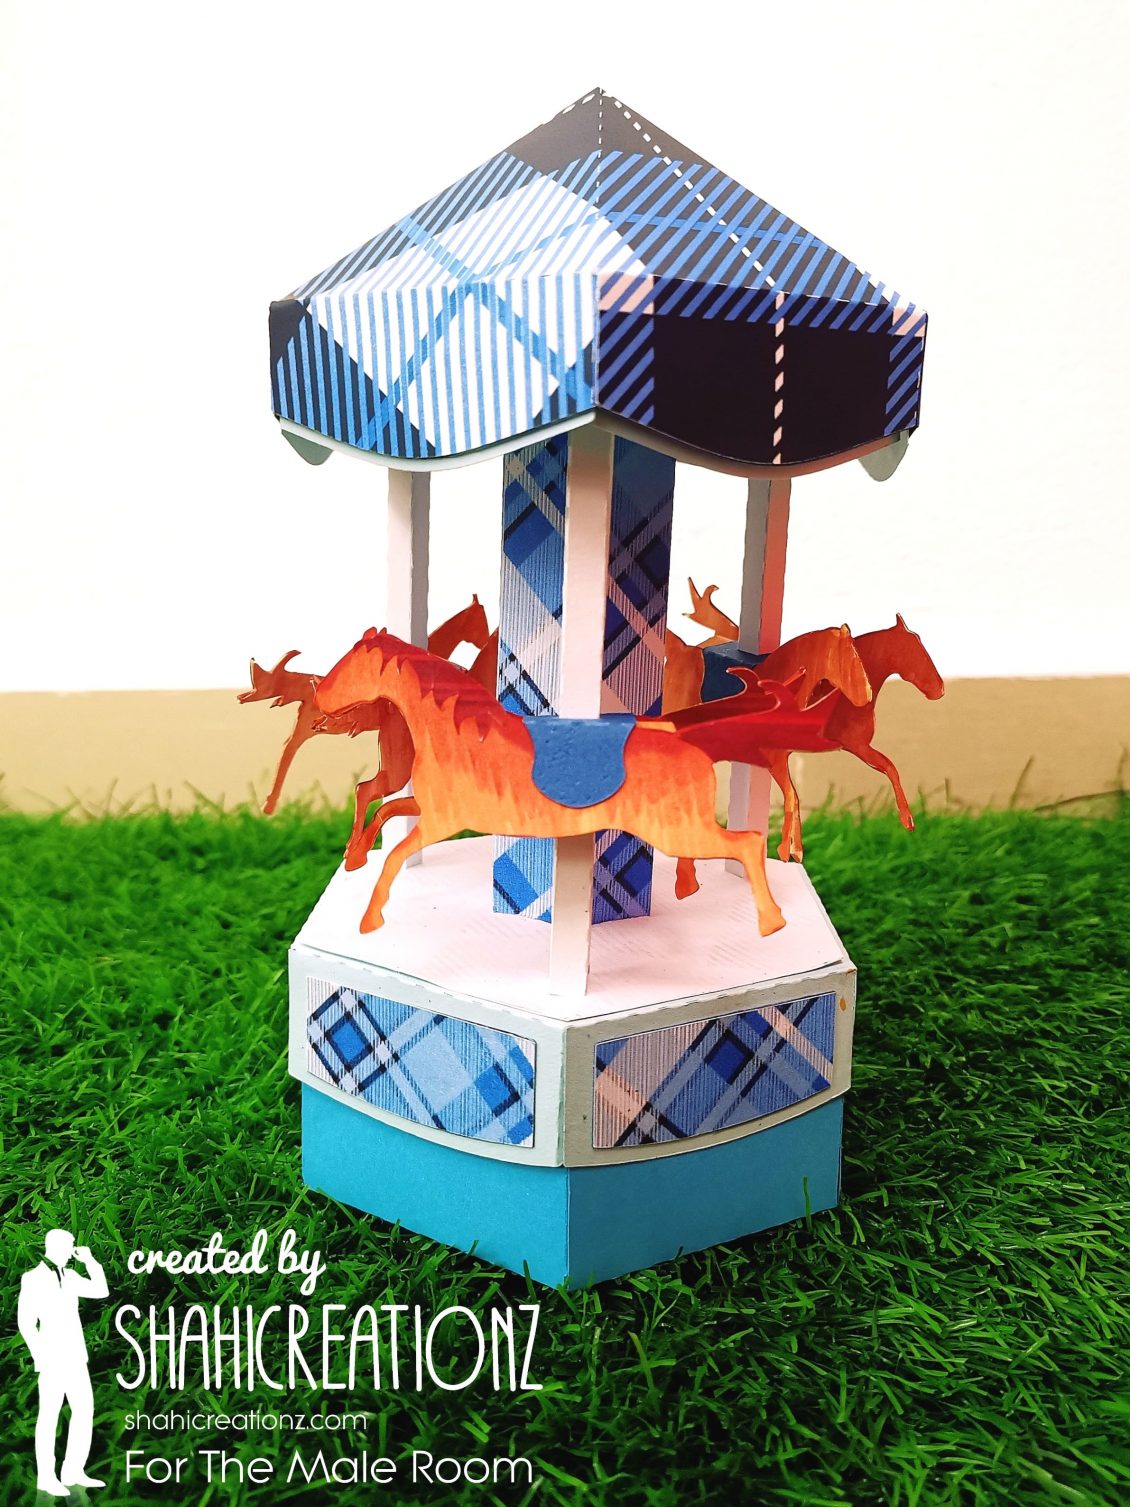
Carousel Box
When you think of masculine Christmas projects tartan or plaid always jump into my head. So that’s what this month’s challenge is all about at the male room craft challenge – tartan or plaid . I thought about doing something special, and here is what I came up with.
To start off, I cut the svg file from creative cuts in my Cricut Maker. This file was easy to cut as I did not alter the size anymore. I just had to ungroup the images to be able to cut the shapes in the color of cardstock that I wanted. This SVG was a pop carousel box. But as I wanted to create my project with the touch of tartan or plaid, I printed down them as pattern papers and glued them over .
What better way to celebrate a special occasion than with this fun Carousel (or Merry Go Round) gift box. The base of the Carousel is a pretty box that you can fill with goodies and treats. You can even make the box by itself for a versatile gift package. The finished Carousel is approximately 8 3/4″ tall by 4 1/2″ wide.
Have a look at the challenge blog here for all the challenge details and to see the cards from the rest of the Design Team. https://themaleroomchallengeblog.blogspot.com/2020/12/challenge-145-tartan-plaid.html

Truck Pop up card
The Male room craft challenge has always been a happy place for me. I used to eagerly wait for its new challenges and announcements.
As you all know, I was one among the honourable Mentions on their Challenge #137 – Landscapes
Then I was selected as the winner of the Challenge #140 – Sport
Each time I was really happy and excited to receive these mentions.
But I had no idea what was about to happen next. I got an invite from Jane, to be a design team member of my favorite challenge blog – The Male Room.I’m honored to accept this position in the team and will work hard to make the team proud!
The theme of the new challenge today on The Male Room Challenge Blog and theme for this month : Challenge#144 Toys.

So here is my first DT card for The Male Room Challenge Blog. Subhanallah!! I’m on cloud nine! All excited and thrilled.
Have a look at the challenge blog here for all the challenge details and to see the cards from the rest of the Design Team. https://themaleroomchallengeblog.blogspot.com/2020/11/challenge-144-toys.html
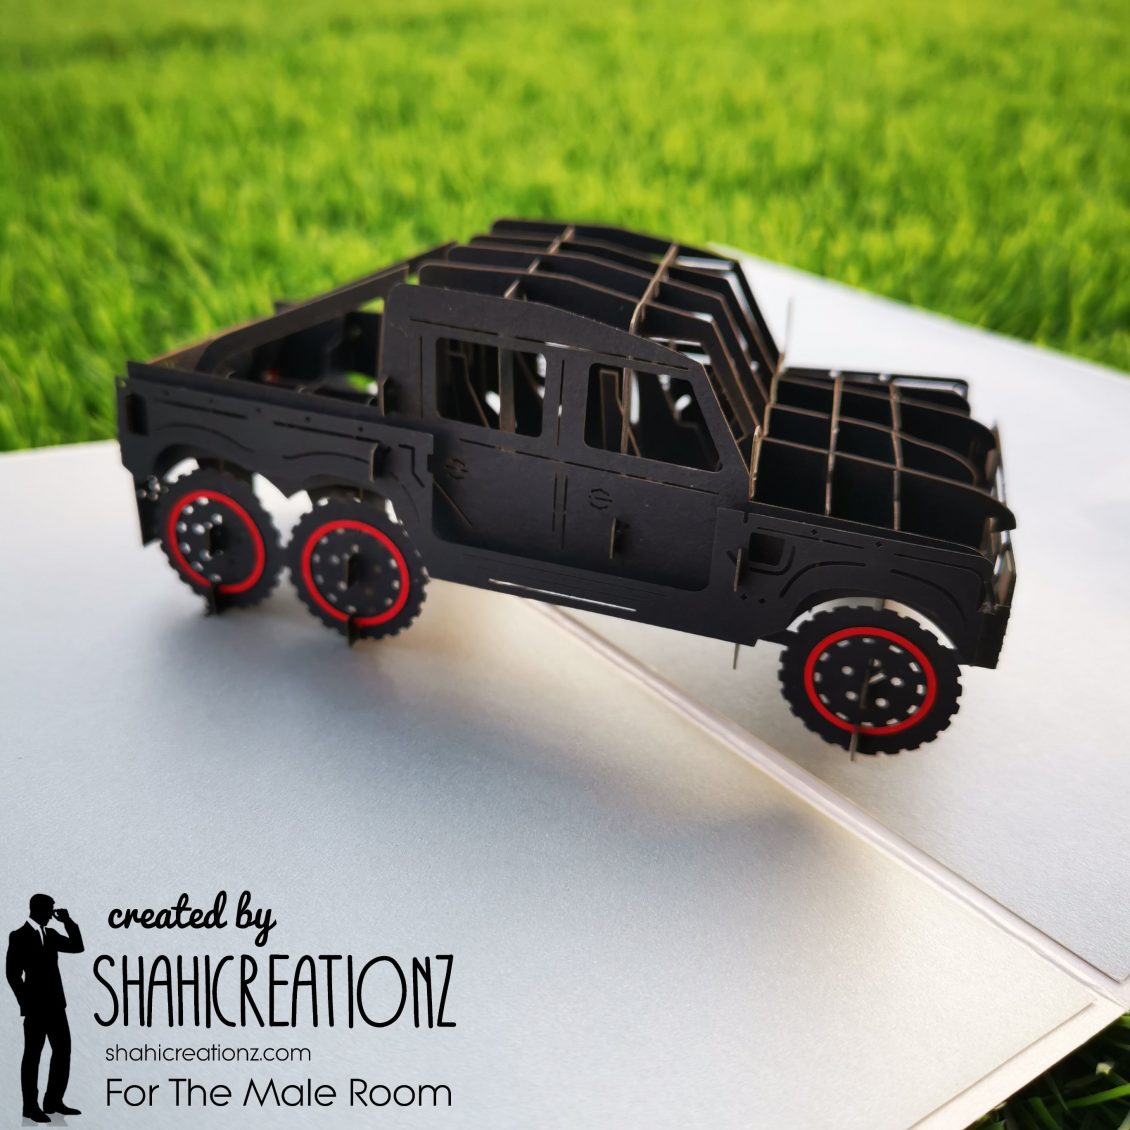
The toy I choose to work with this project is “truck”. Truck, jeep, aeroplane etc are one among the favorite toys, a baby boy would love playing with.
I have cut down the parts of the truck using my Cricut Maker. I have chose black cardstock paper for the truck. While the base of the card was done with white and shimmer golden cardstock. To give an added look to the card, I choose red cardstock paper for rings of the tyre.
Hope you all like it. Do share your valuable thoughts with me.

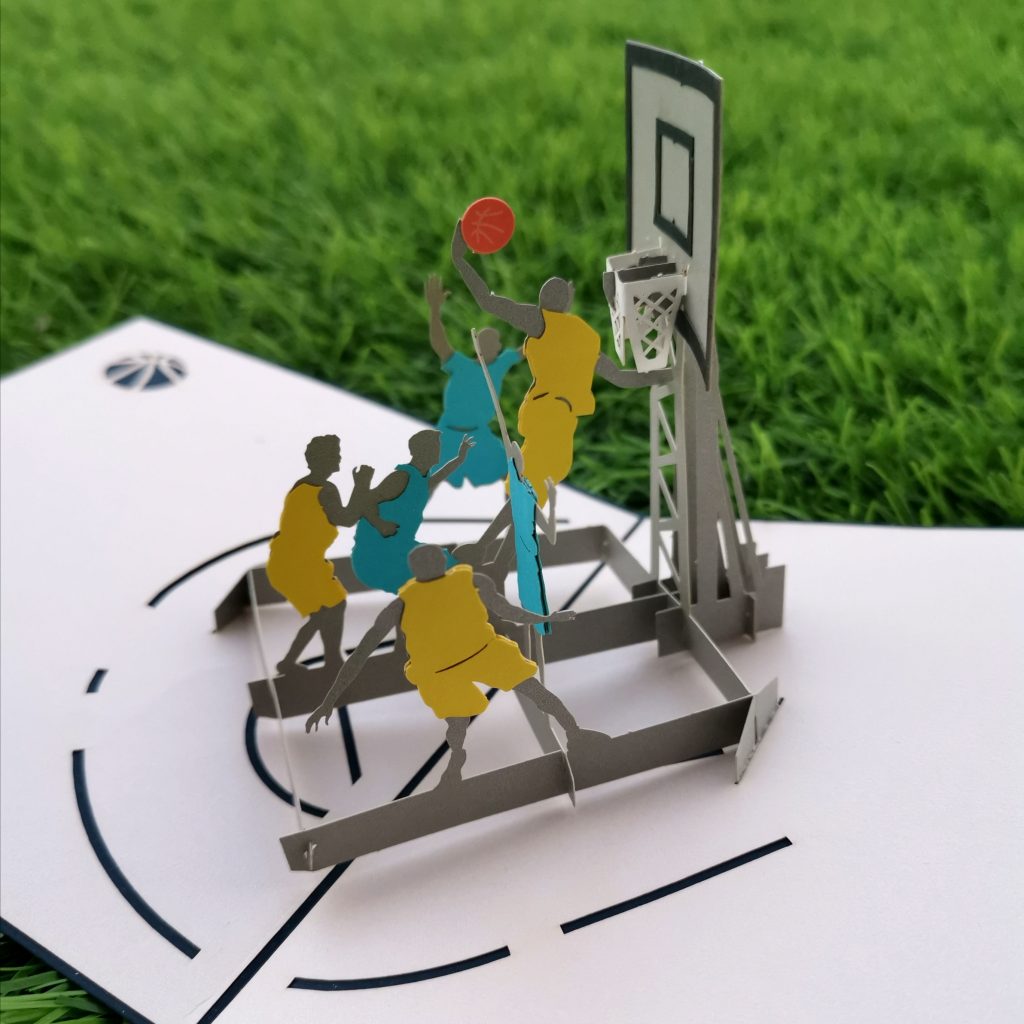
I am also entering my pop up card to AAA birthday card challenge #Game 19 – For A Child
Go check out their page and do enter the challenge. https://aaabirthday.blogspot.com/2020/11/game-19-for-child.html?m=1
 CASE your fellow AECP Crafter
  Clean & Simple Boutique Cards
  Easy Die Cutting Techniques
  Graduation card
  Let it shine
Recent Comments