Category: General
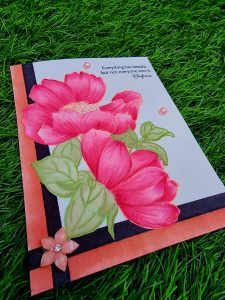
Violet Glow with Altenew’s Sulfur Cosmos
Hello, crafters! Welcome to today’s tutorial where we’ll be creating a stunning floral card using some fabulous Altenew products. Let’s dive right in!
To start, we need our card base. I’m using White Classic Crest cardstock, known for its smooth finish and great ink blending properties. We’ll be working with three cardstocks measuring 4 1/4 by 5 1/2 inches and two cardstocks measuring 4 by 5 1/4 inches. Take one of the 4 by 5 1/4 inch cardstocks and place it on Altenew’s Stamping Wheel. This tool is a game-changer for precise stamping. It features a rotating platform that helps you align your stamps perfectly, ensuring consistent and accurate impressions every time. It’s especially useful for layered stamping and intricate designs. For our inks today, we’re using Enchanted Garden Crisp Dye Ink for the violet tones, Pocketful of Sunshine Crisp Dye Ink for the yellow shades, and Obsidian Black Pigment Ink for the outline. We’ll be using the Sulfur Cosmos stamp set from Altenew’s Build-A-Garden subscription set for our floral outline. Ink up your stamp with Obsidian Black Pigment Ink and stamp the flower, focusing on the left side of the cardstock. The Obsidian Black Pigment Ink provides a rich, crisp outline, perfect for detailed stamping.
Next, let’s bring our flower to life with some color using the layering stencils from the Sulfur Cosmos set. For the petals, start with Wisteria for the first layer. Use a light hand to apply the ink, creating a soft base color. Then, add depth with Hydrangea for the second layer. This two-step process adds dimension and a realistic look to the petals. For the stem, we’re going to create a gradient effect using Honey Drizzle for depth near the base and Fresh Lemon to blend out. This combination from the Pocketful of Sunshine Crisp Dye Ink collection gives the stem a natural and vibrant look. Remember, blending the colors smoothly where they meet is key to achieving a seamless gradient. Once your coloring is complete, trim the right side of the cardstock around the flower. This adds a dynamic touch to your design. Now, take the second 4 by 5 1/4 inch cardstock. We’ll be working on the right side of this piece. Use the background stencil from the Sulfur Cosmos set and apply the same yellow and violet inks to create a cohesive background. Once your stenciling is done, run this piece through the Diamond Stars 3D Embossing Folder. The embossing adds texture and dimension, making your card visually appealing.
Next, layer the trimmed flower cardstock over the stenciled and embossed piece. Use double-sided tape to secure it firmly, ensuring a neat and polished look. For the sentiment, we’re using the “You are lovely” stamp and die set. Stamp the sentiment with Obsidian Black Pigment Ink and then use the coordinating die to cut it out. This gives you a clean, professional finish. Now, let’s decide on the card base. We have two options: a black cardstock base or a white one. I ended up preferring the black base, as it makes the colors pop beautifully. But I’d love to hear your thoughts! Which do you prefer, black or white cardstock? Let me know in the comments below. To finish off the card, add some enamel dots from Altenew. These little accents add a touch of elegance and a bit of sparkle, completing the look perfectly. And there you have it! A lovely, vibrant card made with Altenew products.
Tips and Techniques
- Stamping Wheel: Secure your cardstock on the Stamping Wheel to prevent any shifting. This will help you achieve clean and precise stamps every time.
- Layering Stencils: Start with a light application of ink and gradually build up the color for a soft, blended look. This helps to avoid harsh lines and creates a more natural appearance.
- Blending Inks: Use a circular motion with your blending tool to apply inks smoothly. Blending the colors where they meet creates a seamless gradient effect.
- Embossing: Running your cardstock through an embossing folder adds texture and interest to your card. It’s a great way to elevate a simple background.
Thank you for watching this tutorial. I hope you enjoyed creating this card with me. Remember, crafting is all about having fun and experimenting with different techniques. Don’t forget to share your preference for the card base in the comments. Until next time, happy crafting!
AECP Final Workshop (Part 1)
| Date of the workshop | 3rd December 2022, Saturday |
| Time | Uae time: 7:30pm Karachi: 8:30pm Canada: 10:30am |
| Venue | My home (Dubai) |
| No of participants | 4 |
| No of cards prepared for the workshop | 2 |
| Lessons taught | To make an Interactive card Using Mega Dies Stamping Techniques Coloring using Stencils Embossing Folder Techniques Dimensions using Enamel Dots |
| Zoom Meeting ID | Join Zoom Meeting https://us02web.zoom.us/j/4342656458?pwd=NmpTUzBFOVdmcXg0MFhkb2UwS2NGQT09 Meeting ID: 434 265 6458 Passcode: 1234 |
Each participant will be given a basket, which contain the following items:
- Stamping Mat
- Pre-cut out for each card
- A set from Summer Days Washi Tape set
- Color Enamel dots
- Altenew mini ink cubes
- Stencil and Stamp set from a Build a garden set
- Embossing folder
- Color Papers
- Classic Crest Solar White Cardstock
- Obsidian Pigment Ink
- Adhesive roller Tape
- Scissors
- Pencil & Eraser
- Self-healing Mat and rotary blade
- Measuring ruler
Other Essentials:
- Classic Crest Solar White Cardstock
- Stamp Cleaner
- Misti Stamping tool
- Die Cutting Machine
- Paper trimmer
- Primary color Artistic Markers
- Purple Tape
CARD 1: Triple floating diamond card
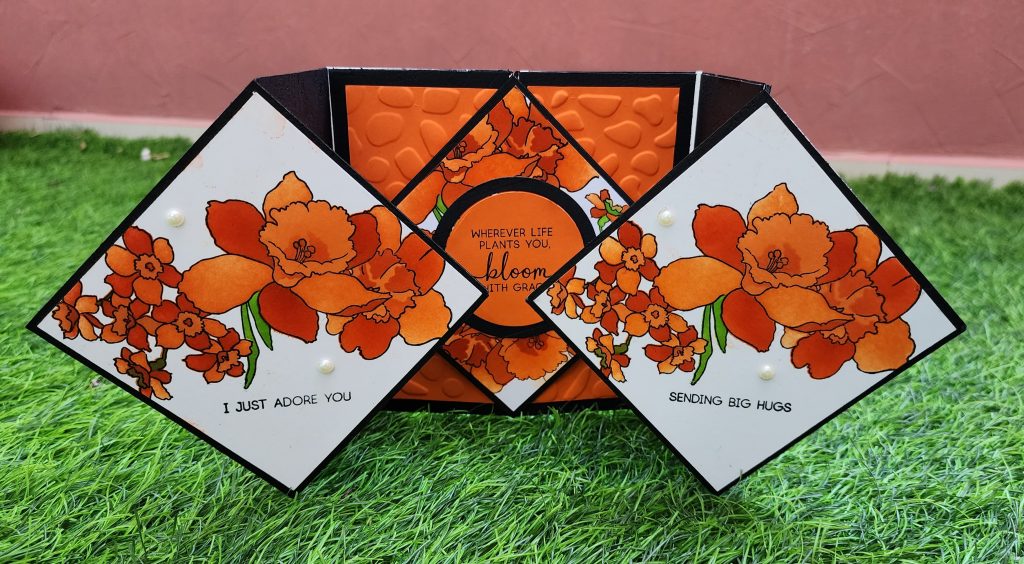
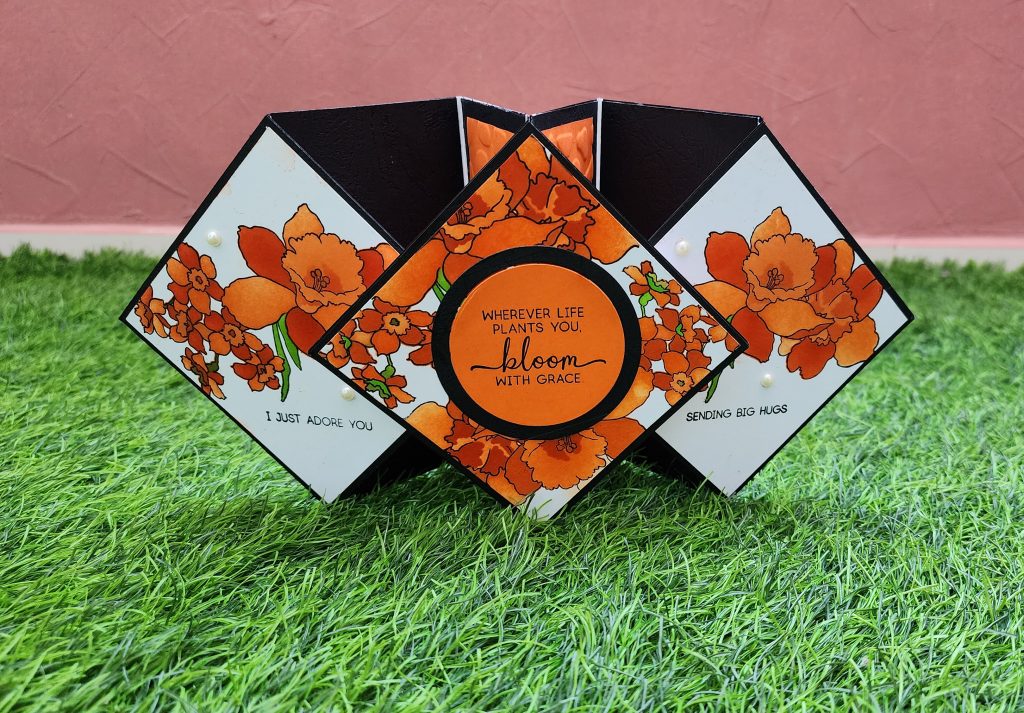
Card Making Method:
- Take a 12 x 12 cardstock and divide it into half. Then you will get two base cardstocks with dimensions 6 x 12
- Score both of your cards at 3 inches, 6 inches and 9 inches.
- Once you have done your scoring, you have to take each piece and make a mark along the short edge, halfway at three inches on both ends of both pieces. `
- Using a craft knife cut off from that crease line on the left to that bottom mark and from bottom mark to the crease line on the right.
- Repeat the same process on both the ends on the two cardstocks.
- You will end up having two pieces.
- Fold and burnish your score lines
- Make three black base square cards that are 4 ¼ x 4 ¼
- Now to line up those cards, putting both the pieces flat on the deck and then you fold in the nearest triangular piece inwards and line those up to make it like a square.
- Glue down a square cardstocks over the folds.
- If the points of the square are overlapping the folds, then trim down the edges of the card if required. ( 4 1/8)
- Glue up the remaining squares on the triangles on both the sides. Adjust it and Make it fit to dimensions.
- Next, You will need six black panels and four Color themed Panels
- Make your own panels by running your color cardstock paper through your embossing folder.
- Stick them over the main base card.
- You may stick two, color themed pattern paper on both sides of the middle square.
- You will also need three color paper squares of dimensions 4 x4 and three pattern squares or toppers of dimensions 3 ½ x 3 ½
- Make your own pattern paper using your favorite Altenew stamps and colors.
- Cut out two circles using halftone dies. (Bigger circle in black and smaller one in the color theme.)
- Add a greeting sentiment on the smaller circle die cut and paste in on the middle of the square card. Add sentiments on the other square panels too.
- You may add pearls and gems to make your card more beautiful.
- When folded flat, it will fit in an envelope for 6 x 6 card.
Pre-cuts for the card:
- Two base cardstocks with dimensions 6 x 12 scored at 3 inches, 6 inches and 9 inches
- Three black base square cards that are 4 ¼ x 4 ¼
- Four Color papers trimmed 6 x
- Six black panels
- Black Circle
- Color Circle
CARD 2: Washi tape Card

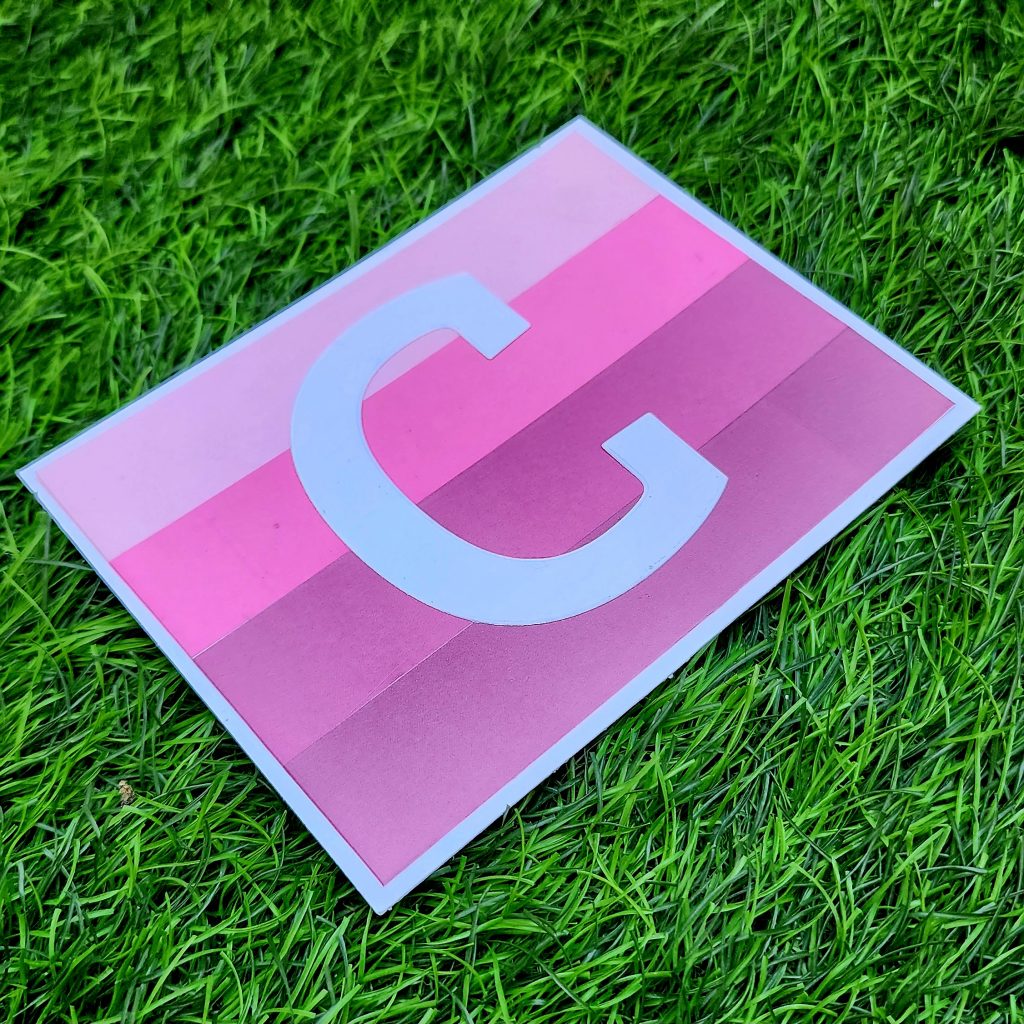
Card Making Method:
- Create a 4 ¼” x 5 ½” base folding card from Classic Crest Solar White Cardstock.
- Create a 4 ” x 5 ¼” card from Classic Crest Solar White Cardstock and stick the four washi tapes (Summer Days Washi Tape) according to the ombre effect
- Take a piece of Classic Crest Solar White Cardstock, place the mega alphabet Die (starting letter of your name) over it and run it through the die cutting machine.
- Stick it to the center of the card
- Once done, you may adhere it to the base card
Pre-cuts for the card:
- 4 ¼” x 5 ½” base folding card
- 4 ” x 5 ¼” Classic Crest Solar White Cardstock
- A5 size Classic Crest Solar White Cardstock
Let’s head on to part 2 for more updates on my upcoming workshop.
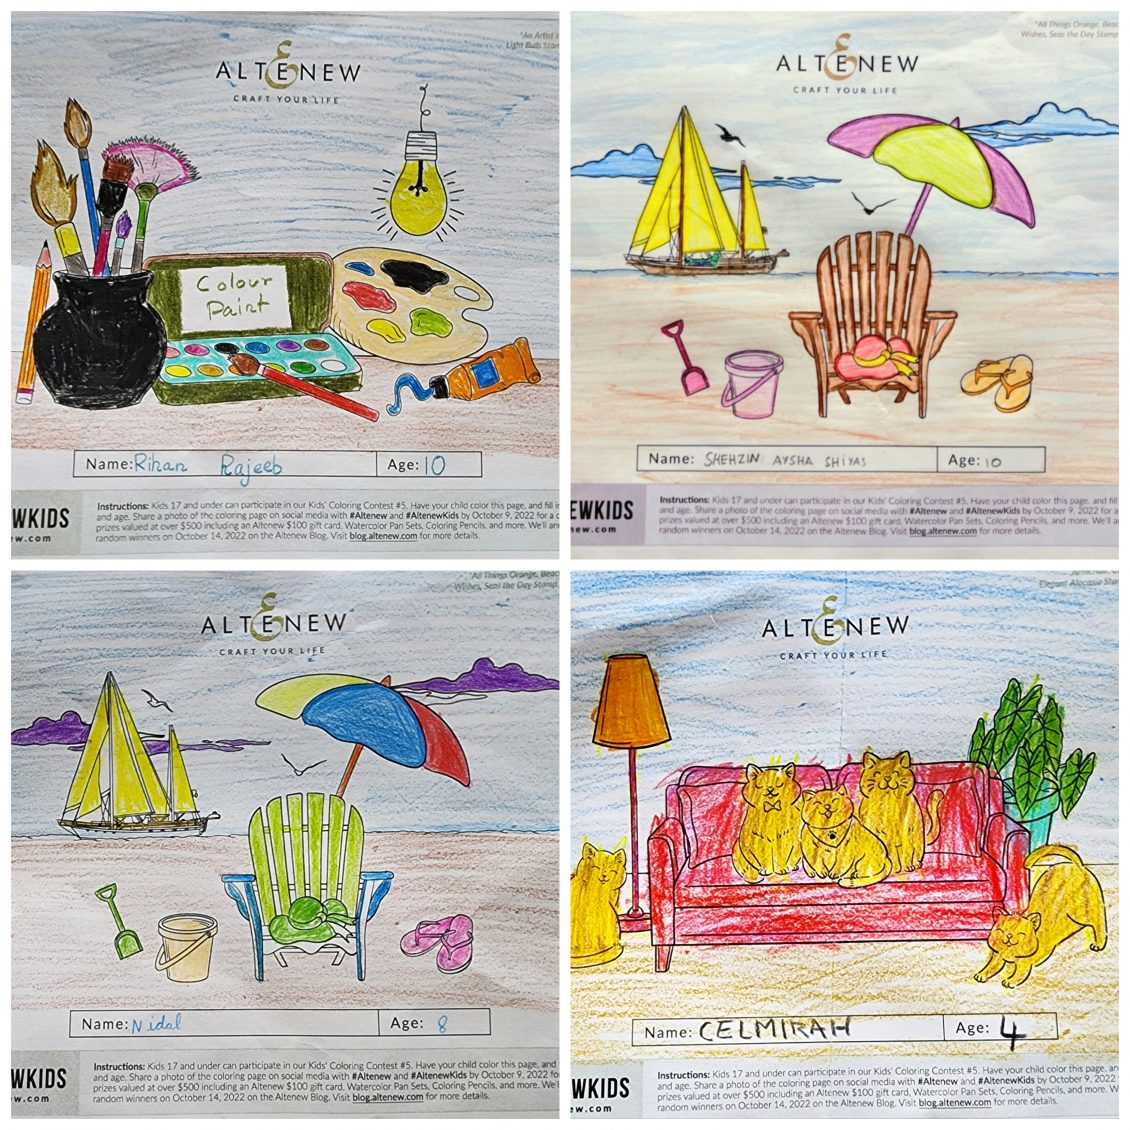
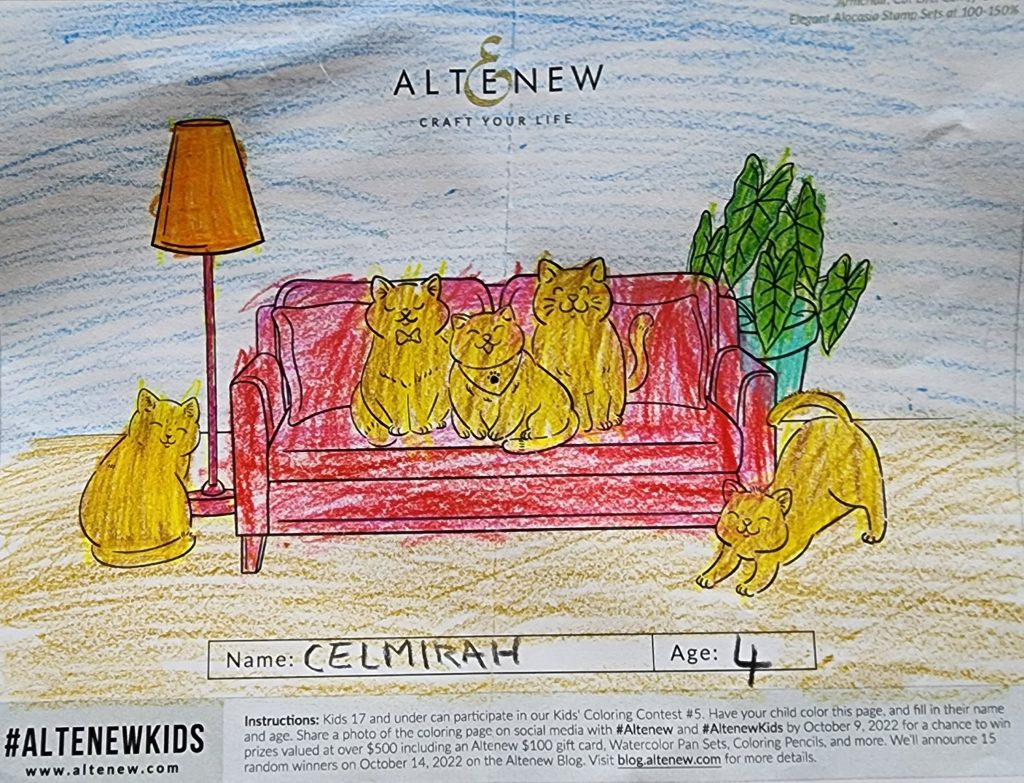
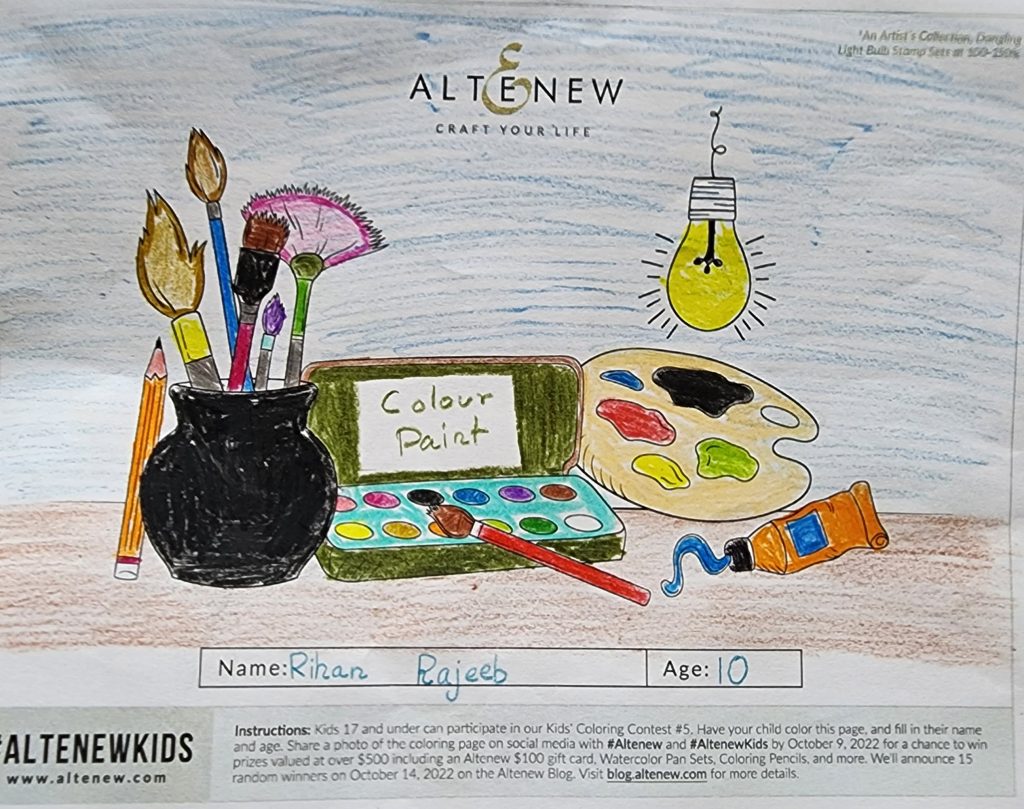
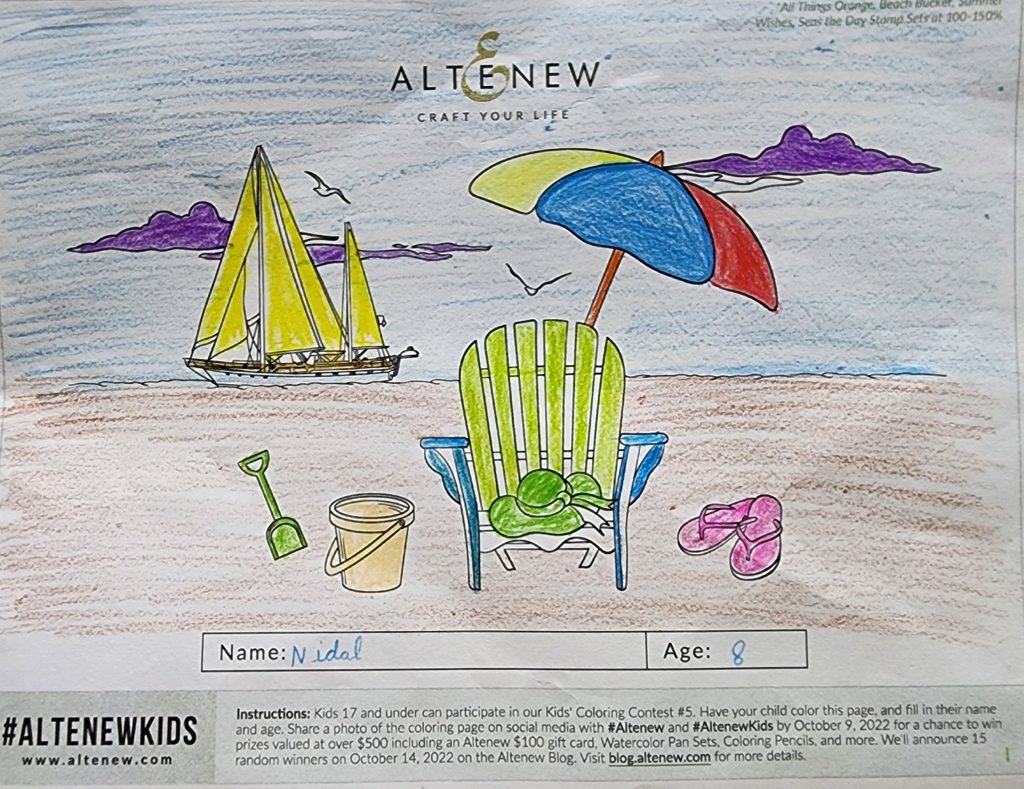
Altenew Kids’ Coloring Contest #5

AECP: Cards in Motion
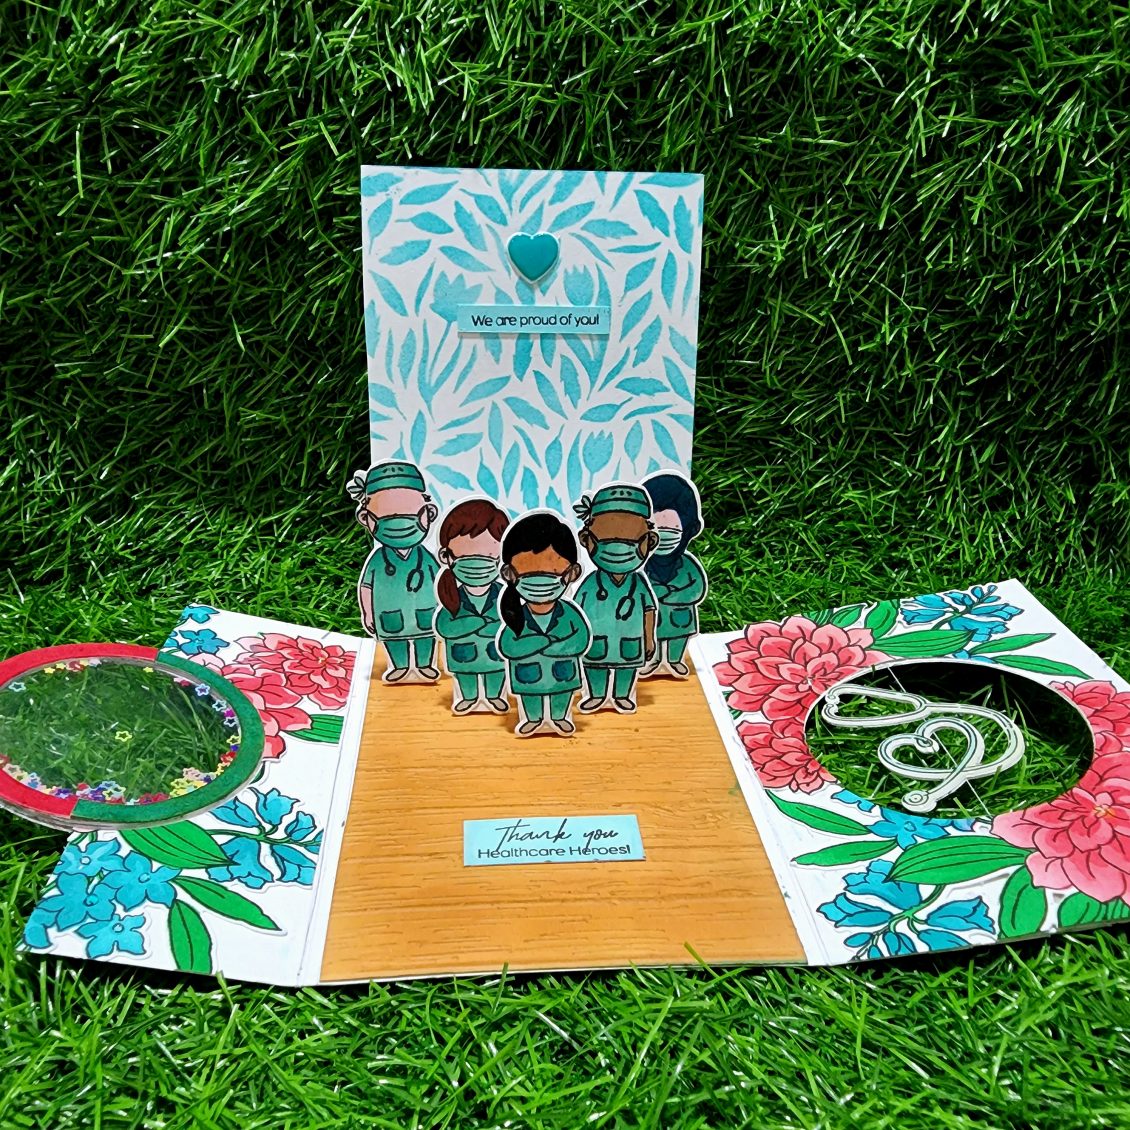
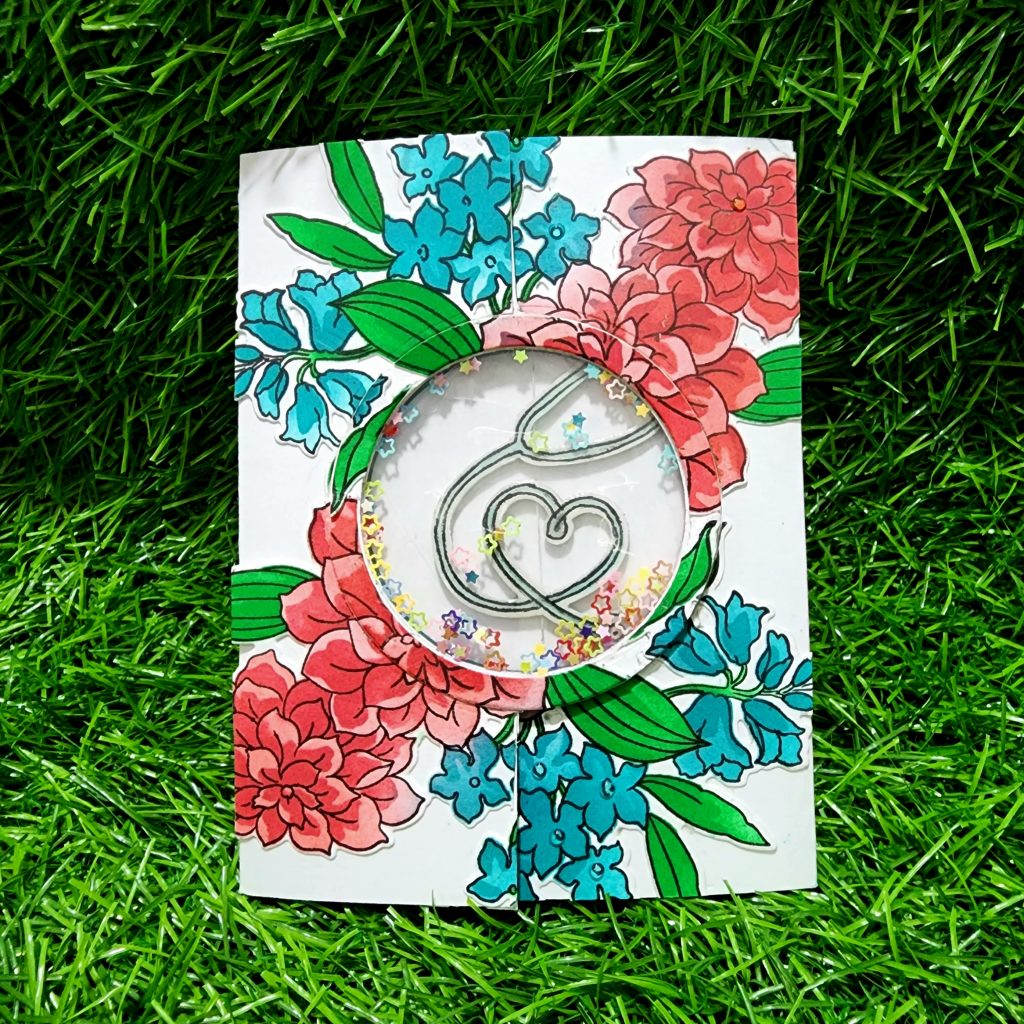
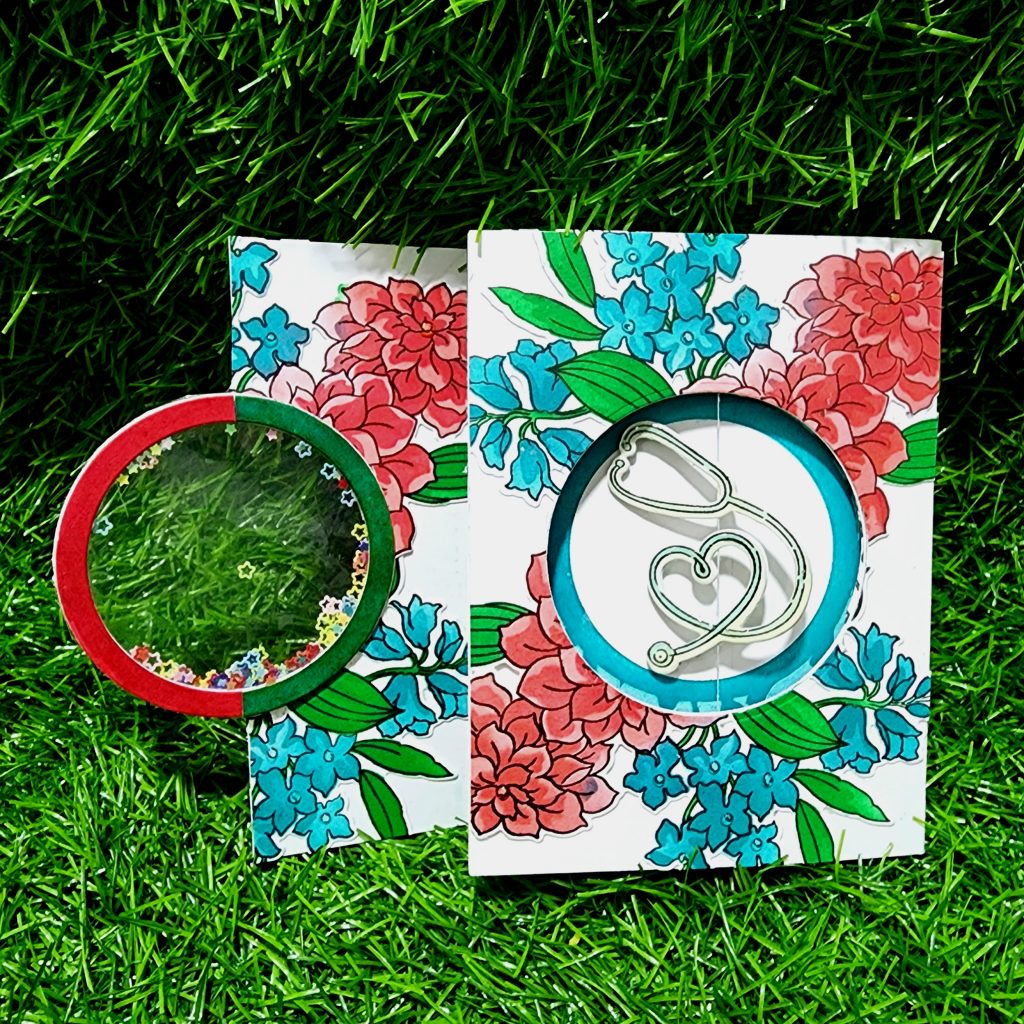
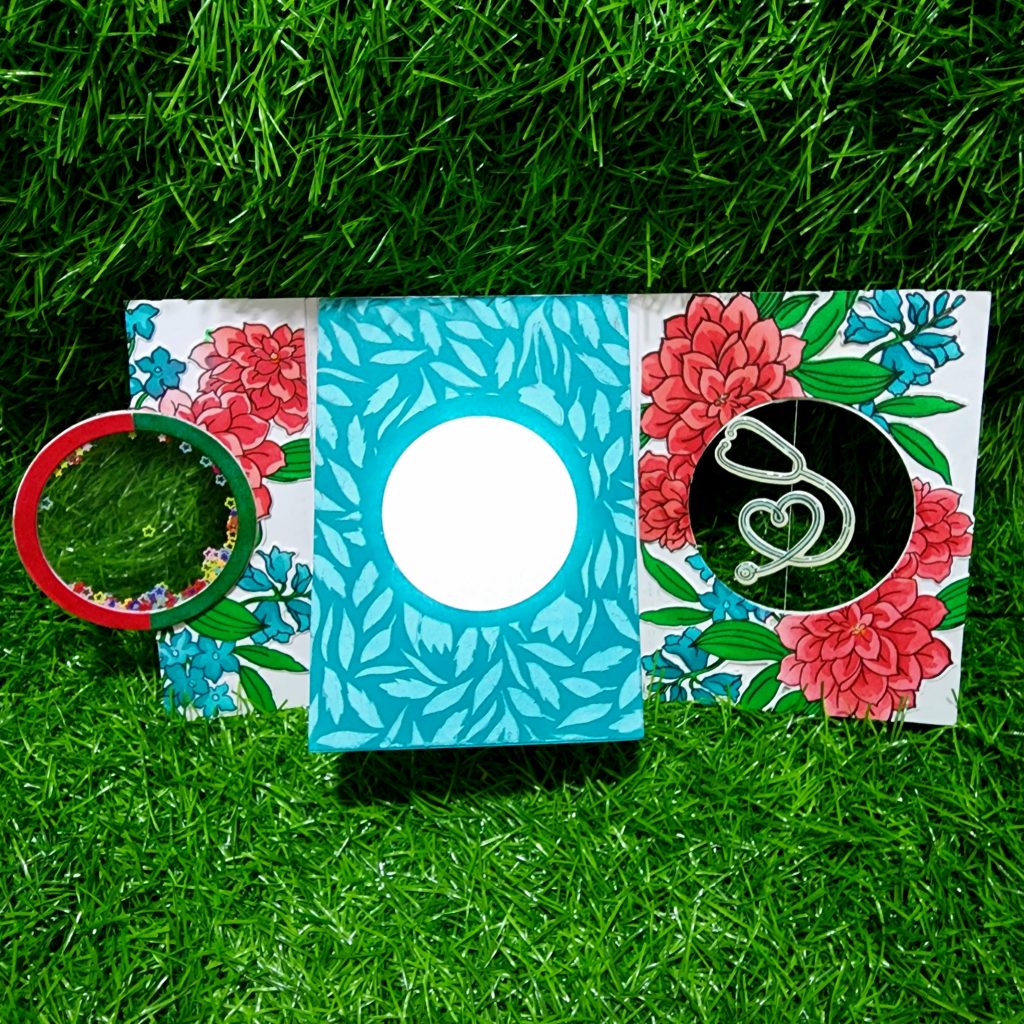
Finally, I’m here with my 5th class of level 3. Ashley Tucker has named it as “Cards in Motion” This class is filled with wonderful inspirations and ideas, cool tips, and tricks on how to create various interactive cards to boost your creativity . Grab a chair because this is going to be a huge one. I can definitely say that this is the most interactive and time consuming project I have done for a class. Those who know me, knows that I am in love with interactive cards. This is going to be my last Class. Next step is the Ultimate one. Final Challenge, Live session. So I’m very much excited for the card. Today I’m going to follow LESSON 7 – Combination of All Lessons . Here, I’m trying to inculcate 3 interactive features on this card. They are, Shaker element, pop up feature and String Spinner. So let’s get started.
INSTRUCTIONS
- Take a 5 ½” x 10 ¾” cardstock. Score at 2 ⅛” and fold. Flip the cardstock over with the folded edge on the left-hand side, score at 4 ¼”, and flip the cardstock again. Then, fold along the scored line.
- When you try to fold, it won’t fold over the cardstock, so mark and trim off the excess cardstock from the half panel. You will end up with the card base.
- Take two dies from the Halftone Circles Die Set, secure them together, onto the card front with the half flap, and run it through the die cutting machine.
- Remove the die from the half panel, close the panel, and place the die right back into the circle you just cut, but this time, secure the die to the panel underneath the flap. Very carefully, pull out the half panel and open up the card base. Run this through the die cutting machine.
- Die cut a piece of acetate using the larger of the circle dies.
- Apply liquid adhesive at the back of the frame, and adhere a piece of acetate to it.
- Now, double the layer of your foam tape, and adhere it to the back of the circle frame.
- Put some sequins onto the stamped panel.
- Adhere the frame over it, and you have your shaker piece
- Place a acetate sheet, facing down in your stamp positioner where your cardstock normally goes.
- Now, stamp on it the image of the stethoscope from Healthcare heroes stamp set in Permanent Black Crisp Ink. Stamp a few times till you get a good crisp image.
- Place a cardstock over this, and press it a bit so that the image from the stamp transfers onto it. This is how you can get a mirror image of your stamp.
- Now stamp another stethoscope but this time directly on the cardstock in Permanent Black Crisp Ink
- Use Artist Marker, B802 to color the stethoscope
- Once done, die cut the normal stamped image, flip it over, and then use any light source to place the mirror stamped image on it, and then fussy cut it out.
- To make your spinner element on the panel with the circle cut-out, adhere a thread with tape right above and below the die-cut; make sure this is taut. To make it last, pull the string back over on itself, and add another tape over it. Repeat with the other side, as well .
- Adhere the stethoscope images together with the thread in between to complete the spinner.
- To create better dimension apply nuvo crystal glaze over it.,
- Make a 5 ¼” x 4” top folding card ,Trace out the shape and size of the circle from the spinner element and mask it using a masking paper.
- Place Spring Garden Stencil over card base and mask outlines with masking tape.
- Take some embossing paste on the watercolor palette and add few drops of Aqualicious Alcohol Ink and blend it well
- Apply the paste on the cardstock over the stencil.
- Wait until the paste dries , blend Aqualicious Crisp Dye ink over it
- Remove the masking.
- Open the card, and Place Spring Garden Stencil over the top part of the card base and mask outlines with masking tape.
- Blend over with Aqualicious Crisp Dye ink
- Trim out a piece of 5 ¼ x 4 and blend Paper bag Crisp dye ink over it and run it through the die cutting machine placing it in between Deck Planks Embossing Folder
- Grab a piece of cardstock and stamp 5 doctors with Healthcare heroes stamp on the cardstock with jet black ink
- Color them with artist markers. You may make small changes to make the doctors look like from different ethnicities.
- Take 5 piece of strip of half inch width.
- Score two of them at 1/2 , 2 1/2 , 3,5 1/2 and 6
- Take another 2 strips and score them at 1/2, 3, 3 1/2, 6 and 6 1/2
- Take the last strip and score it at 1/2, 3 1/2, 4, 7 1/2 and 8
- Trim the ends and adheres the overlapping flaps to form a rectangular shape.
- Adhere it to the base of the card in order and close the card. Once its fully stuck, stick the die cut of the doctors .
- Add sentiment strips to the card.
- Color the cardstock with Artistic marker and stamp the sentiment from the same stamp set with Black artistic marker.
- U may use small die cuts or stamps as embellishments.
- Just stamp the image and die cut it. Add nuvo crystal glaze or nuvo crystal drops to create dimension to it.
- Adhere the completed 5 ¼” x 4” top folding card to the middle section on the inside of the card.
- Take a classic crest white card stock and stamp the main flower from Build a Garden: Dear Dahlias set using jet black ink
- Place its coordinating Stencil over card base and secure it with tape.
- Add patterns to your project by ink blending with, Paper bag Crisp dye ink, Aqualicious Crisp Dye ink , Vineyard Crisp Dye ink , Just Green and Crisp Dye ink Coral Bliss Crisp Dye ink .
- Gently pull the stencil off from the project area to see the result
- Using the coordinating dies, die cut 4 bunch of flowers.
- Position it over the card and trace out the circle part.
- Place the circle nesting dies and cut out the circle part
- Stick the remaining part of the flower to your main card base.
- Make sure that you have sufficient flowers for the inside part of the card too.
- Thus your interactive card is ready you may use nuvo drops to create droplets over the flowers.
SUPPLIES
- Neenah classic crest white card stock
- Misti stamping tool
- Sizzix big shot die cutting machine
- Guillotine Paper Trimmer
- Glue stick
- Scissors
- Masking paper
- Double sided foam tape
- Nuvo crystal glaze
- Nuvo Crystal Drops
- Glittering Star
- Aqualicious Alcohol ink
- Spring garden stencil
- Healthcare heroes stamp and die set
- Build a Garden: Dear Dahlias bundle set
- Fine liner pen
- Acetate sheet
- Paper bag Crisp dye ink
- Jet black crisp dye ink
- Aqualicious Crisp Dye ink
- Vineyard Crisp Dye ink
- Coral Bliss Crisp Dye ink
- Just Green Crisp Dye ink
- Jet black Artistic Marker
- Mountain Mist Artistic Marker
- Volcano Lake Artistic Marker
- Emerald Artistic Marker
- Peach Perfect Artistic Marker
- Ruby Red Artistic Marker
- Rocky Shore Artistic Marker
- Mocha Artistic Marker
- Dark Chocolate Artistic Marker
- Limestone Artistic Marker
- Lagoon Artistic Mar sssssssssker
- Morning Frost Artistic Marker
- Galactic Stream Artistic Marker
- Sea glass Artistic Marker
- Volcano lake Artistic Marker
- Blush Artistic Marker
- Deck Planks Embossing Folder
- Circle Nesting Die
- Score Board
- Bone Folder
Thank You!
Hope you liked my card. Have a wonderful day and I hope to see you all soon with another project from AECP. Until then happy stamping and thanks for stopping by! If you like what you’ve seen from me, please give me a follow over on my Instagram (@shahicreationz) and/or subscribing to my vlog and YouTube if you haven’t already.
-shahi

AECP: Exploring Watercolor Medium
Hey, Good day to u all. No-line water coloring is a technique many of us love the look of but may not know how to achieve, but there is a way to bulk up our no-line skills without even inking up a stamp. That’s the reason why I choose to take this course by Jennifer Rzasa and Ashlea Cornell. This is a perfect class for those who love watercolors! In this class, we are going to do look deeper into various water coloring mediums you can find at Altenew and learn about how to use them for multiple techniques! This is great for those who are wanting to get more out of their current watercolor supplies and get fresh inspirations! I am also submitting this post to the September 2022 Inspiration Challenge. Check out the challenge at https://blog.altenew.com/fall-inspired-card-inspiration-challenge/
INSTRUCTIONS
- Create a “4 1/4 x 5 1/2 ” card base from Watercolor Cardstock .
- Stamp flower from Build-A-Garden: Pristine Peonies in Buttercream Crisp Dye Ink onto Watercolor Cardstock.
- Tap the ink pads on a watercolor palate and use a water color brush to color your flowers and leaves.
- Pick up pigment from Coral Berry Altenew Crisp Dye Ink and apply it onto the base of the petal.
- Next, use clean water to pull the pigment out
- Color all the petals in the same way, skipping the adjacent petal and coloring the next until the first one dries.
- Apply more pigment to areas where you want to show shadow or depth and less where you want to show highlights.
- For the flower center, simply color it with a combination of Buttercream and Coral Bliss
- For the leaves use , Parrot Altenew Crisp Dye Ink for the base and Forest Glades Altenew Crisp Dye Ink for highlights
- Finally, Draw black strips using black artistic marker and fine liner pens .
- To fit the inspiration challenge of September i have added a watercolor layer with Coral Bliss Altenew Crisp Dye Ink adjacent to the black strip.
- Stamp the sentiment on the right most corner with jet black ink.
- Any embellishments of your choice can be added to enhance the look of the card
SUPPLIES
- Sizzix Bigshot die cutting Machine
- Misti stamping tool
- Distress Sprayer / Water Spritzer
- Altenew Watercolor Paper Pad (9”x 12”)
- Build-A-Garden: Pristine Peonies
- Buttercream Altenew Crisp Dye Ink
- Forest Glades Altenew Crisp Dye Ink
- Coral Berry Altenew Crisp Dye Ink
- Coral Bliss Altenew Crisp Dye Ink
- Black Artist Alcohol marker
- Fine Liner Pen Set
- Watercolor Palette – Medium
- Sticker Embellishments
- Watercolor brush
- Guillotine Paper Trimmer
Thank You!
Hope you liked my card. Have a wonderful day and I hope to see you all soon with another project from AECP. Until then happy stamping and thanks for stopping by! If you like what you’ve seen from me, please give me a follow over on my Instagram (@shahicreationz) and/or subscribing to my vlog and YouTube if you haven’t already.
-shahi
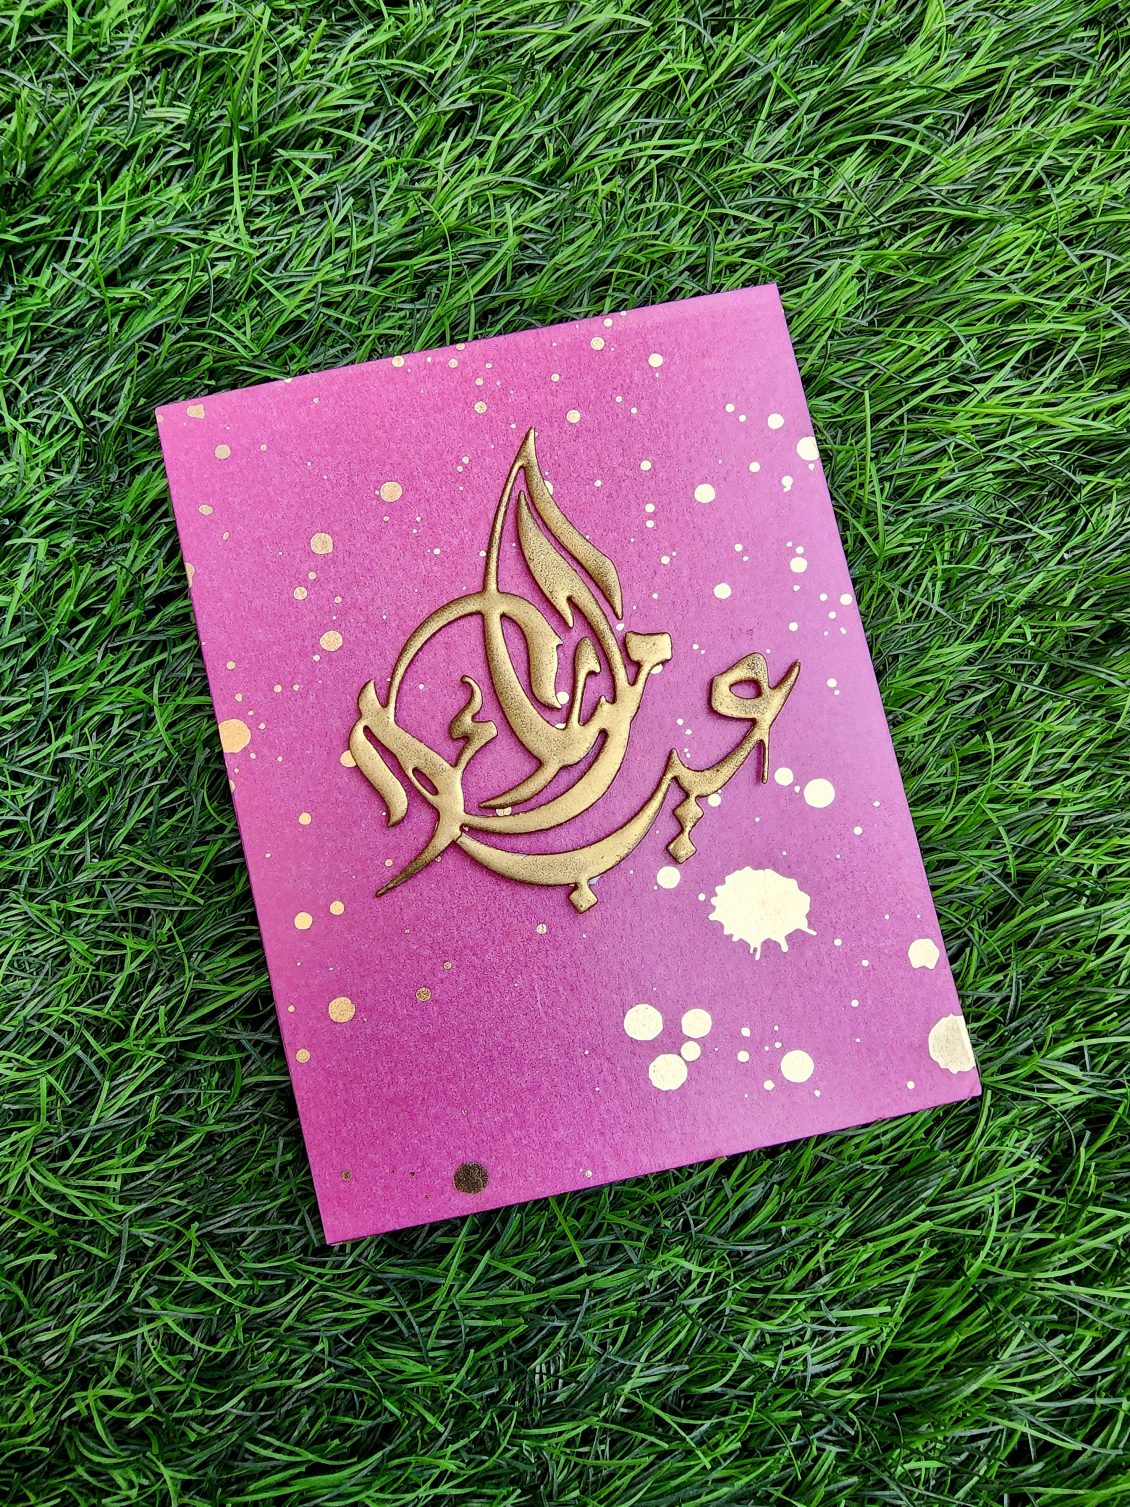
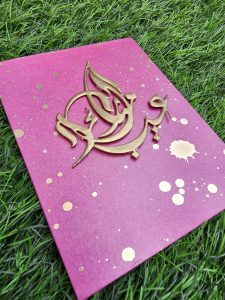
AECP: Progressive Cardmaking
Today I am here with a work based on my latest Altenew Academy class – Progressive Cardmaking with Justine Hovey . I am inculcating 2 of her techniques for my card. The washi tape technique for the background and the Embossing technique for the Sentiment. Trust me, this is one of the most simple and elegant card you can make.
INSTRUCTIONS
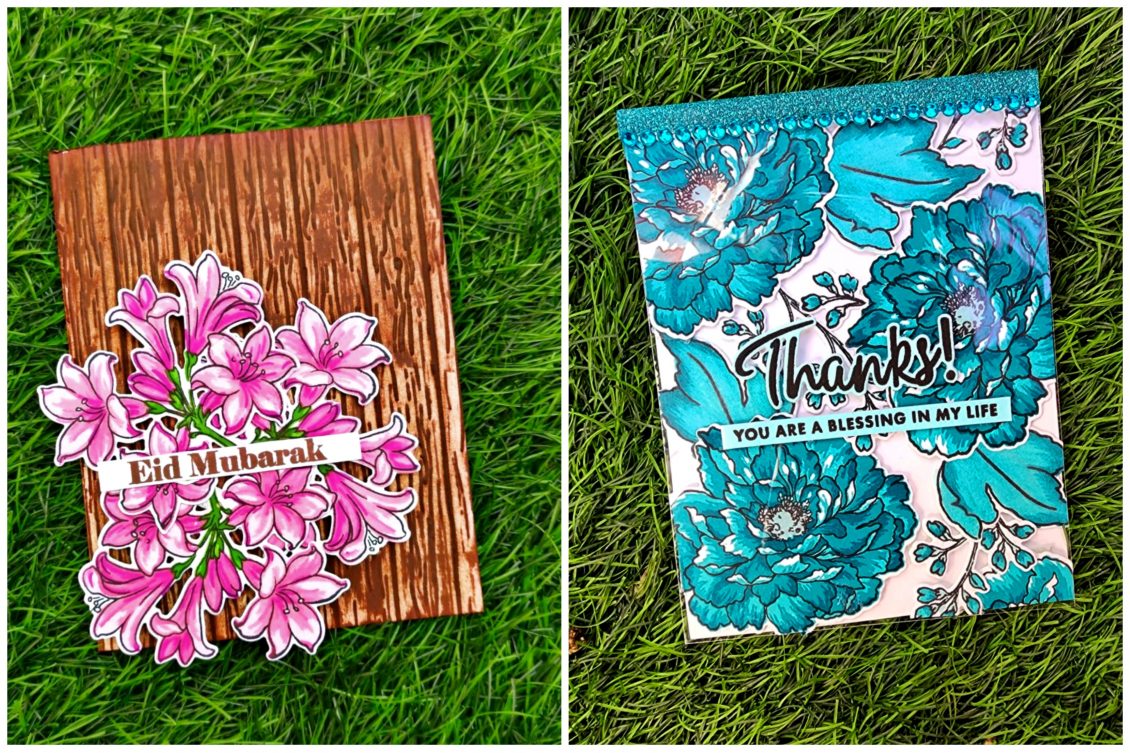
- Create a 4 ¼” x 5 ½” card base from Classic Crest Solar White Cardstock.
- Stick Gold Splatter Cosmic Berry Wide Washi Tape over it
- Take a piece of Classic Crest Solar White Cardstock, place Eid Mubarak Die over it and run it through the die cutting machine.
- Brush the die cut image with antistatic powder tool.
- Apply the embossing ink over the top and Cover it with the embossing powder and heat emboss it with a heat gun.
- Stick it to the center of the card using double sided foam tape
SUPPLIES
- Antique Gold Crisp Embossing Powder
- Eid Mubarak Die
- Anti static powder tool
- Heat Gun
- Double sided foam tape.
- VersaMark Watermark stamp pad
- Gold Splatter Cosmic Berry Wide Washi Tape
- Classic Crest Solar White Cardstock.
- Sizzix big shot die cutting machine
TIPS
- Use anti-static powder tool to prevent embossing powder from sticking to unwanted areas while we stamp the image with Versamark
- Point the heat gun straight down to the paper without a slanted angle this way the onset embossing powder will not be blown away leaving you with a sloshy embossed image
- Add extra layers of embossing powder and melt after each layer to get a smooth look.
- Touch it only after few minutes after heating the die cut sentiment or else you can get your finger prints get melted into it .
- Wrap the tape around the paper for extra strength and to ensure that the washi stays in place over time.
Thank You!
Hope you liked my card. Have a wonderful day and I hope to see you all soon with another project from AECP. Until then happy stamping and thanks for stopping by! If you like what you’ve seen from me, please give me a follow over on my Instagram (@shahicreationz) and/or subscribing to my vlog and YouTube if you haven’t already.
-shahi
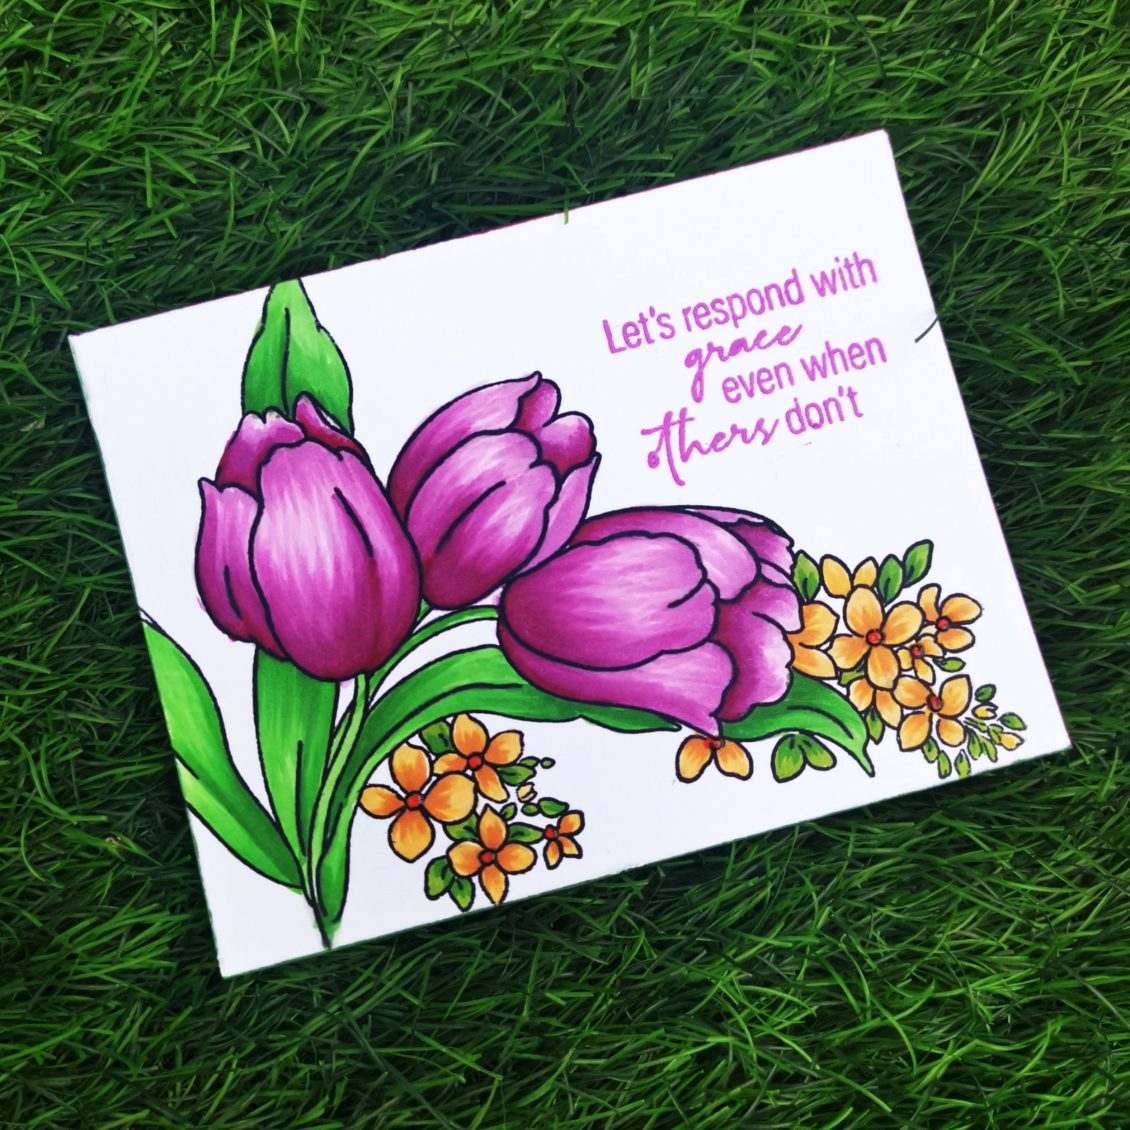
AECP :Creative coloring with artistic markers
My today’s card is based on the class, Creative coloring with artistic markers by Mindy Baxter.
In this class, you will learn creative tips and techniques to add stunning colors to your stamped images and create gorgeous cards.
INSTRUCTIONS
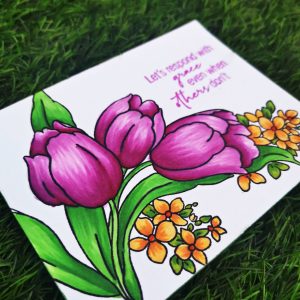
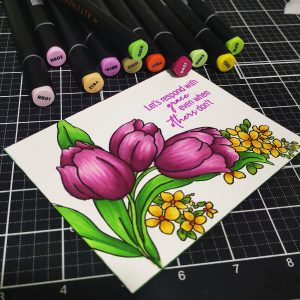
- Create a 4 ¼” x 5 ½” card base from Classic Crest Solar White Cardstock.
- Stamp image from Build-A-Garden: Tulips & Friends Stamp set onto a piece of Classic Crest Solar White Cardstock using Obsidian Ink.
- Color stamped image using Artistic Markers.
- The tulips are colored using Rose Quartz Artist Alcohol Marker, Puffy Heart Artist Alcohol Marker, Purple Wine Artist Alcohol Marker and Pinkalicious Artist Alcohol Marker.
- The leaves are colored using Grass Field Artist Alcohol Markers , Shadow Creek Artist Alcohol Markers and Firebrick Artist Alcohol Marker
- Stamp the sentiment from Build-A-Garden: Magnificent Branch Outline Stamp Set with Coral Berry Crisp Dye Ink
SUPPLIES
- Rose Quartz Artist Alcohol Markers R601
- Puffy Heart Artist Alcohol Markers R603
- Purple Wine Artist Alcohol Markers R614
- Pinkalicious Artist Alcohol Markers R504
- Firefly Artist Alcohol Markers G503
- Grass Field Artist Alcohol Markers G515
- Shadow Creek Artist Alcohol Markers G425
- Caramel Toffee Artist Alcohol Markers Y612
- Forest Glades Artist Alcohol Markers G715
- Warm Sunshine Artist Alcohol Markers Y205
- Firebrick Artist Alcohol Markers Y817
- Coral Berry Crisp Dye Ink
Thank You!
Hope you liked my card. Have a wonderful day and I hope to see you all soon with another project from AECP. Until then happy stamping and thanks for stopping by! If you like what you’ve seen from me, please give me a follow over on my Instagram (@shahicreationz) and/or subscribing to my vlog and YouTube if you haven’t already.
-shahi
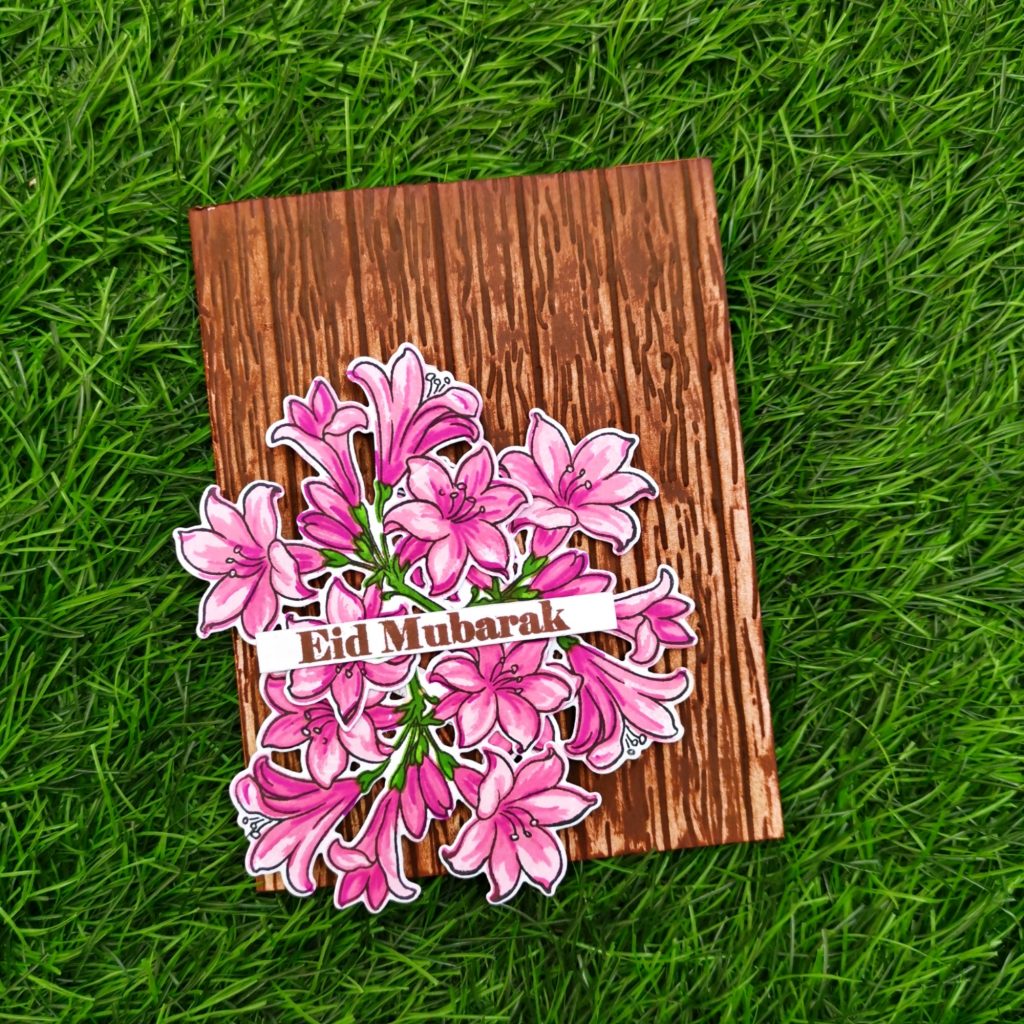
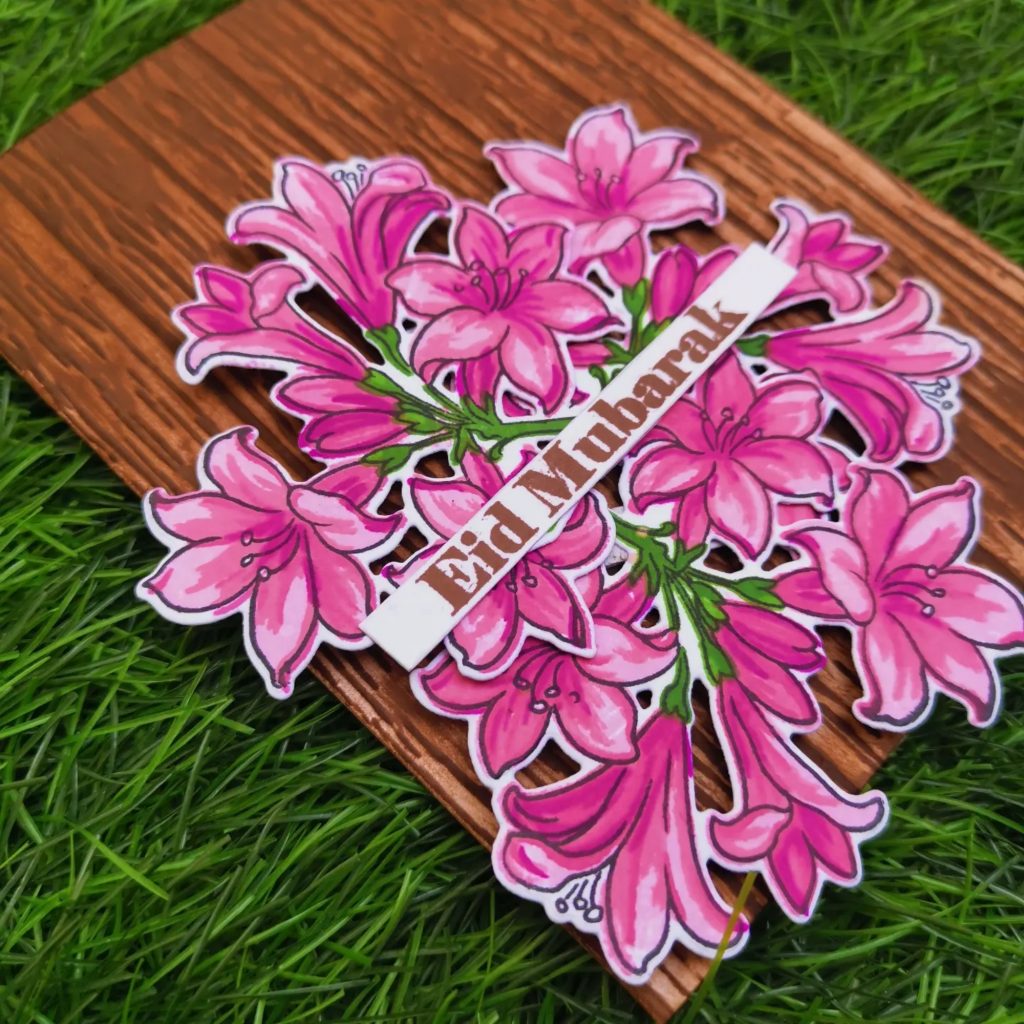
AECP: All About Layering 5
Actually this project was done long back, but unfortunately I was not able to post it. So here it goes…
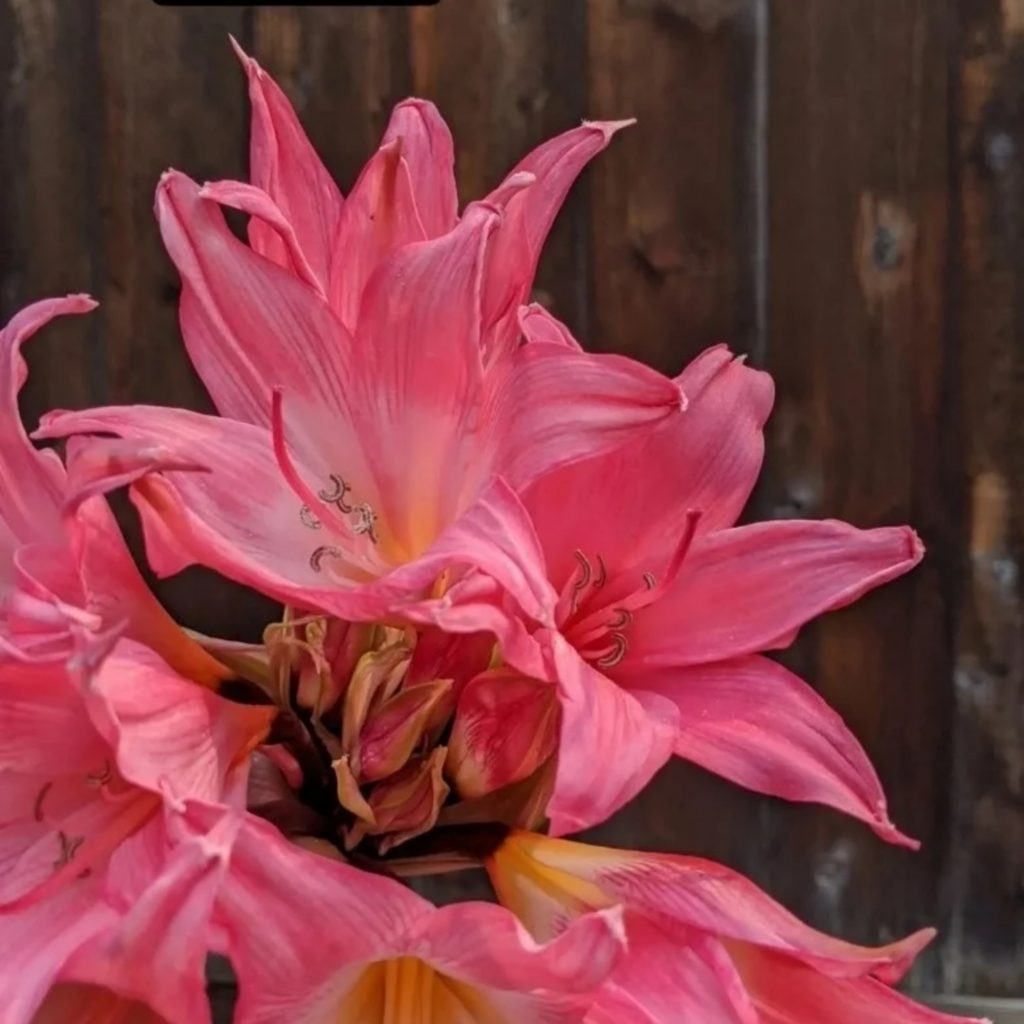
After taking a long break from card making, I am back to do my favorite course, AECP. Few months back, I came across an Instagram story posted by the president and founder of Altenew, Tasneem. She posted a picture of a pink flower and asked the followers to guess the flower. I doubted if it was belladonna lily. Randomly guessed it and she said that it was the correct answer. I was sure that she was working on something special. A special stamp set or an amazing embossing folder, who knows what is going to come up. So I randomly took a screenshot of that story. Months passed by, Ramadan is here and I received my Build a flower subscription for the month of April and it was the same old belladonna lily, I was really excited to hold it as an wonderful stamp set. That’s when I decided to turn my All About Layering card into a dedication to Tasneem. Eid was ahead and belladonna lily being the final BAF stamp set, were the other reason for me to do that. Lydia Evans has done a wonderful job in explaining every detail about layering stamps, methods and techniques etc.
INSTRUCTIONS
- Take the flower stamp from the Build-a-Flower: belladonna lily Set and stamp the outline layer in black Ink onto a piece of white cardstock.
- Then stamp the base layer with Pink Diamond Crisp dye Ink
- The second layer of the stamp will fit around all of the edges of the previously stamped layer, stamp this in Pinkalicious Crisp dye Ink .
- The third layer will fit around the bottom-right edge of the previously stamped layer, stamp this in Rubellite Crisp dye Ink .
- The fourth layer will fit on the top edge of the previous layer, stamp this in Razzleberry Crisp dye Ink .
- Stamp the stems with Grass Field Crisp dye Ink and Shadow Creek Crisp dye Ink
- Die cut 3 bunches of each flower.
- Create a 4 ¼” x 5 ½” card base from Classic Crest Solar White Cardstock.
- Run it through Deck Planks 3D Embossing Folder and shade it with Vintage Photo Distress Ink .
- Arrange and Stick the flowers according to your liking.
- Stamp the Eid sentiment and stick it at the middle of the flower.
SUPPLIES
- Pink Diamond Crisp dye Ink
- Pinkalicious Crisp dye Ink
- Rubellite Crisp dye Ink
- Razzleberry Crisp dye Ink
- Grass Field Crisp dye Ink
- Shadow Creek Crisp dye Ink
- Vintage Photo Distress Ink
- Versafine black pigment ink
- Eid greetings Stamp Set
- Deck Planks 3D Embossing Folder
- Classic Crest Solar White Cardstock.
- Sizzix big shot die cutting machine
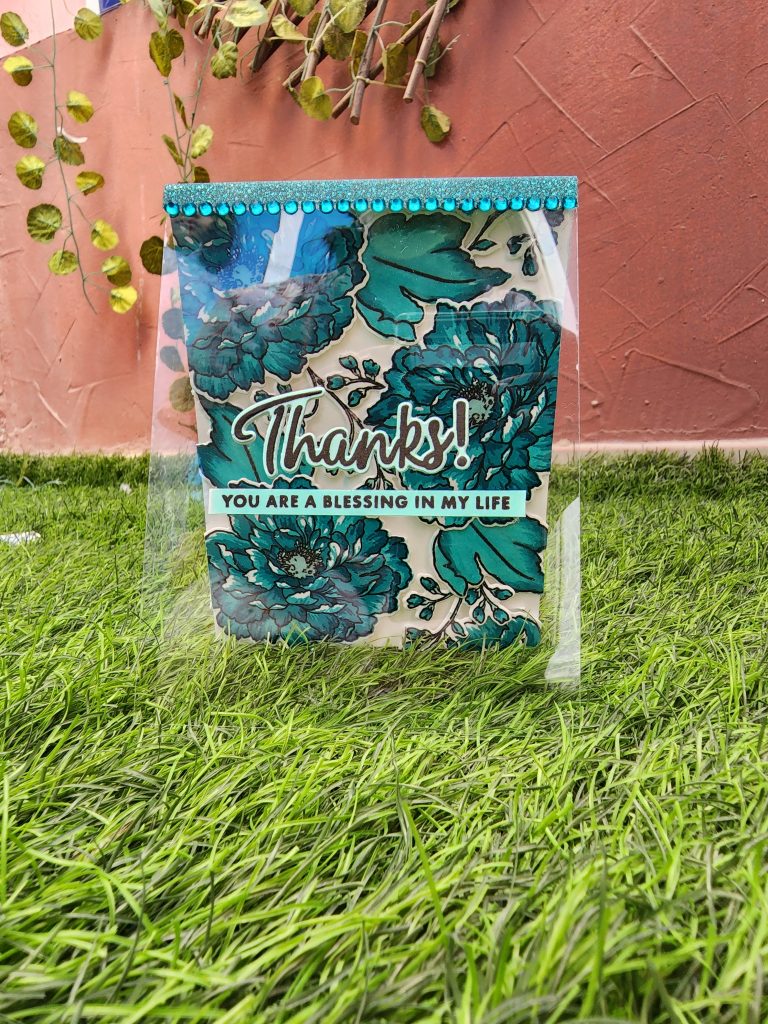
Here is my second take , on this class. I have tried sticking the sentiment to the acetate sheet for this card.
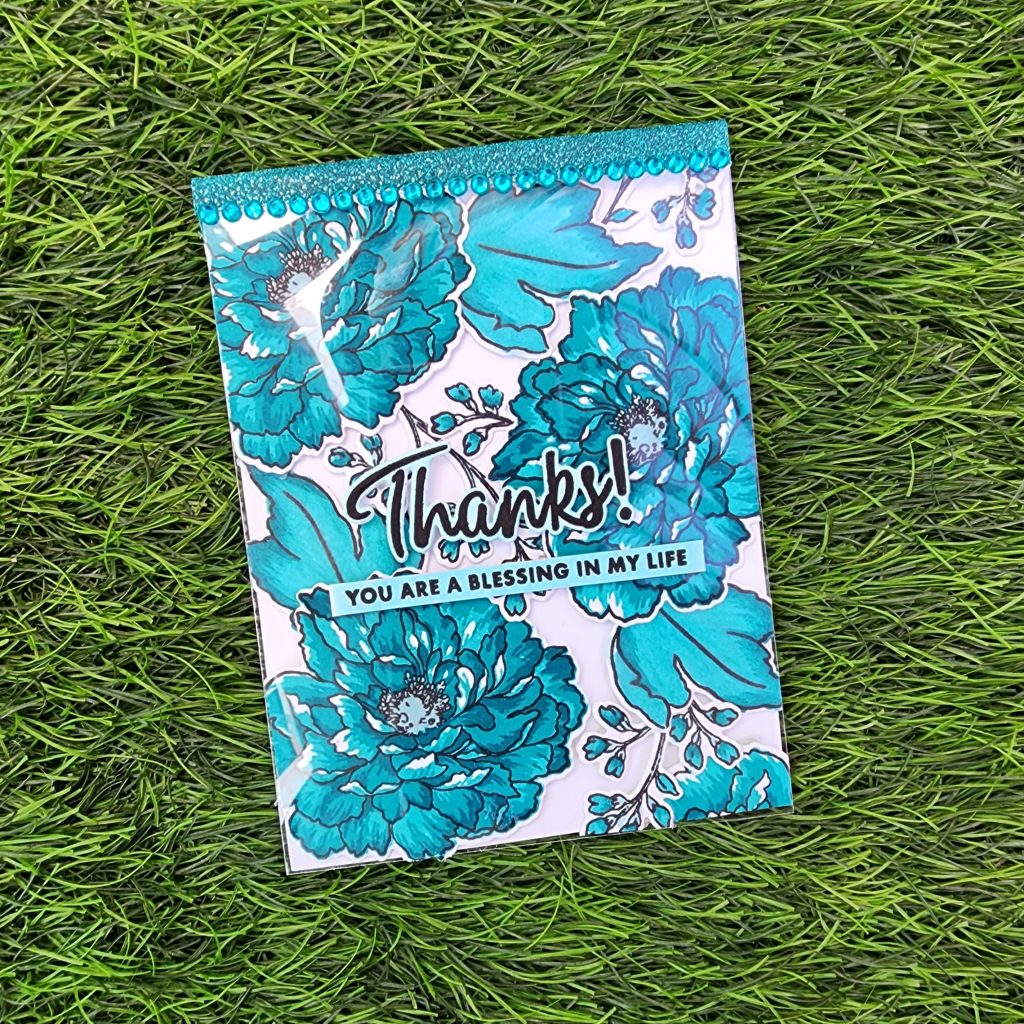
INSTRUCTIONS
- Take the flower stamps from the Build-A-Flower: Tree Peony Layering Stamp Set and stamp the base layer in Dew Drops Crisp dye Ink onto a piece of white cardstock.
- Followed by Aqualicious Crisp dye Ink, Teal Cave Crisp dye Ink ,Galactic Stream Crisp dye Ink respectively.
- Stamp the outline layer of the flower and leaves with versa fine onyx black
- For the leaves, Color it with the similar shades of Artist Alcohol Marker
- Stamp several of these images for the project and use the coordinating dies to die cut them.
- Create a 4 ¼” x 5 ½” card base and set it aside.
- On a 4 ¼” x 5 ½” panel, start arranging the florals and adhere them with foam tape.
- Use glue tape to adhere the leaves.
- Cut off the excess pieces that are going off the edges.
- Take a 4 ¼” x 5 ½” piece of acetate sheet and place it above the card.
- Trim a similar shade of Teal Glitter washi tape and stick it over the Acetate sheet joining the back part of the card.
- Stick a layer of teal gem stones as a border to the washi tape.
- Stamp and Die cut “Thanks” from Halftone Circles Stamp & Die Bundle over a cardstock colored in Dew Drops Crisp dye Ink .
- Stick it on the middle of the acetate sheet.
- Stamp the sentiment from Build a Garden: Tulips & Friends with versa fine onyx black Ink on a thin strip of cardstock colored in Dew Drops Crisp dye Ink. Stick it below the die cut.
SUPPLIES
- Classic Crest Solar White Cardstock.
- Sizzix big shot die cutting machine
- Build-A-Flower: Tree Peony Layering Stamp & Die Set
- Build a Garden: Tulips & Friends
- Halftone Circles Stamp & Die Bundle
- Teal Glitter washi tape
- Acetate sheet
- Versa fine onyx black
- Dew Drops Crisp dye Ink
- Aqualicious Crisp dye Ink
- Teal Cave Crisp dye Ink
- Galactic Stream Crisp dye Ink
- Dew Drops Artist Alcohol Marker
- Aqualicious Artist Alcohol Marker
- Teal Cave Artist Alcohol Marker
- Galactic Stream Artist Alcohol Marker
Thank You!
Hope you liked my card. Have a wonderful day and I hope to see you all soon with another project from AECP. Until then happy stamping and thanks for stopping by! If you like what you’ve seen from me, please give me a follow over on my Instagram (@shahicreationz) and/or subscribing to my vlog and YouTube if you haven’t already.
-shahi
AECP – level 2 Final challenge (Part 2)
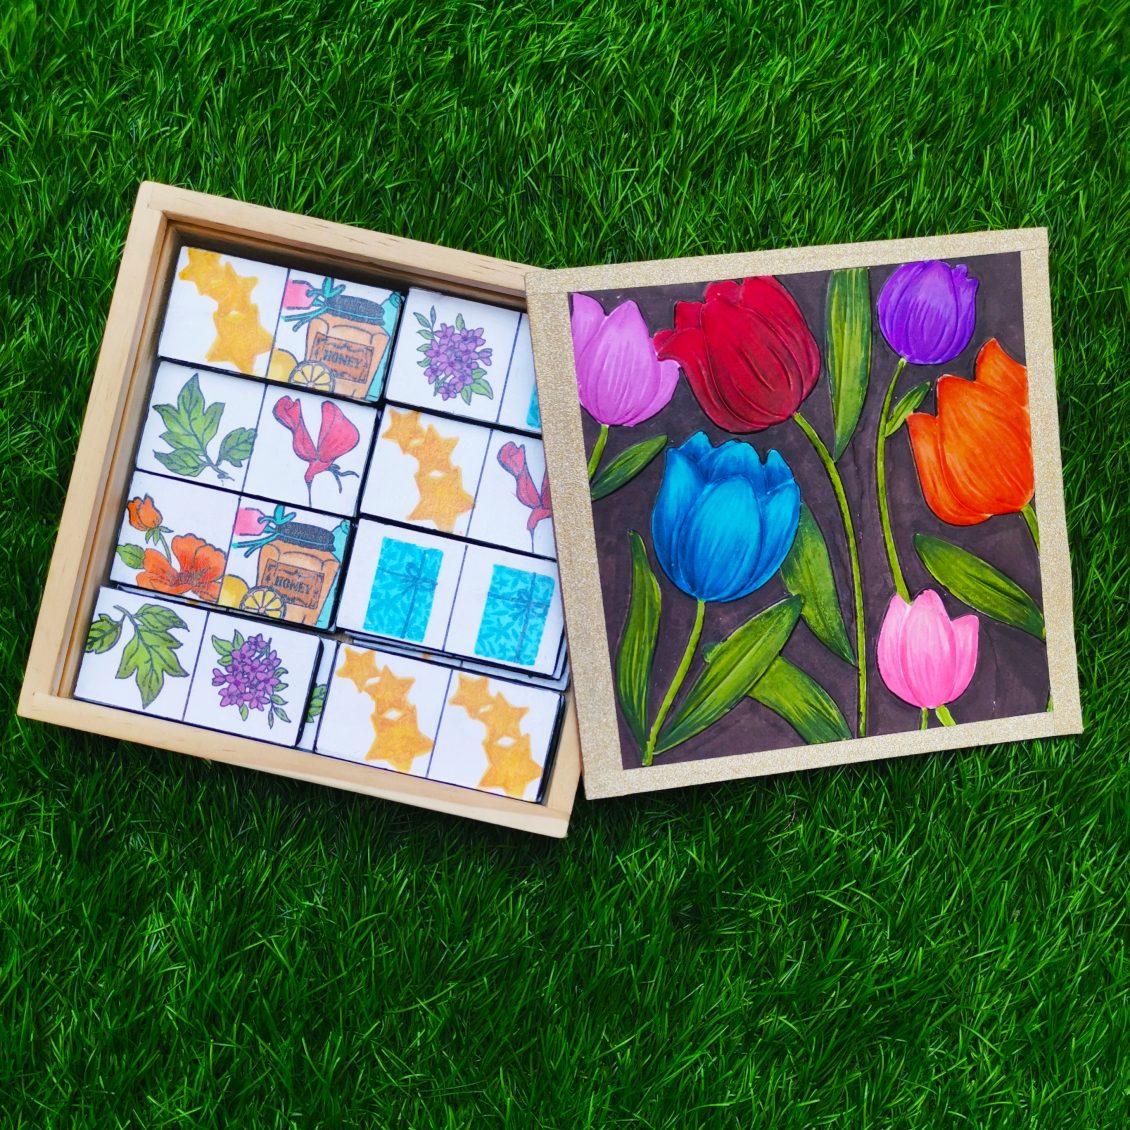
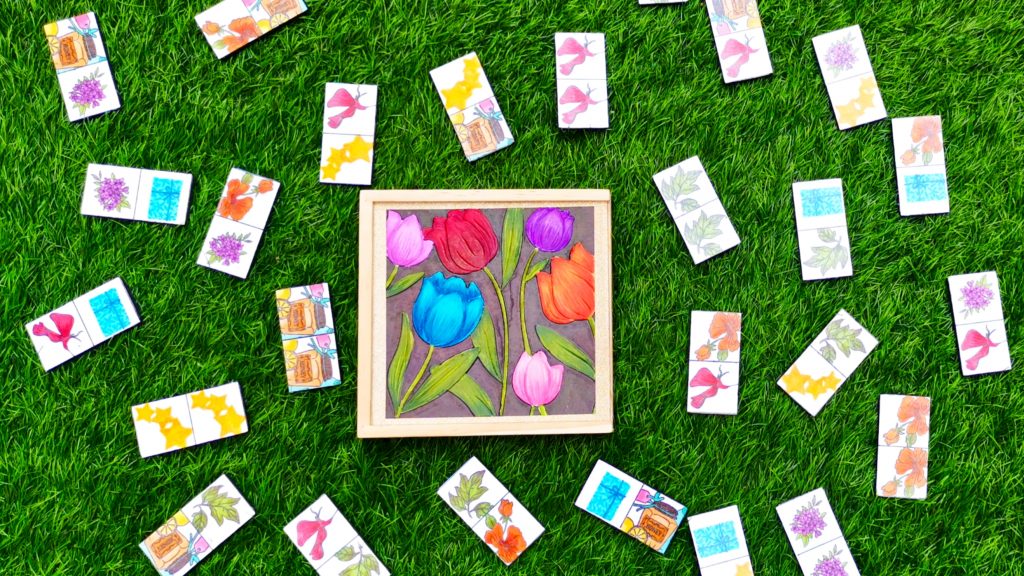
Hi, let’s explore the this part of my Altenew Educator Certification Program’s Level 2 challenge . Today I’m presenting something a little different from what I usually post, but it’s a project I’ve been wanting to do for a long time. This section’s task was to produce an Altered Item/Upcycled Project. I had tons of ideas running inside my head after getting the challenge details mail from erum. But was confused about finalizing into something specific. I wanted to explore into something unusual. Dint want to take the same track of my other aecp friends.
Finally!!!!! it’s time for the big reveal.
We all know that, there are various varieties of domino sets in use all over the world and a great number of games that can be played with them. But today I am presenting before you a different one .” DOMINOES FROM ALTENEW “
The Game
The dominoes are ritually shuffled face down . Each player draws 6 dominoes and places them so that the other players can’t see their value. The first person to play is that person holding the double picture. The tile played must be the double tile that permitted the player to take the first turn. If none of the players hold a double picture tile, then the tiles are reshuffled and re-drawn. Each player must in turn then play a tile onto the table positioning it so that it touches one end of the domino chain which thus gradually increases in length. A player may only play a tile which has upon it a picture showing at one end of the domino chain or the other . If a player plays a domino with the result that both ends of the chain show the same picture (normally a number which is useful to the player and distasteful to the opponents), that player is said to have “stitched up” the ends.
The way that the tiles are placed provides a small part of the entertainment. Each tile being placed must be positioned so that the two matching ends are adjacent. Unless, the tile is a double, the tile can be placed square in any one of the three directions as long as the two matching sides are touching fully. Doubles are always placed cross-ways across the end of the chain. A tile played to a double must also be placed accordingly – perpendicular to the double touching at its middle. The shape of the domino chain develops snake-line at random according to the whims of the players and the limitations of the playing surface. If a player can lay a domino, then it must be played. Otherwise the player “knocks”, or raps the table and play passes to the next player. The opposing players will, of course, make mental note of the numbers currently available on the table and try to ensure that they are available in future too…..
Normally play stops when one player “chips out” (plays his last domino) . Anyone who can’t go has to miss their turn. The winner is the player who gets rid of their cards first.
Planning
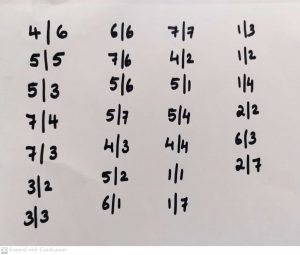
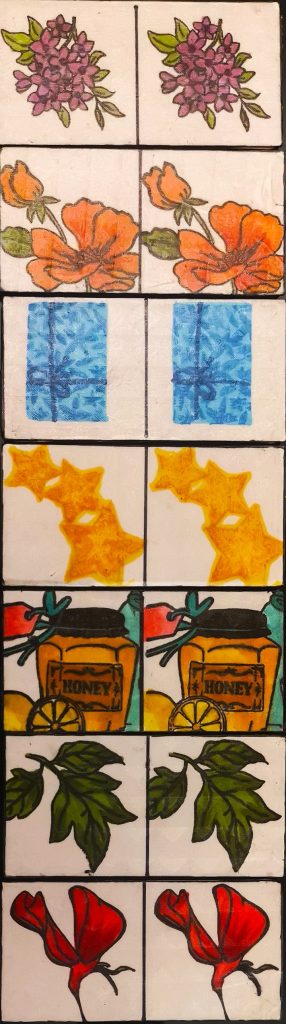
This is a project which requires lot of planning in the beginning stage. Each dominoes set contains 28 pieces. So I made a pattern for 28 tiles with 7 patterns. I choose different pictures from various stamp sets . I also created a list of how they should be combined. Total of 28 tiles with 2 divisions makes a total of 56 pictures. Thus each pattern was to stamp 8 times including doubles. Next step was to create a pattern for them. Below is the rough sketch of the pattern I made.
Making domino cards
This is definitely not a simple project. But I promise you this is something worth all your effort. Initially I bought some wooden tiles from a local store. Then traced it onto a classic crest white card stock . And trimmed it of in the shape of tiles I did the same for all 28 tiles. Then measured the middle point and drew a line across it using a black pinpoint pen. Then i stuck them on to the tiles and stamped the images on it. I positioned the stamp on my misti tool and stamped it using jet black ink . Some pictures were also stamped with crisp dye inks. For stamping the pictures on the right side, I placed a tile vertically towards the corner of the stamping tool and then positioned the second tile on its left thus the picture gets stamped on the right side of the second tile. But if you want to stamp it on the left side, then remove the first tile and then move the main tile towards the corner of the stamping tool. Thus we get the image stamped on the left side of the tile. Then I colored those pictures with artistic markers.
For the box , I took a wooden box from my kid’s storage and then transformed it to a dominoes box. The box had a peace of cardboard sliding in and out to open and close the box. I measured the size of the cardboard and then trimmed a classic crest white card stock in its size. Then I ran it through a 3d embossing folder from Altenew. The remaining part of the paper, was left blank so i stuck glitter tape as a border. Then i colored the embossed paper with the artistic markers from Altenew. The finished paper was stuck to the cardboard. To add little more glitter to the cover, i sprayed Shimmer craft spray over it. As it’s been used by kids,I also stuck a clear coat of transparent sheet over the tiles, as it acts as a protective filim and it’s easy to clean.
Once the tiles are placed inside the box, it turns out to be a perfect handmade gift for any toddler. My 3.5 year old daughter loves it . As I said before, its not as simple as it looks but seeing my daughter play with it ,makes me feel like its definitely worth all my efforts.
Supplies
Stamps
- Sweetest Peas Stamp Set
- Build-A-Flower: Wild Rose Layering Stamp Set
- Get Well Soon Stamp Set
- Wild Flora Stamp Set
- Trophy Life Stamp Set
- Piles of Presents Stamp set
- Poppy Garden Stamp Set
Artistic Markers
- Jet black Artistic Marker
- Emerald Artistic Marker
- Evergreen Artistic Marker
- Frosty pink Artistic Marker
- Corral berry Artistic Marker
- Dusk Artistic Marker
- Velvet Artistic Marker
- Grapevine Artistic Marker
- Caramel toffee Artistic Marker
- Orange cream Artistic Marker
- Volcano lake Artistic Marker
- Bamboo Artistic Marker
- Olive Artistic Marker
- Puffy Heart Artistic Marker
- Purple wine Artistic Marker
- Deep iris Artistic Marker
- Midnight violet Artistic Marker
- Crimson Artistic Marker
- Autumn blaze Artistic Marker
- Forest glades Artistic Marker
- Moss Artistic Marker
- Orange cream Artistic Marker
- Fire brick Artistic Marker
- Ruby Red Artistic Marker
- Ocean waves Artistic Marker
- Desert night Artistic Marker
- Mountain Mist Artistic Marker
- Volcano Lake Artistic Marker
- Warm sunshine Artistic Marker
- Mango Smoothie Artistic Marker
- Cotton Candy Artistic Marker
- Paper bag Artistic Marker
Inks
- Versa fine black ink
- Tide blue crisp dye ink
- Star light crisp dye ink
- Maple yellow crisp dye ink
- Carved pumpkin Distress ink
Other Products
- Wooden tiles
- Wooden box
- Scissors
- Glue
- Guillotine Paper Trimmer
- Scale
- Glitter tape
- Pencil
- Black pinpoint pen
- Sheer shimmer craft spray
- Clear coast stickers sheets

Before I finish, If you are looking for an altered project as a display piece . Here is one below.
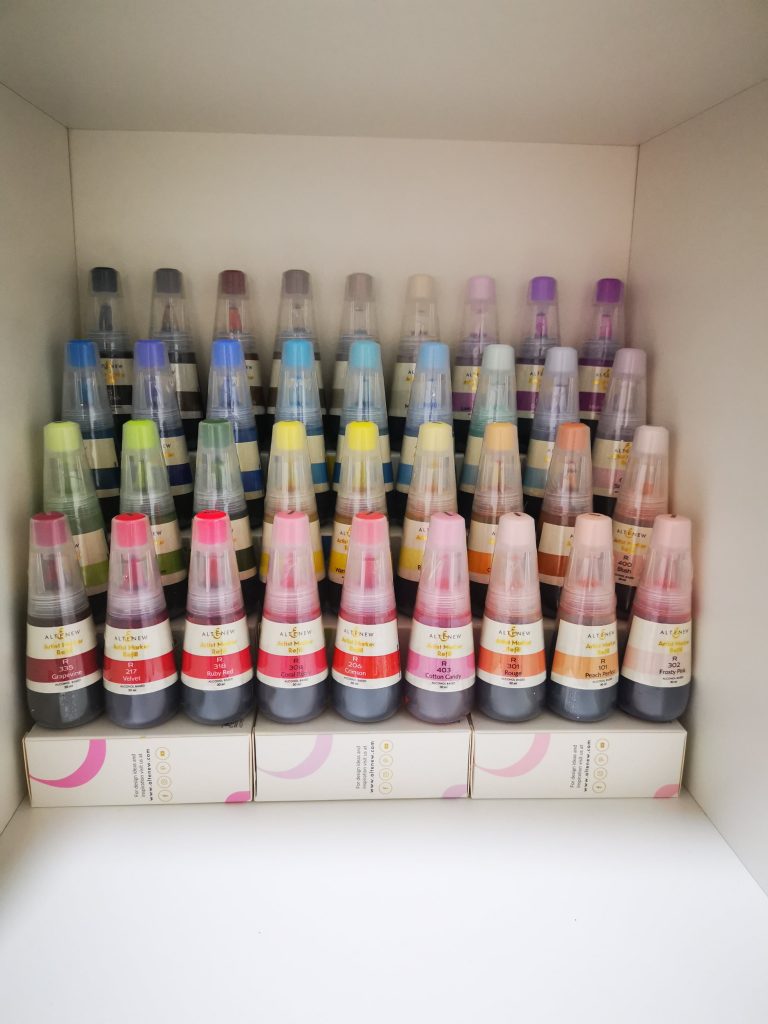
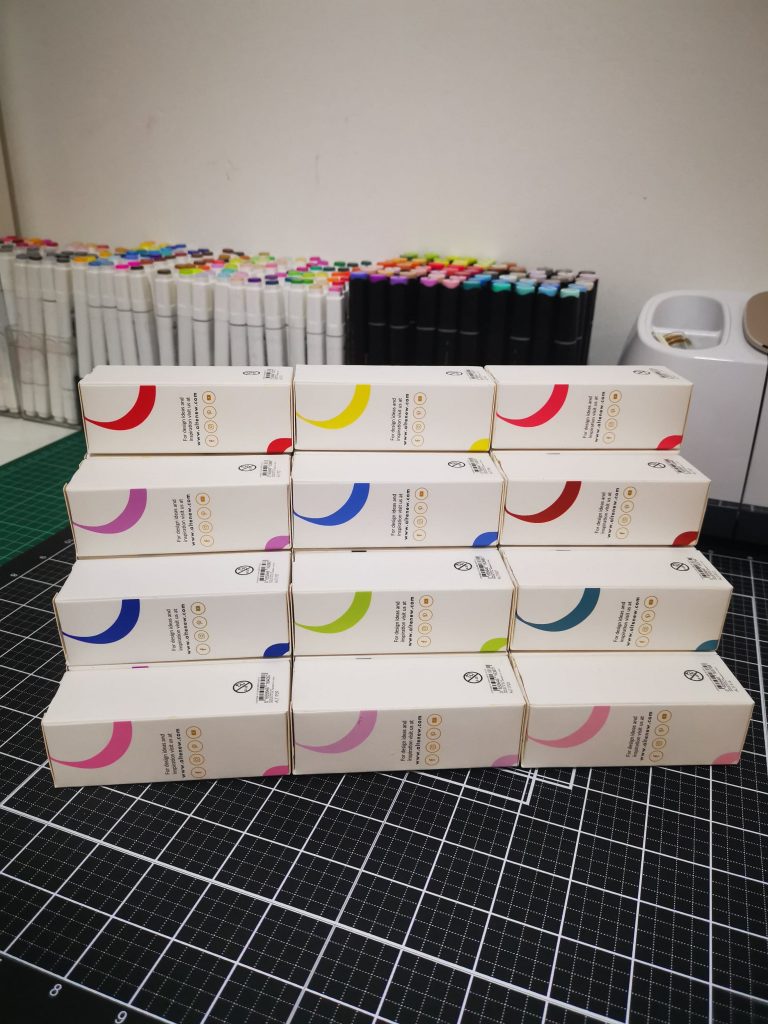
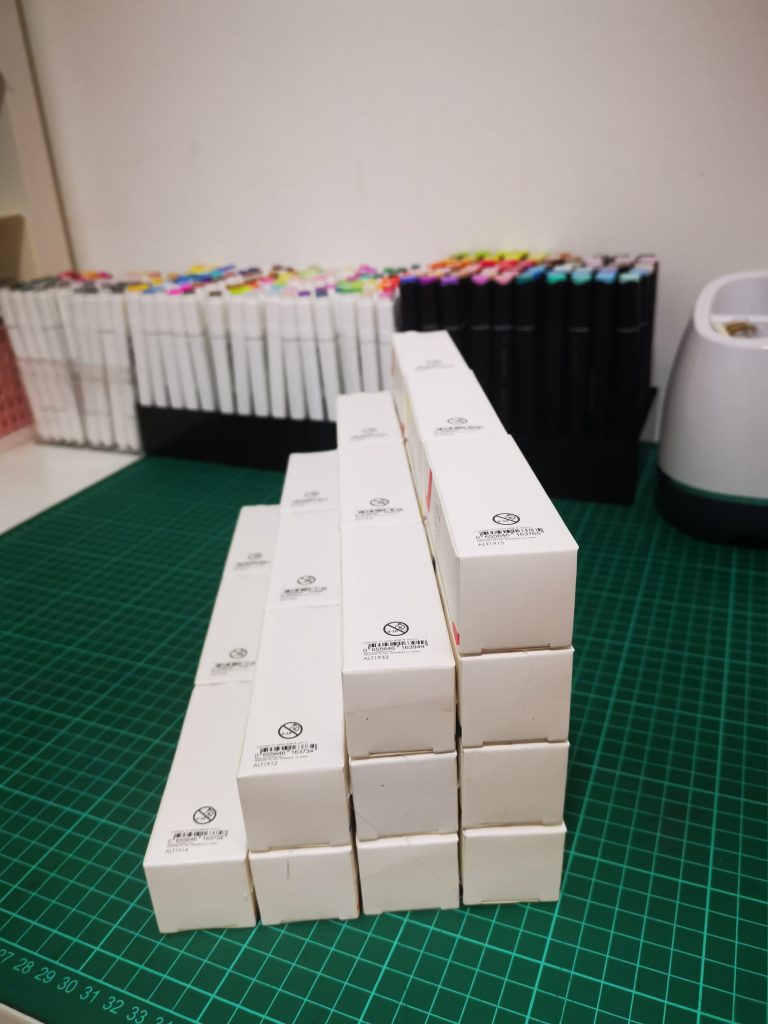
Artistic markers from Altenew are something I always reach out with. If you are someone like me, then its refills are a must buy and It’s something that you should definitely catch hold of. But organizing them was kind of tricky for me. I wanted to see all the colors in a single sight. It helps me to choose the right one. That’s why I choose to create my own stand for that. Altenew is always best for its products. Buy it once, you can never stop buying things from them. It’s not just their products, their packaging is also always on my favorite list. So I decided to create a stand for my refills, using their own boxes. And it definitely came out great. Do give a try for yourself. All you need is to stick the boxes together and create a stair like stand. The boxes are strong enough to hold your refill markers in its place. when you buy new ones, all you need to do is add an extra layer of boxes and they are good to go.
So That’s the end of my level 2 final challenge . Hope you liked my take on the altered project too. stay tuned to my Instagram and YouTube page for a making video reel on this project.
Thank You so much!
Hope you liked my cards. Have a wonderful day and I hope to see you all soon with another project from AECP. Until then happy stamping and thanks for stopping by! If you like what you’ve seen from me, please give me a follow over on my Instagram (@shahicreationz) and/or subscribing to my vlog and YouTube if you haven’t already.
-shahi

 CASE your fellow AECP Crafter
  Clean & Simple Boutique Cards
  Easy Die Cutting Techniques
  Graduation card
  Let it shine
Recent Comments