Month: June 2020
For the guys(Take 2 )
So here is my second take on the course “For the guys” from Altenew academy. I am a person who is usually comfortable with Masculine cards, but this time it isn’t the same. Sticking to altenew products is the greatest challenge I’m facing right now. I don’t have much of my craft supplies in hand with me right down. Which narrows my mind with less opinions. Yet I’m trying my level best to think outside the box. So this how it began.
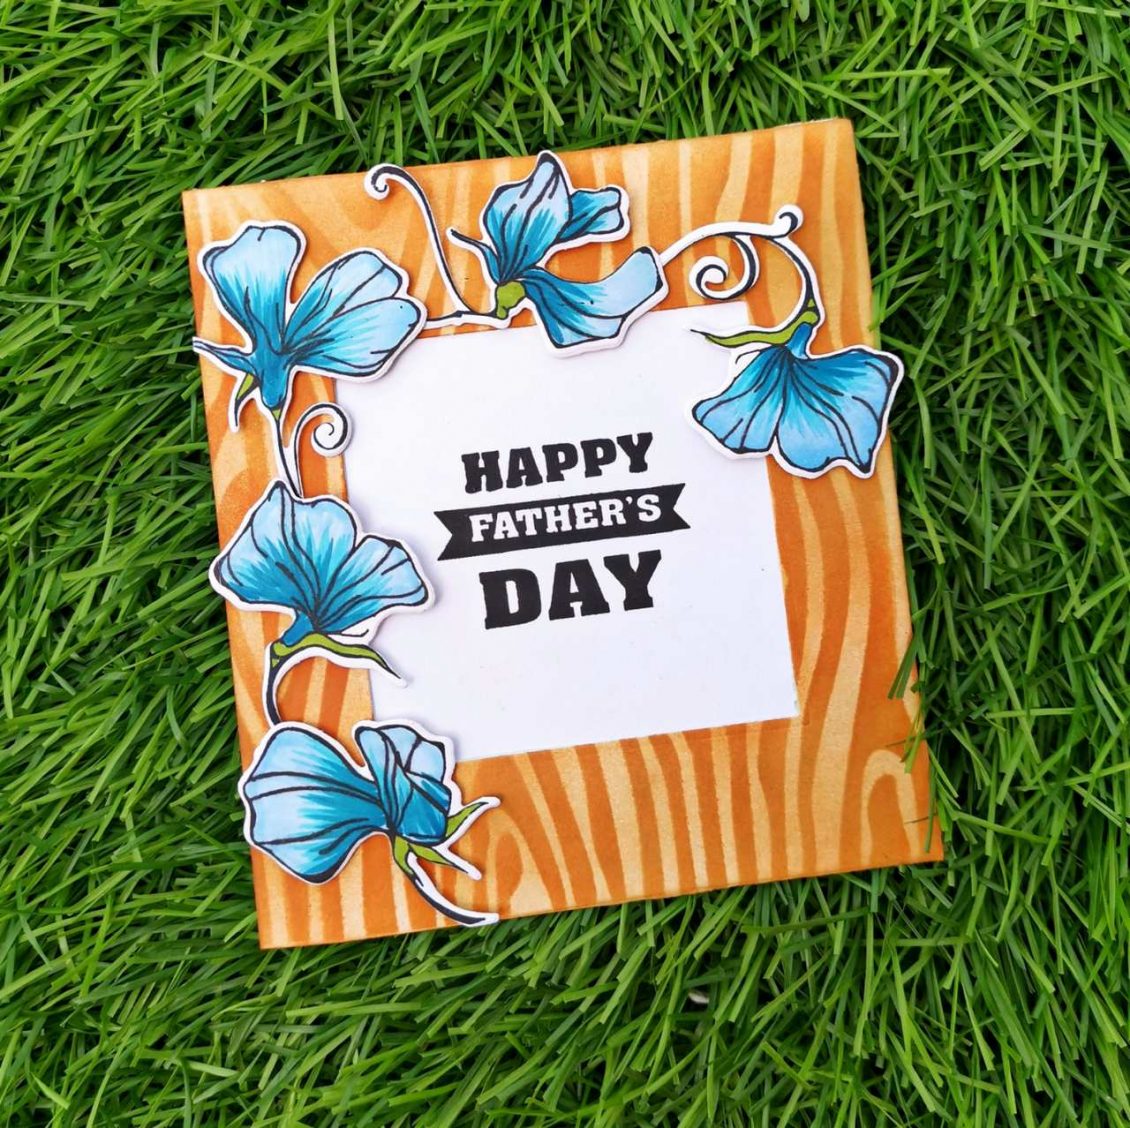
I trimmed two 4 1/4 *4 1/4 Neenah classic crest solar white square cards. The first one was blended with hazelnut crisp die ink from Altenew. Then I placed a wood textured stencil on it and blended it with brown distress ink. I trimmed out a square piece from the middle of my card. Then I placed the other white cardstock behind it and stamped “Happy Father’s day” (best dad from Altenew) with versafine black ink on the center of the card.
Then I stamped some flowers with black ink on a white cardstock paper. I choose the flowers from the sweetest peas stamp set from Altenew. I colored them with 3 shades of blue artistic markers from Altenew( Caribbean sky, ocean waves, dessert night). After die cutting them with their coordinating dies. I placed them on the border of the square die cut. That square shape in the center of the card acts as the basic geometric shape used in this card. So in order to add more geometric shapes, I decided to stick those flowers in a triangle shape. Thus leaving aside a segment of the square, I stuck those flowers around the die-cut.
I have got no idea if my card came out well or not But you do give it a try to learn this course on Masculine cards at https://altenew.com/products/for-the-guys.I hope to see you all soon with another project from AECP. Until then happy stamping and thanks for stopping by!
-shahi

Graduation card
I had prepared this card for my brother in law, who recently completed his ACCA. This card is a combination of back and white colors.
Firstly I trimmed a Neenah classic crest solar white cardstock into 5*5. Then I choose a stencil from Simon says stamp, Graduation Celebration layering set (Sunny Days Ahead). I positioned it on my cardstock paper and blend my versa fine black ink on it.
Then I die cut a black cardstock with rectangle die (coordinating with magic slider die set) from lawn fawn. A small strip of white cardstock was being trimmed and the sentiment “congrats grad” from Simon says stamp (hats off grad) was being stamped on it with versafine Onyx Black ink. It was placed in the middle of the black cardstock. Then “you’re one” and “smart cookie” was stamped on the top and bottom of the black cardstock respectively. Those were the sentiments from the lawn fawn smart cookie stamp set. After stamping all of these, I positioned that black cardstock paper into the middle of the main cardstock and stuck it with some foam tape.
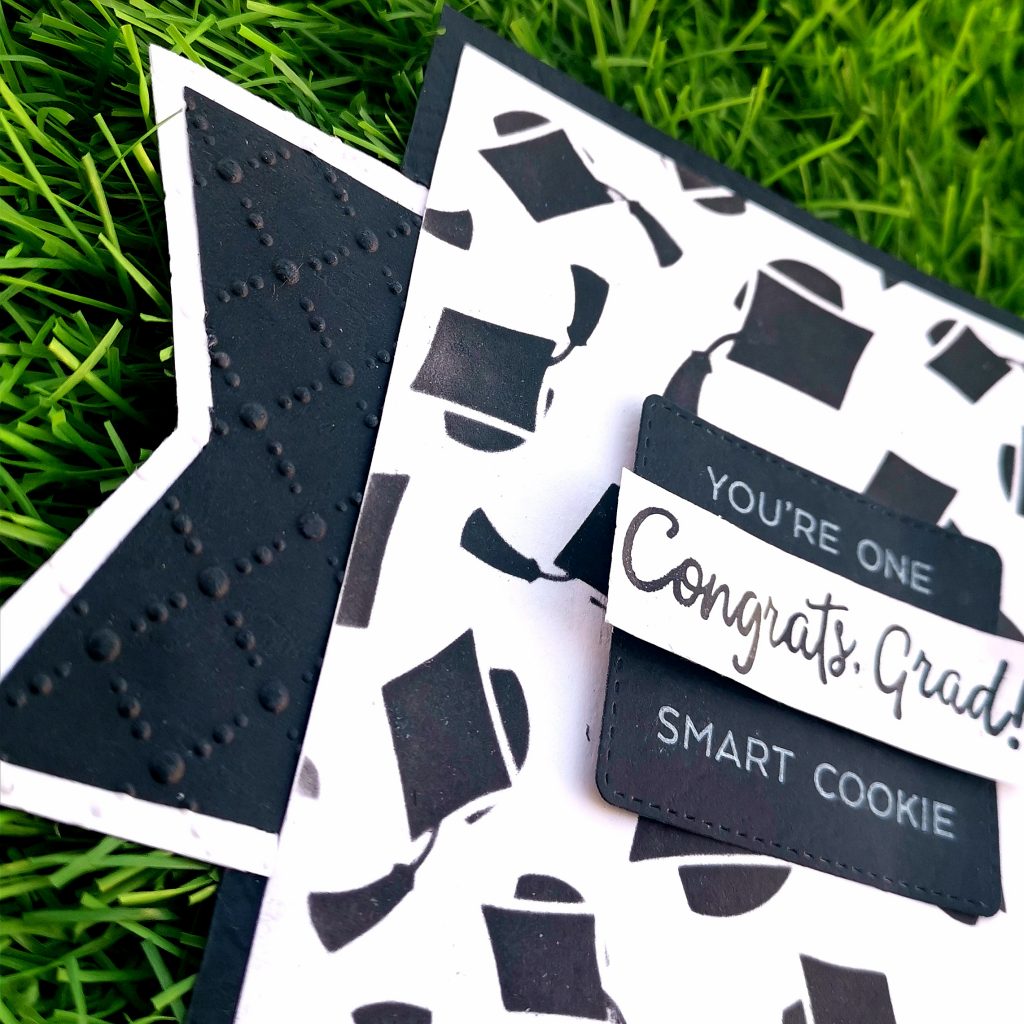
I trimmed 2 irregular polygons out of white cardstock paper and 2 blacks which were just 1/4 inch less than the white ones from all the sides. I stuck the black cardstock paper above the white cardstock. I then got them through my die cutting machine. I embossed it with an embarrassing folder from the sizzix. Then I stuck these 2 parts on the right and left sides of My basic card. As a final step. I trimmed a black cardstock paper into 5 1/4*5 1/4 and placed it behind the white cardstock.
So that’s how I ended up making a Masculine card. I am entering into a challenge from the maleroomcraftchallenge with this card. This week, their challenge was to make a Masculine card with the design below.

I hope I fulfilled their criteria and hope my card qualifies, but either way, I love this card and had a blast making it!
Also, do visit the maleroom craft challenge at https://themaleroomchallengeblog.blogspot.com/2020/06/challenge-138-sketch.html?m=1

For the guys
Alhamdulilah, finally I have reached out to my last assignment of level 1 at the altenew educator certification program. Fingers are crossed for the final project now. Like most of my fellow cardmakers, I always tend to make a feminine greeting card. It’s really rare that I make cards for the guys.
But today I have 2 reasons to make one. First of all, recently I attended a course,” for the guys” at the altenew academy. And I was looking for ideas to make a card with this theme. Secondly, I had a small fight with my hubby, and I think this is the best way to sort it out than sitting around a table talking for hours and finally reaching nowhere. Due to the current lockdown situation, I couldn’t go out shopping to get him some flowers. So I decided to inculcate all of this into my card.
As usual, I trimmed a Neenah classic crest solar white cardstock into 4 * 5 1 /4. I stamped a flower from Simon Says Stamp Exclusive 6×8 Stronger Together clear stamp set on the center of my card. As I wanted to give a try on the no borderline coloring, I stamped it with very pale distress ink from Rangers.
I colored the green leafy parts of it with the forest glades artistic marker from Altenew. For the red, I choose Ruby red artistic markers. The same markers were used throughout the making of the card. In order to get the darker shade of the same color, I colored over it again in certain areas of the flower. I gave an outline to the flower with the fine tip of my artistic markers.
I choose a sentiment from the versatile vases from Altenew and stamped it with Ruby Red crisp die ink. It was stamped towards the lower center of the card, just below the flower. To get a finished look, I trimmed a green cardstock paper into 4 1/4*5 1/2 sized cardstock and stuck it behind my white cardstock.
I gave it to him when he was back from the office. I was really delighted to see his reaction. Everything was worth the effort and time I took for making it. He said he loved it so much and would cherish it forever. Especially the sentiment, It made him realize that he was still on my thoughts even if we had a tough time. I don’t know if this could be considered as a masculine card, but I’m glad that it fulfilled my purpose.
I hope this method of making a simple Masculine card will turn out to be a inspiration for you too. Do give it a try to learn this course at https://altenew.com/products/for-the-guys. I hope to see you all soon with another project from AECP. Until then happy stamping and thanks for stopping by!
-shahi
Landscape card
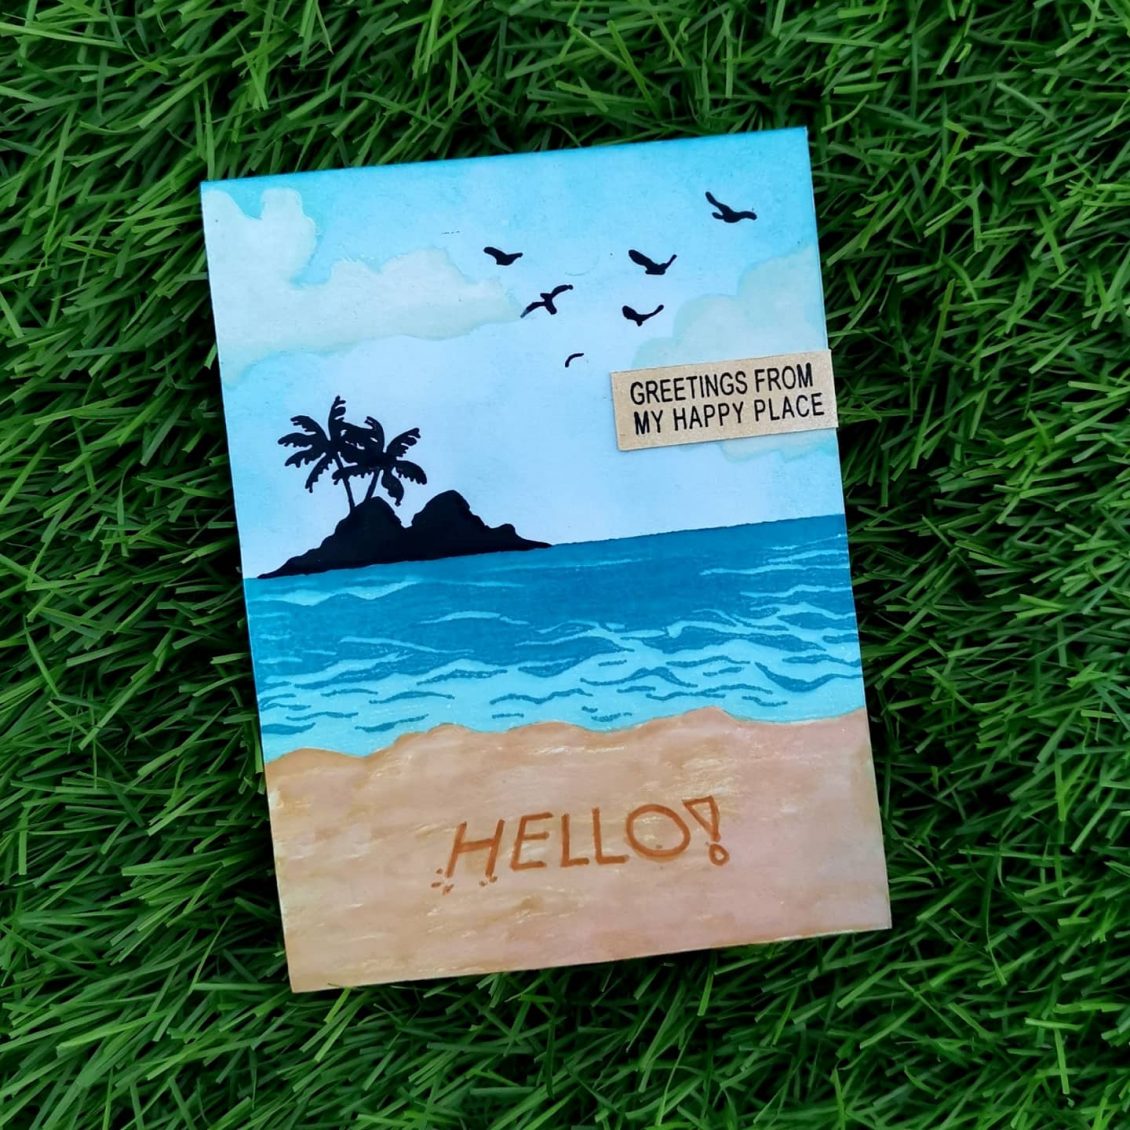
Entering into the 137th challenge at @themaleroomcraftchallenge
The challenge theme is landscapes.
As usual, it’s a 4 1/4 *5 1/2 Neenah classic crest Solar white cardstock. For stamping the image, I choose color layering waves and color layering sea and sky from heroarts. This is one of my favorite stamp set which hero arts have produced so far.
I have used my mini distress ink pads from Ranger for ink blending and my crisp die ink from Altenew.
To join the challenge:
https://themaleroomchallengeblog.blogspot.com/2020/05/challenge-137-landscapes.html?m=1

Irresistible Inking Techniques
Hi, welcome back to a new blog. Hope you all are doing great.
Today’s blog is based on the Irresistible Inking Techniques taught by Sara Nauman at Altenew academy. This course helps us to stretch the purpose of our ink pads! It teaches us how to give new life to them by thinking outside the box. I never used my stamps for anything else other than stamping or ink Blending. So literally this course made me do things outside the box.
This is the first time I’m trying to color something with watercolor brushes. So eagerly waiting for your opinions and suggestions.
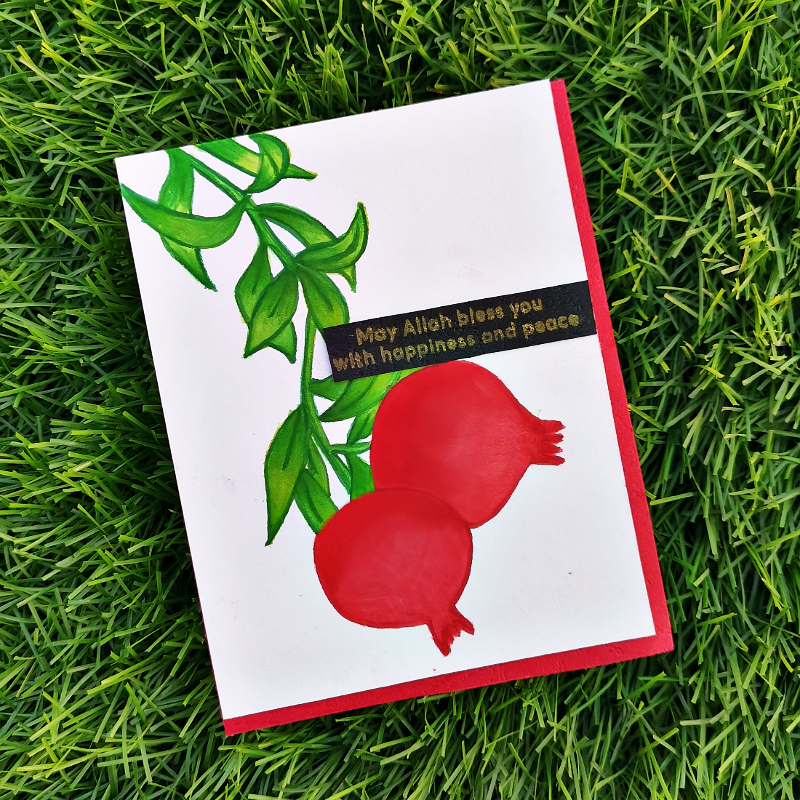
I took Neenah classic white cardstock and trimmed it into 4*5 1/4. I decided to use Happy pomegranates from Altenew for this project. I stamped the green leafy parts of the picture with just green altenew crisp die ink. And the red pomegranate parts with the heart beat crisp die ink from Altenew. Then I stamped these inks on my Altenew Watercolor Palette. Its light-colored surface ensures an accurate representation of our ink color and is smooth and sturdy. It’s perfect for our artistic needs, especially for the ones who play with colors.
I painted the pomegranates with these colors using a watercolor brush. I used the fine tip brush to paint the border and filled the inside part with a size medium watercolor brush. The tip retains its shape allowing for both broad strokes and fine detail work. I was really nervous about the coloring part, as this is my first painting with the watercolor brushes.
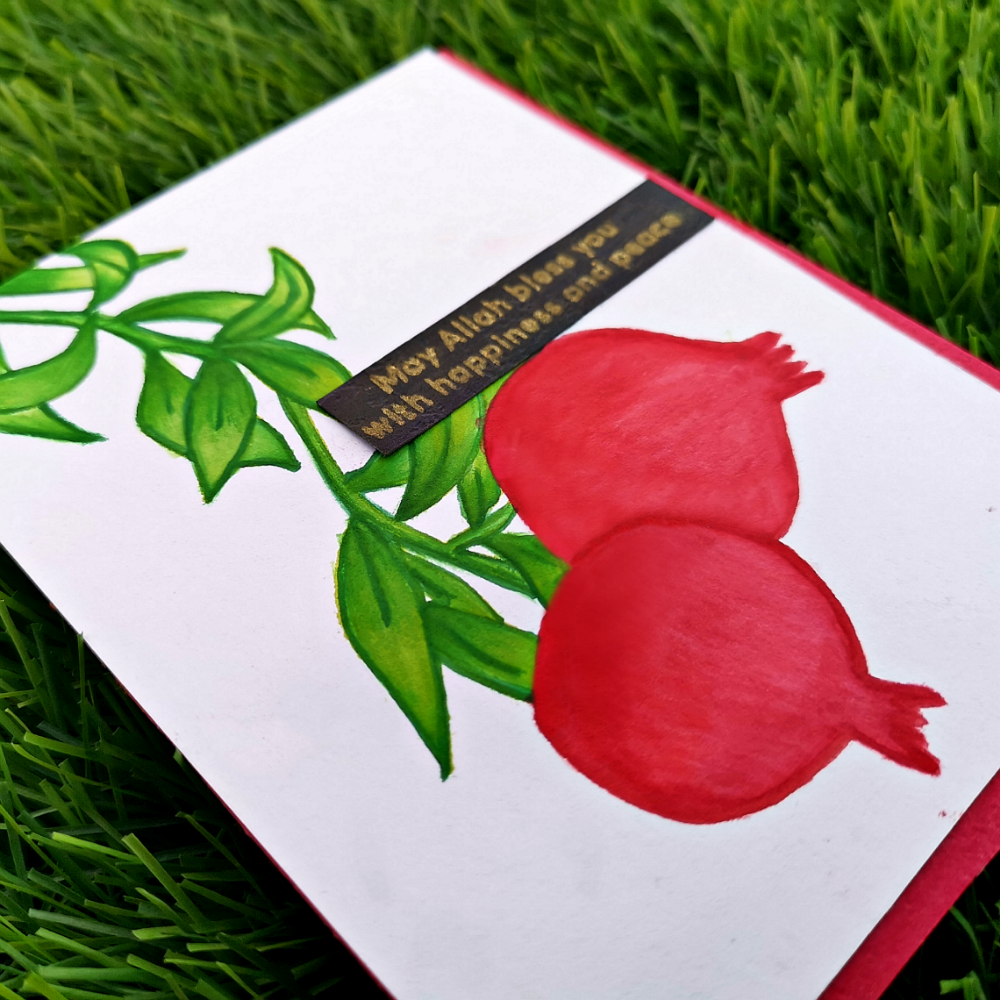
Ones the painting is dried, I trimmed a strip from the black cardstock and stamped out the sentiment from Mudra “Islamic festive” stamp set. I stamped it again with versa fine ink. And heat embossed it with Wow gold embossing powder. That trimmed sentiment strip was placed on the right middle corner of the card. I also trimmed a red cardstock paper into 4 1/4*5 1/2 and placed it behind the white one. This time I positioned it towards the lower right side of the card. So that the red color is focused on a single side of the card.
I hope this method will turn out to be an inspiration for you too. Do give it a try to learn this course at https://altenew.com/products/irresistible-inking-techniques
I hope to see you all soon with another project from AECP. Until then happy stamping and thanks for stopping by!
-shahi
Celebration: Stencil Techniques
Hi friends, I hope you all are doing good. Stay home. Stay safe.
Like many others, even I’m stuck out of my country. Wondering when I can go back. I’m definitely missing my craft room and my private crafty space. I just came done to meet my parents and got stuck here. But there is always good about getting stuck in your parents’ house, especially after marriage. I used to miss this place so badly.
Alhamdulilah somehow I could manage to get some of my basic craft items from my apartment. ( It was a real tough job. But I couldn’t stop myself from crafting.)
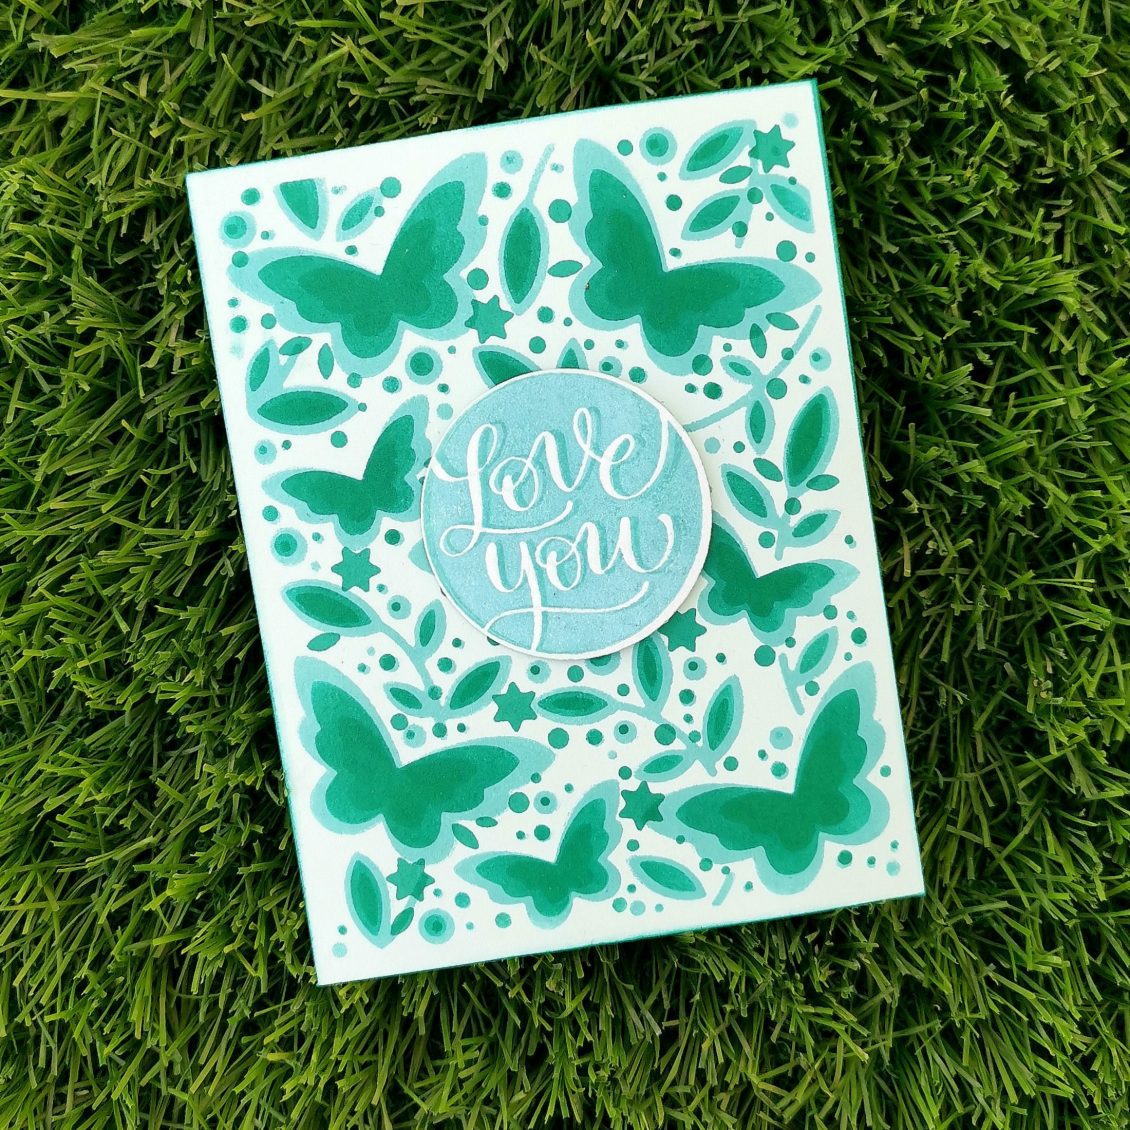
So coming to the point, today’s blog post is exclusively about how I ended up making a stencil of my own to make a beautiful card. Celebration: Stencil Techniques, is something which I learned from my Altenew educators certification program. Laurel Beard has explained things very well.
For this project, I decided to make a DIY stencil using Birch press butterfly garden layering dies.
This layering set consists of Layers A, B, and C. I die cut all the 3 layers on different cardstocks and used them as my stencils. I used thicker card stock paper while creating my own stencil so that it could be used multiple times.
After placing each die-cut layer on my cardstock, I did my first layer with Lagoon crisp die ink from Altenew and the second one with emerald. I didn’t want my third layer to stand out much from the other two shades. Instead, I wanted a soft color which is just a bit darker than my second shade. That’s how I ended up with my emerald crisp die ink again for my final layer.
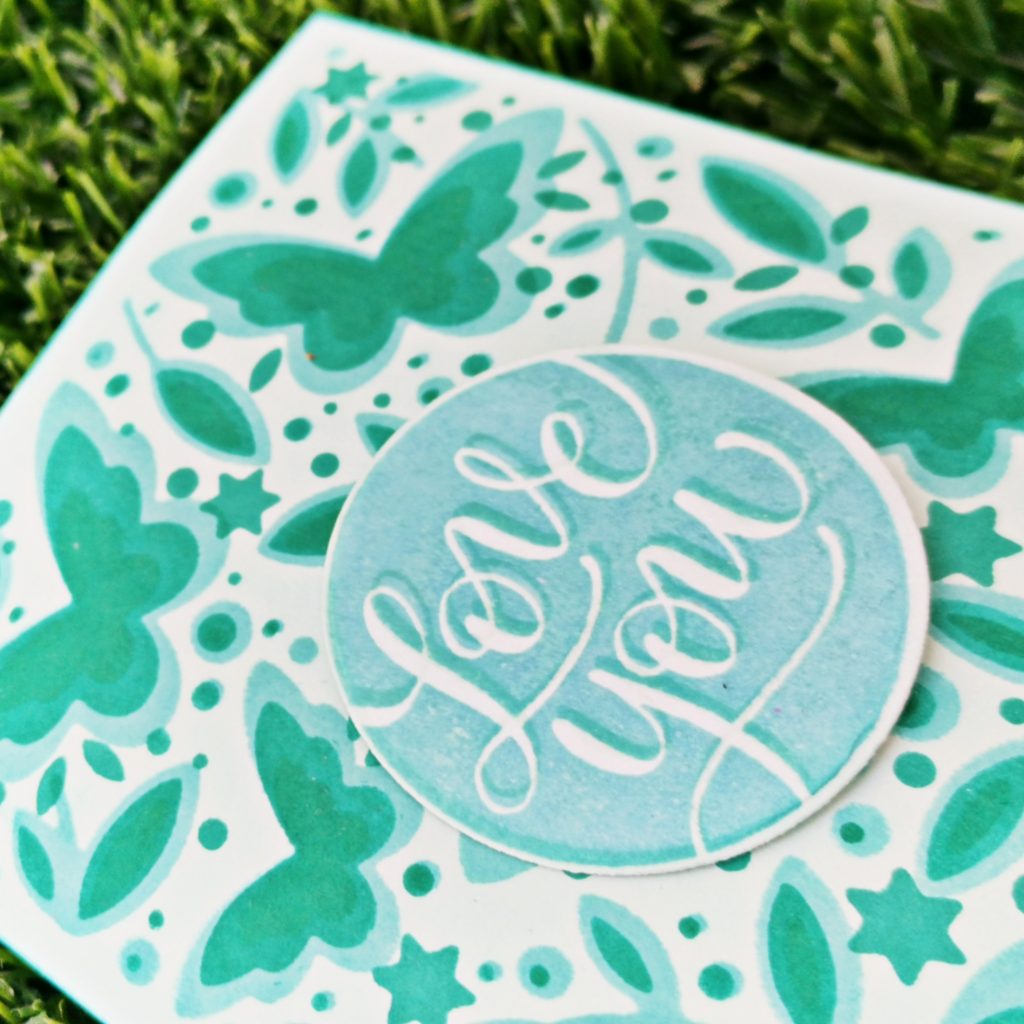
The layers by themselves looked really cool but it makes our card incomplete. So I added a sentiment “Love you” from Simon Says Stamps Love and valentines word mix set. I stamped it with altenew volcano lake crisp die ink and unicorn white pigment ink from hero arts. I just slightly changed the position when I stamped the second layer. Even though it was a small one, it brings a lot of difference to the look of the card. I was wondering if I ended up making a monochromic card. But I am fine. Because it is not something which I do often. I die cut the sentiment with its coordinating dies and stuck it with a piece of foam tape at the center of the card.
And here it goes…
The card is ready. Isn’t it so simple?
I hope this method will turn out to be an inspiration for you too. Do give it a try to learn this course at https://altenew.com/products/celebration-stencil-techniques?_pos=1&_sid=a8928335c&_ss=r
I hope to see you all soon with another project from AECP. Until then happy stamping and thanks for stopping by!
-shahi
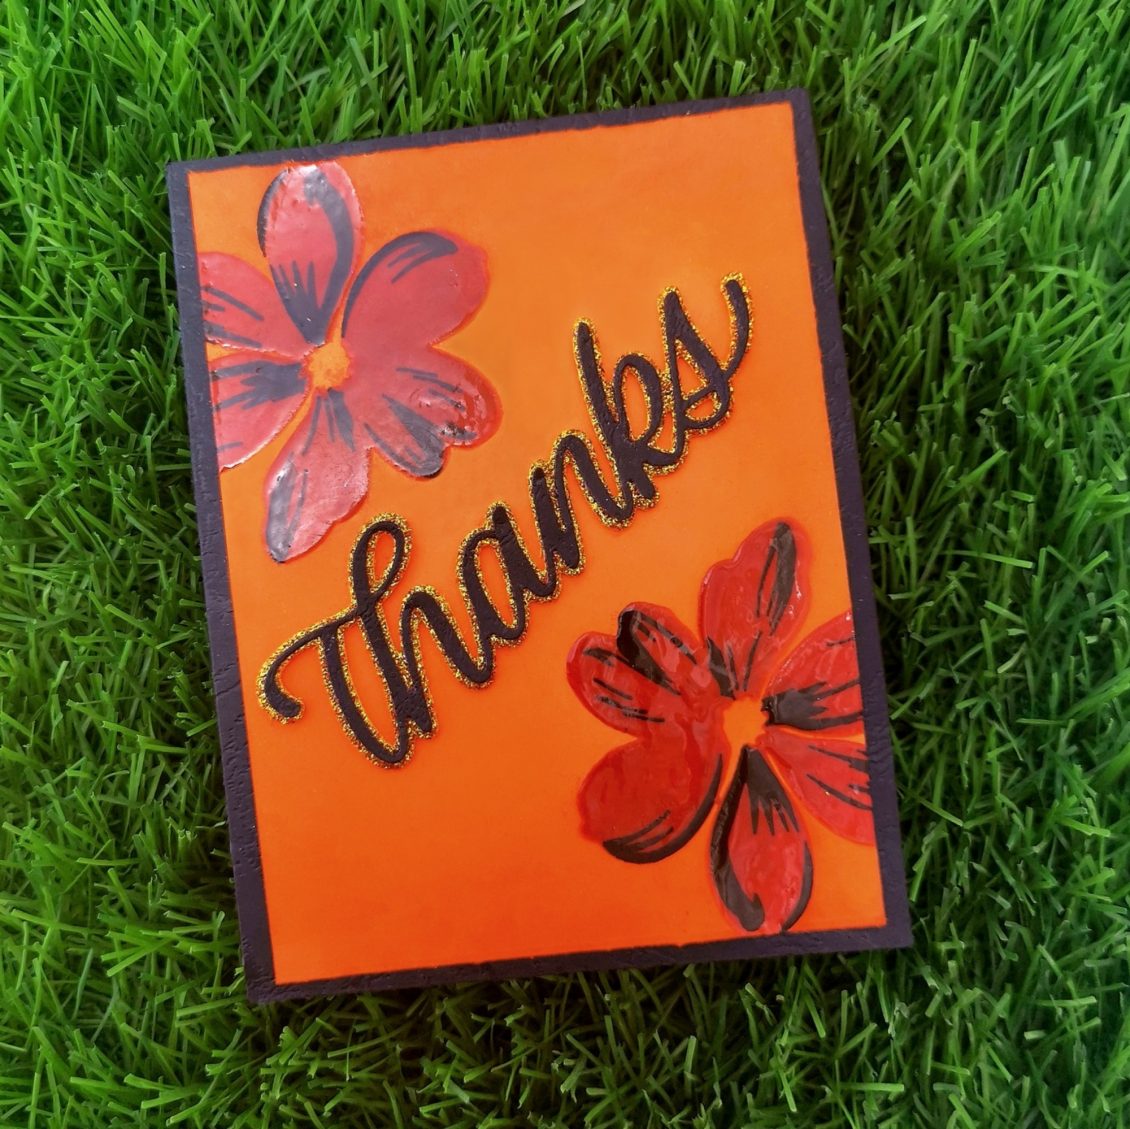
Let it shine
As I complete my projects one by one, of level 1, it’s getting real fun at the Altenew educator certification program. My today’s task is to make a card based on the lesson, Let it shine. This class literally helped me to determine some of the best ways to add shine to my projects and WOW others!
I trimmed a black card stock into 4 1/45 1/2. And placed an orange card stock on it. As it was about the size 3 3/4 *5, there was enough room for the black card stock paper to be seen. I choose the Fabulous Florets Stamp Set from Altenew for this project. So I placed it on my card stock and stamped the top flower with Caramel toffee Altenew crisp die ink and the bottom flower with the Autumn blaze Altenew crisp die ink. The second layer was done with the versafine Onyx black ink.
Then I prepared my card surface with some sort of anti-static powder tool. This fine layer of powder will prevent embossing powder from sticking to areas where you don’t want it to stick. Then I used Versa mark ink. It’s a clear sticky ink that can be used for embossing, or for watermark images. Then I applied some Hero Arts clear embossing powder on my card stock. Embossing powders can make any stamped image shiny and dimensional. And it’s easy to do. There are basic embossing powders, clear and white, that leave a hint of shine.
Here, I choose clear embossing powder as I wanted my flowers to shine in its original color which I have stamped. (Orange and black). Before heat setting the embossing powder, I used a dry brush to sweep away any stray pieces of embossing powder. These little specs will expand as they heat and turn into blobs. Quickly brushing away strays will give you great results every time. I allowed my heat gun to heat up to its hottest point before taking it to the paper. This will minimize the amount of time it takes for the powder to melt and will minimize warping. Once the embossing powder is melted, I moved my heat gun. We should not heat it in one place for too long. Once the grainy appearance goes away, and you see a bit of shine, you’re all set to move on.
I had a sudden change in plan while making my card. In fact, in happens most of the time. I never stick on to my planned project. But, isn’t it good? Because you end up making things better. Here I decided to softly blend the corners of the card with the same dieink with which I stamped my flowers at the start of my project.
For the sentiment, I decided to choose the Simon Says Stamp BIG THANKS Shadow Wafer Dies. I die cut the glitter card stock with the base wafer dies using my die cutting machine and the black card stock with the thin front wafer dies. It’s was positioned and stuck in the middle of the card.
Isn’t it so simple. I hope this method will turn out to be an inspiration for you too. Do give it a try to learn this course at https://altenew.com/products/let-it-shine I hope to see you all soon with another project from AECP. Until then, happy stamping and thanks for stopping by!
-shahi
 CASE your fellow AECP Crafter
  Clean & Simple Boutique Cards
  Easy Die Cutting Techniques
  Graduation card
  Let it shine
Recent Comments