Tag: AECP
AECP: Progressive Cardmaking
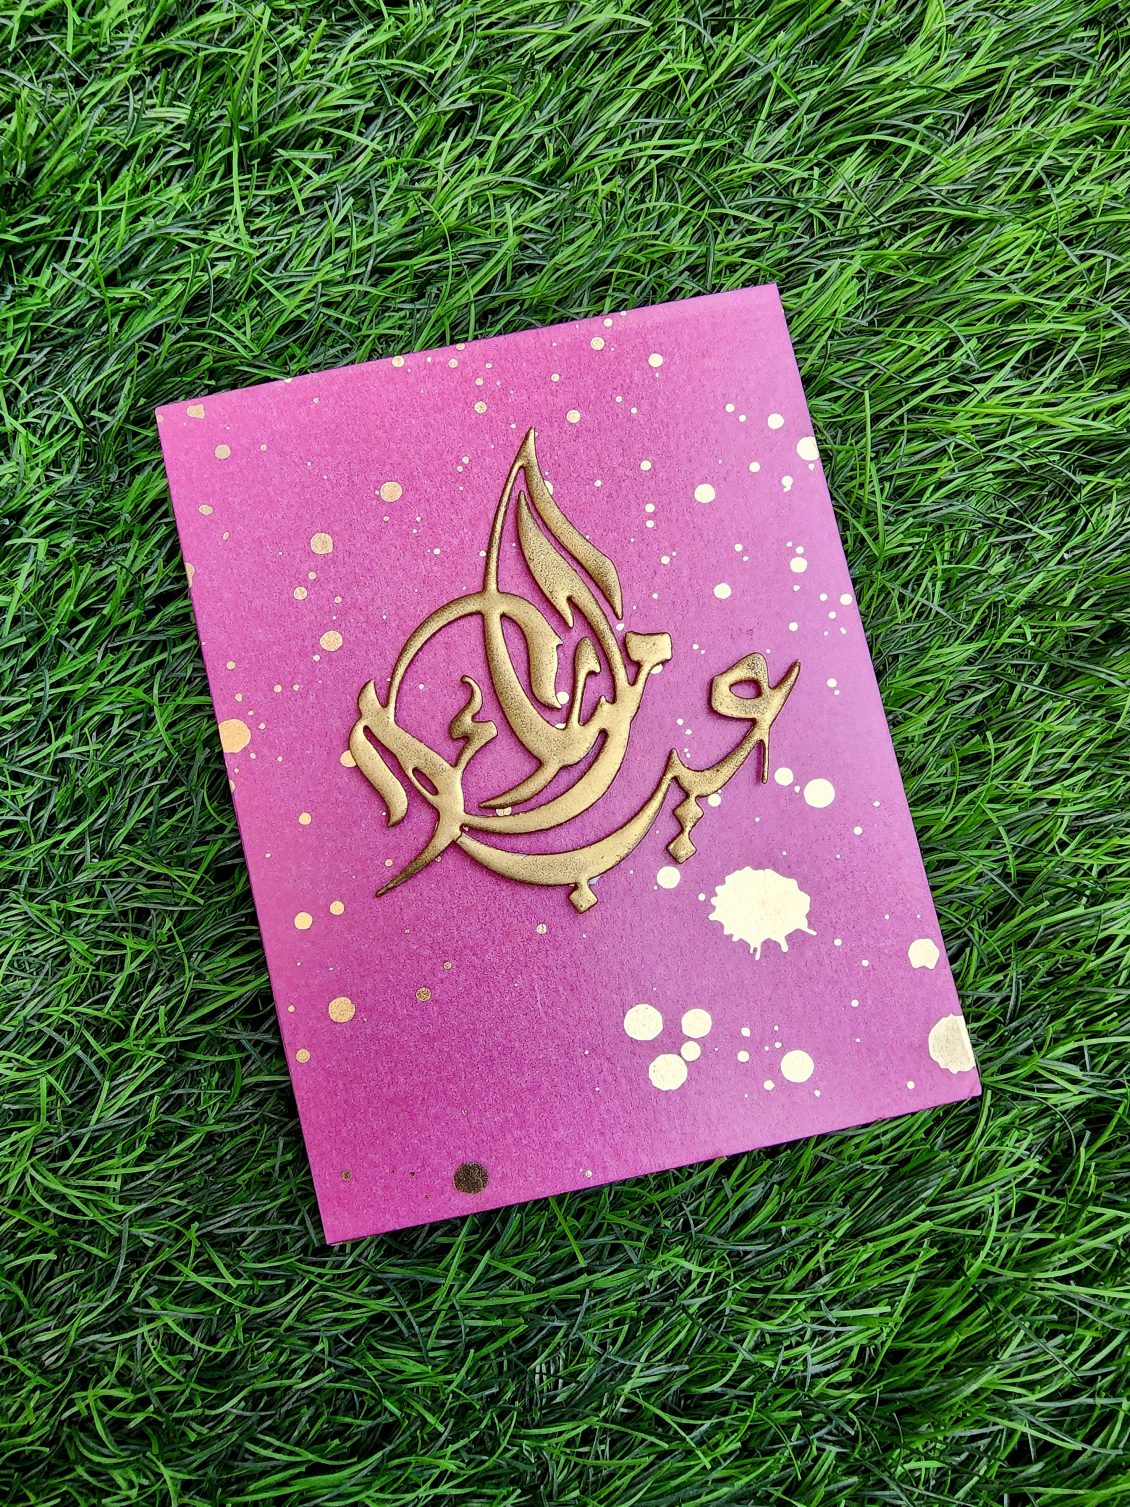
Today I am here with a work based on my latest Altenew Academy class – Progressive Cardmaking with Justine Hovey . I am inculcating 2 of her techniques for my card. The washi tape technique for the background and the Embossing technique for the Sentiment. Trust me, this is one of the most simple and elegant card you can make.
INSTRUCTIONS
- Create a 4 ¼” x 5 ½” card base from Classic Crest Solar White Cardstock.
- Stick Gold Splatter Cosmic Berry Wide Washi Tape over it
- Take a piece of Classic Crest Solar White Cardstock, place Eid Mubarak Die over it and run it through the die cutting machine.
- Brush the die cut image with antistatic powder tool.
- Apply the embossing ink over the top and Cover it with the embossing powder and heat emboss it with a heat gun.
- Stick it to the center of the card using double sided foam tape
SUPPLIES
- Antique Gold Crisp Embossing Powder
- Eid Mubarak Die
- Anti static powder tool
- Heat Gun
- Double sided foam tape.
- VersaMark Watermark stamp pad
- Gold Splatter Cosmic Berry Wide Washi Tape
- Classic Crest Solar White Cardstock.
- Sizzix big shot die cutting machine
TIPS
- Use anti-static powder tool to prevent embossing powder from sticking to unwanted areas while we stamp the image with Versamark
- Point the heat gun straight down to the paper without a slanted angle this way the onset embossing powder will not be blown away leaving you with a sloshy embossed image
- Add extra layers of embossing powder and melt after each layer to get a smooth look.
- Touch it only after few minutes after heating the die cut sentiment or else you can get your finger prints get melted into it .
- Wrap the tape around the paper for extra strength and to ensure that the washi stays in place over time.
Thank You!
Hope you liked my card. Have a wonderful day and I hope to see you all soon with another project from AECP. Until then happy stamping and thanks for stopping by! If you like what you’ve seen from me, please give me a follow over on my Instagram (@shahicreationz) and/or subscribing to my vlog and YouTube if you haven’t already.
-shahi

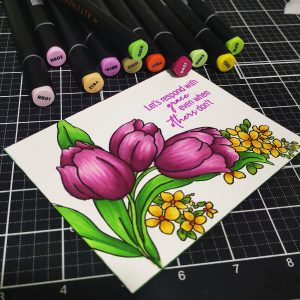
AECP :Creative coloring with artistic markers
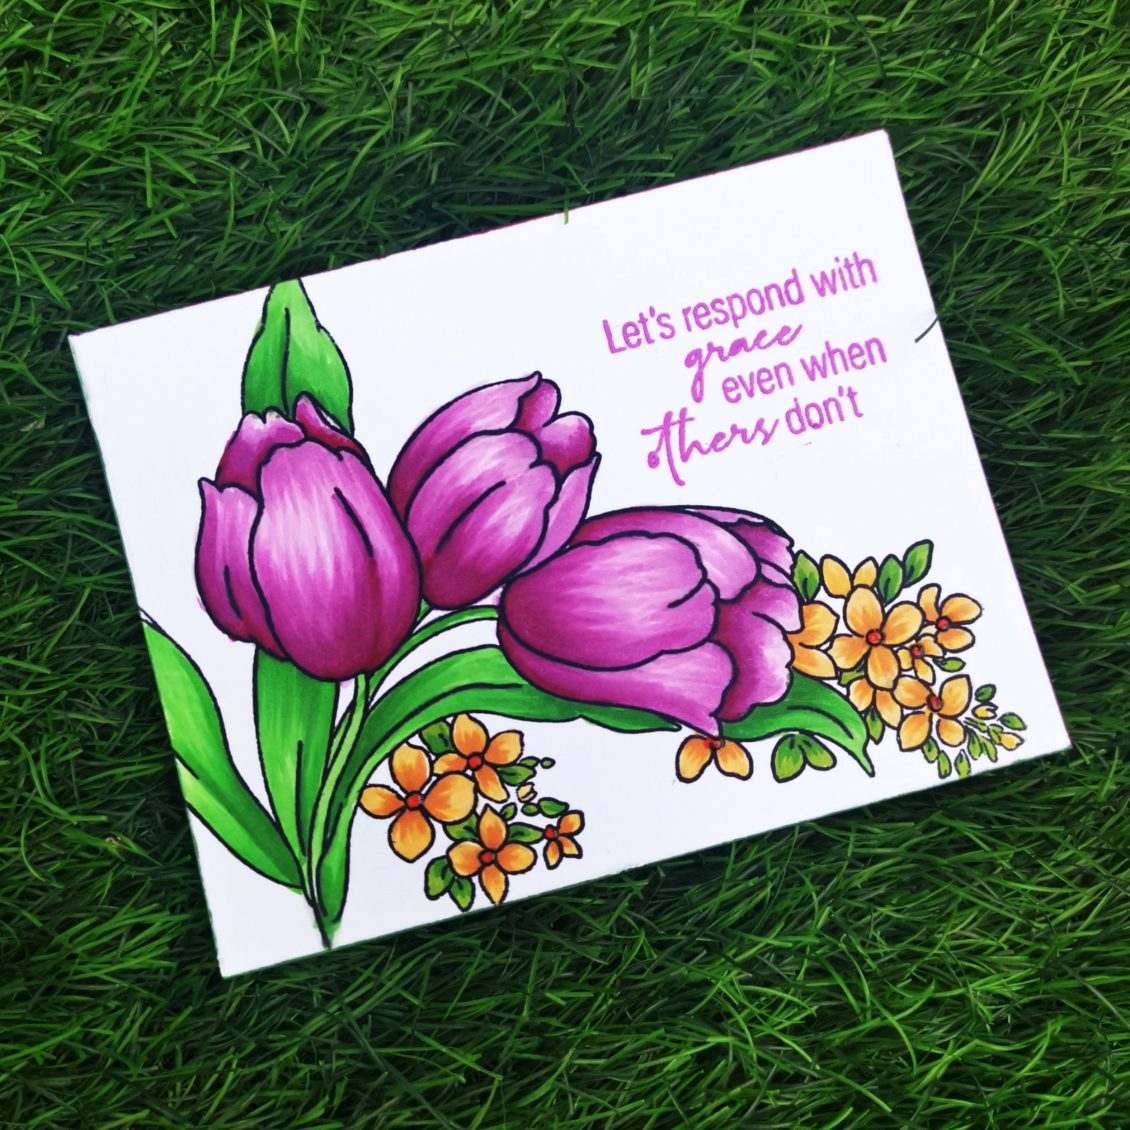
My today’s card is based on the class, Creative coloring with artistic markers by Mindy Baxter.
In this class, you will learn creative tips and techniques to add stunning colors to your stamped images and create gorgeous cards.
INSTRUCTIONS
- Create a 4 ¼” x 5 ½” card base from Classic Crest Solar White Cardstock.
- Stamp image from Build-A-Garden: Tulips & Friends Stamp set onto a piece of Classic Crest Solar White Cardstock using Obsidian Ink.
- Color stamped image using Artistic Markers.
- The tulips are colored using Rose Quartz Artist Alcohol Marker, Puffy Heart Artist Alcohol Marker, Purple Wine Artist Alcohol Marker and Pinkalicious Artist Alcohol Marker.
- The leaves are colored using Grass Field Artist Alcohol Markers , Shadow Creek Artist Alcohol Markers and Firebrick Artist Alcohol Marker
- Stamp the sentiment from Build-A-Garden: Magnificent Branch Outline Stamp Set with Coral Berry Crisp Dye Ink
SUPPLIES
- Rose Quartz Artist Alcohol Markers R601
- Puffy Heart Artist Alcohol Markers R603
- Purple Wine Artist Alcohol Markers R614
- Pinkalicious Artist Alcohol Markers R504
- Firefly Artist Alcohol Markers G503
- Grass Field Artist Alcohol Markers G515
- Shadow Creek Artist Alcohol Markers G425
- Caramel Toffee Artist Alcohol Markers Y612
- Forest Glades Artist Alcohol Markers G715
- Warm Sunshine Artist Alcohol Markers Y205
- Firebrick Artist Alcohol Markers Y817
- Coral Berry Crisp Dye Ink
Thank You!
Hope you liked my card. Have a wonderful day and I hope to see you all soon with another project from AECP. Until then happy stamping and thanks for stopping by! If you like what you’ve seen from me, please give me a follow over on my Instagram (@shahicreationz) and/or subscribing to my vlog and YouTube if you haven’t already.
-shahi
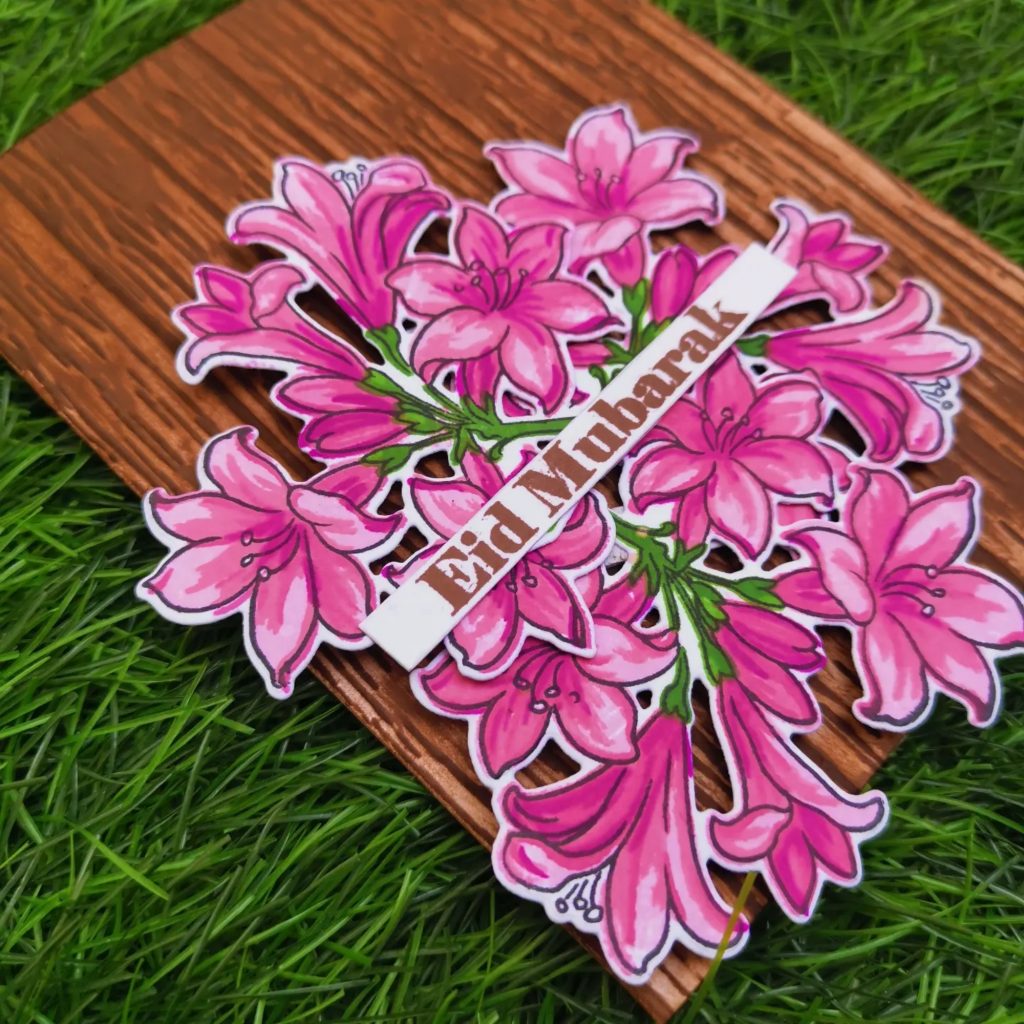
AECP: All About Layering 5
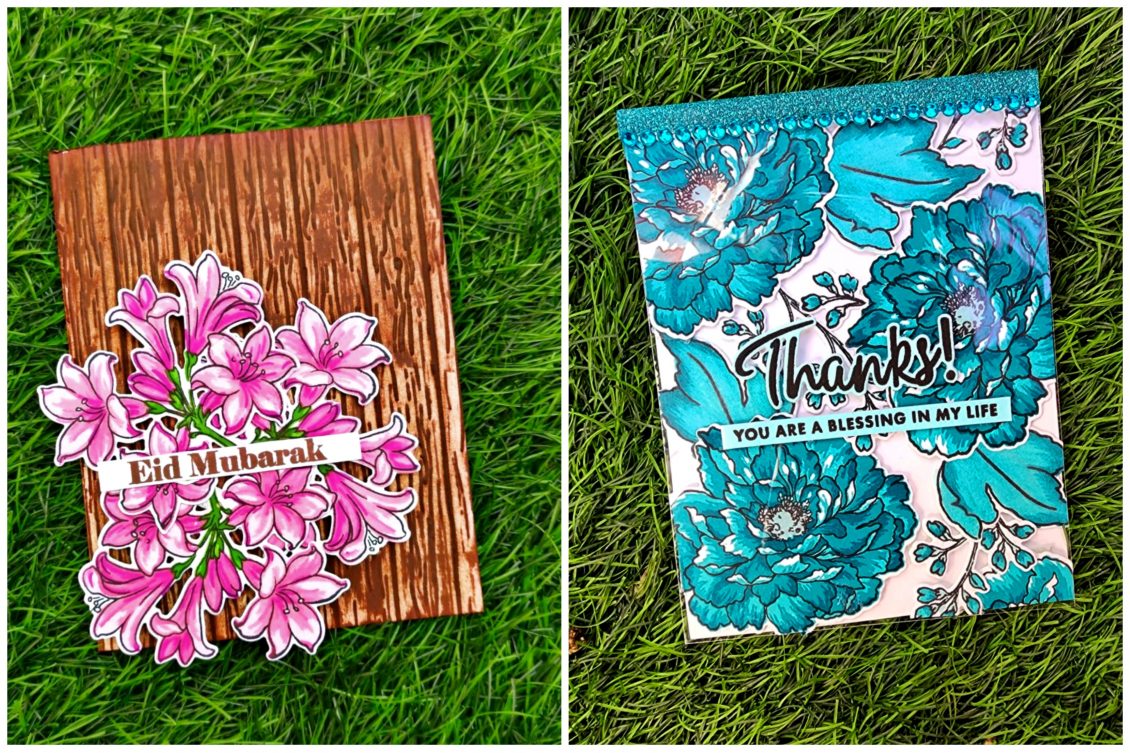
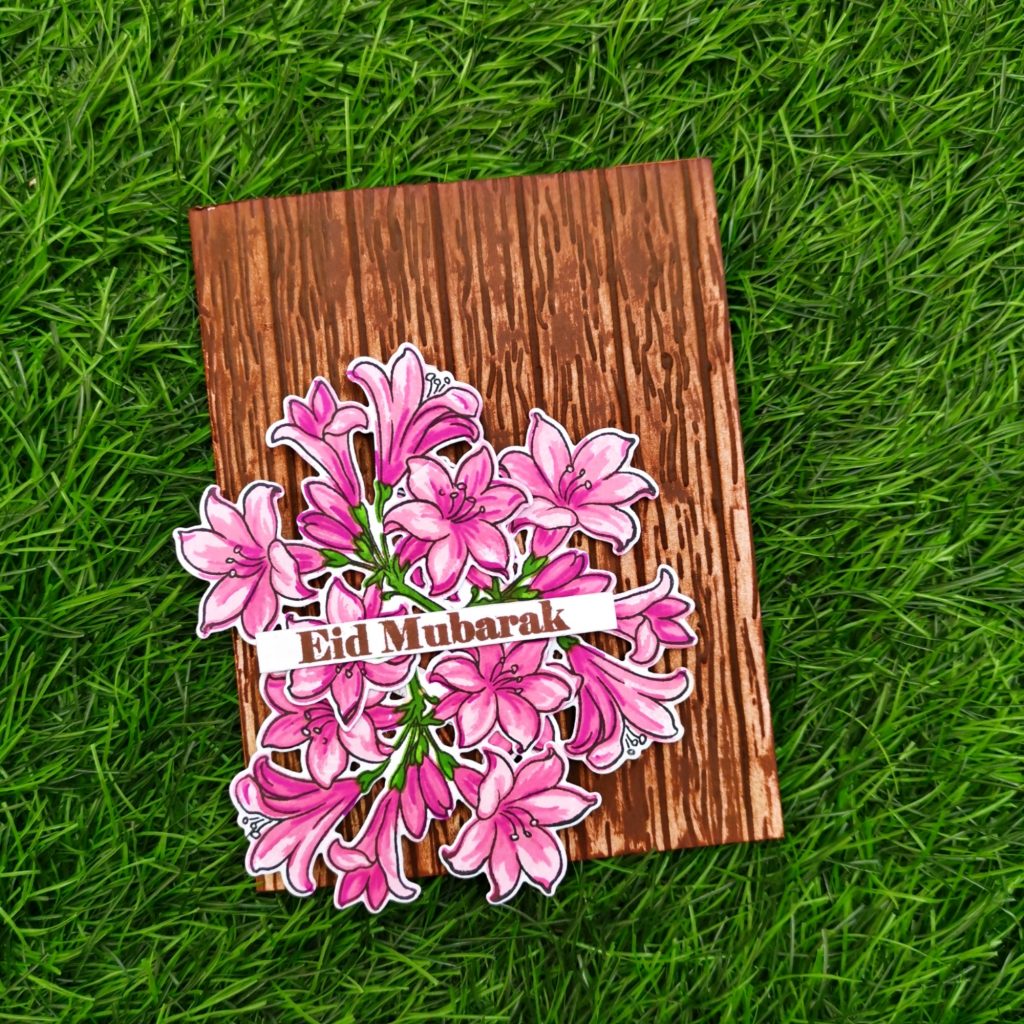
Actually this project was done long back, but unfortunately I was not able to post it. So here it goes…
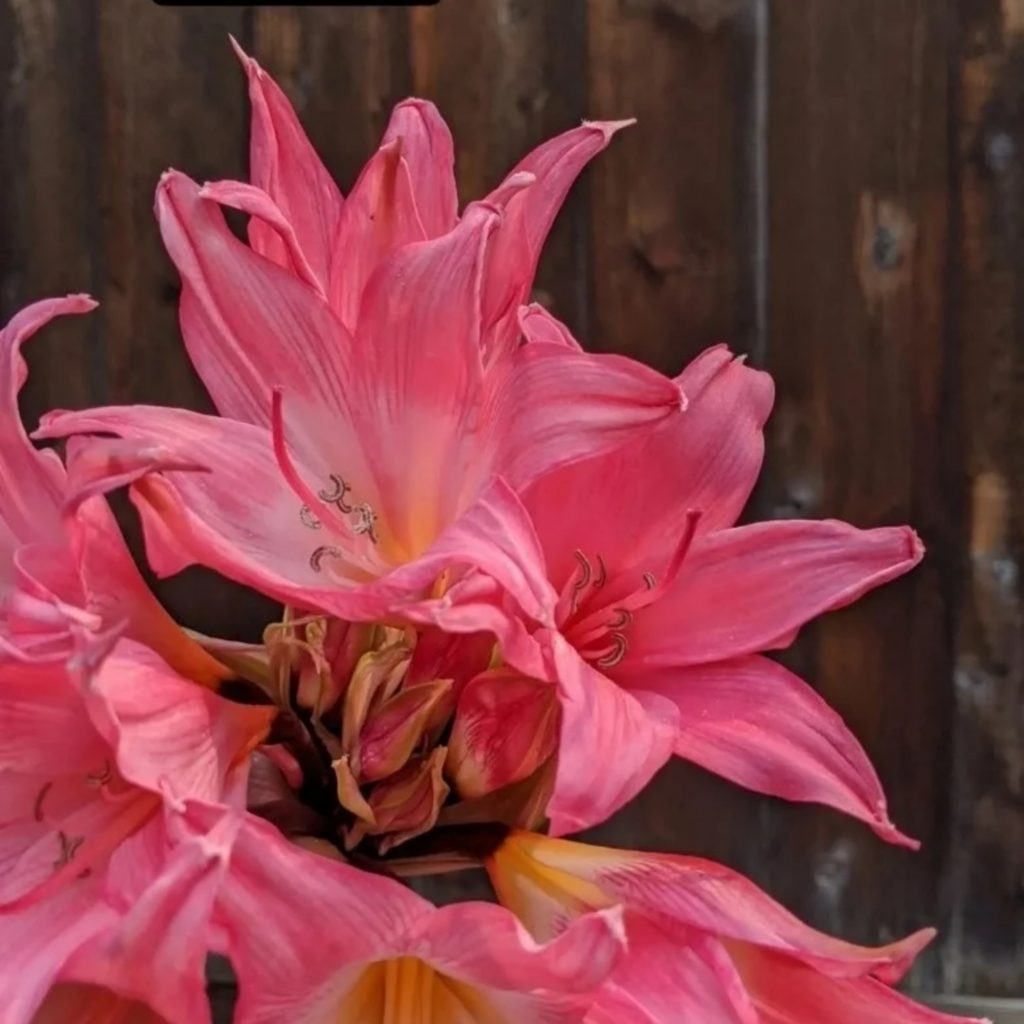
After taking a long break from card making, I am back to do my favorite course, AECP. Few months back, I came across an Instagram story posted by the president and founder of Altenew, Tasneem. She posted a picture of a pink flower and asked the followers to guess the flower. I doubted if it was belladonna lily. Randomly guessed it and she said that it was the correct answer. I was sure that she was working on something special. A special stamp set or an amazing embossing folder, who knows what is going to come up. So I randomly took a screenshot of that story. Months passed by, Ramadan is here and I received my Build a flower subscription for the month of April and it was the same old belladonna lily, I was really excited to hold it as an wonderful stamp set. That’s when I decided to turn my All About Layering card into a dedication to Tasneem. Eid was ahead and belladonna lily being the final BAF stamp set, were the other reason for me to do that. Lydia Evans has done a wonderful job in explaining every detail about layering stamps, methods and techniques etc.
INSTRUCTIONS
- Take the flower stamp from the Build-a-Flower: belladonna lily Set and stamp the outline layer in black Ink onto a piece of white cardstock.
- Then stamp the base layer with Pink Diamond Crisp dye Ink
- The second layer of the stamp will fit around all of the edges of the previously stamped layer, stamp this in Pinkalicious Crisp dye Ink .
- The third layer will fit around the bottom-right edge of the previously stamped layer, stamp this in Rubellite Crisp dye Ink .
- The fourth layer will fit on the top edge of the previous layer, stamp this in Razzleberry Crisp dye Ink .
- Stamp the stems with Grass Field Crisp dye Ink and Shadow Creek Crisp dye Ink
- Die cut 3 bunches of each flower.
- Create a 4 ¼” x 5 ½” card base from Classic Crest Solar White Cardstock.
- Run it through Deck Planks 3D Embossing Folder and shade it with Vintage Photo Distress Ink .
- Arrange and Stick the flowers according to your liking.
- Stamp the Eid sentiment and stick it at the middle of the flower.
SUPPLIES
- Pink Diamond Crisp dye Ink
- Pinkalicious Crisp dye Ink
- Rubellite Crisp dye Ink
- Razzleberry Crisp dye Ink
- Grass Field Crisp dye Ink
- Shadow Creek Crisp dye Ink
- Vintage Photo Distress Ink
- Versafine black pigment ink
- Eid greetings Stamp Set
- Deck Planks 3D Embossing Folder
- Classic Crest Solar White Cardstock.
- Sizzix big shot die cutting machine
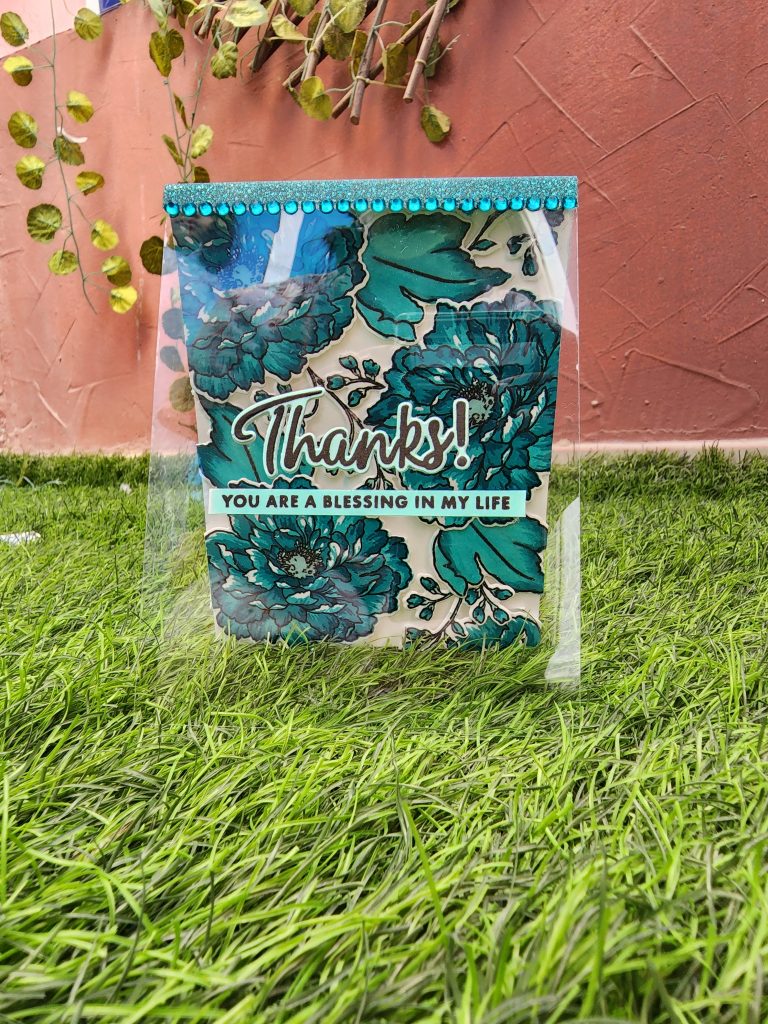
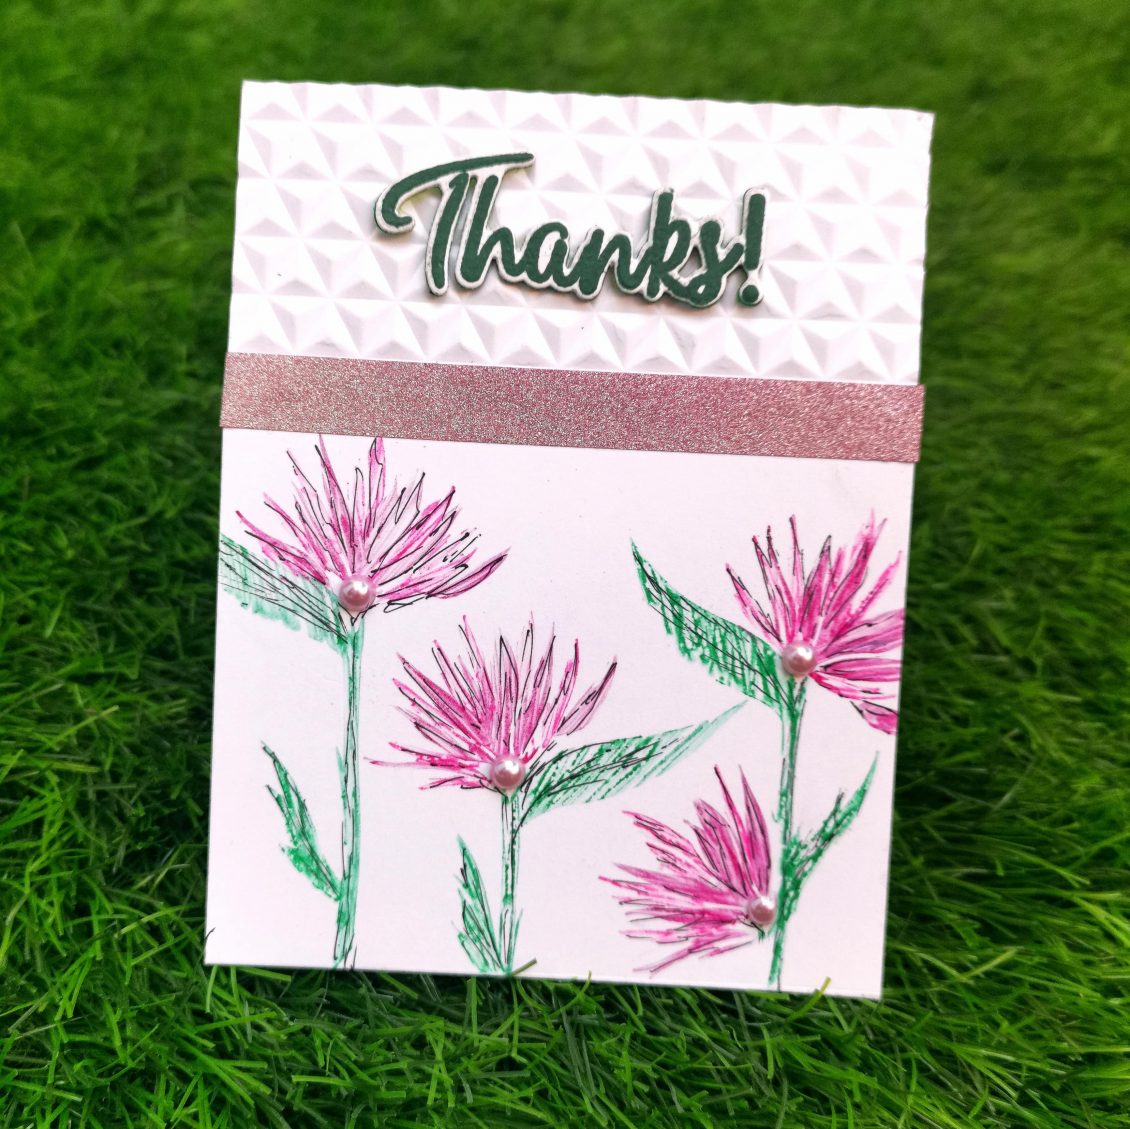
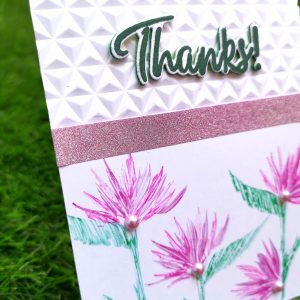
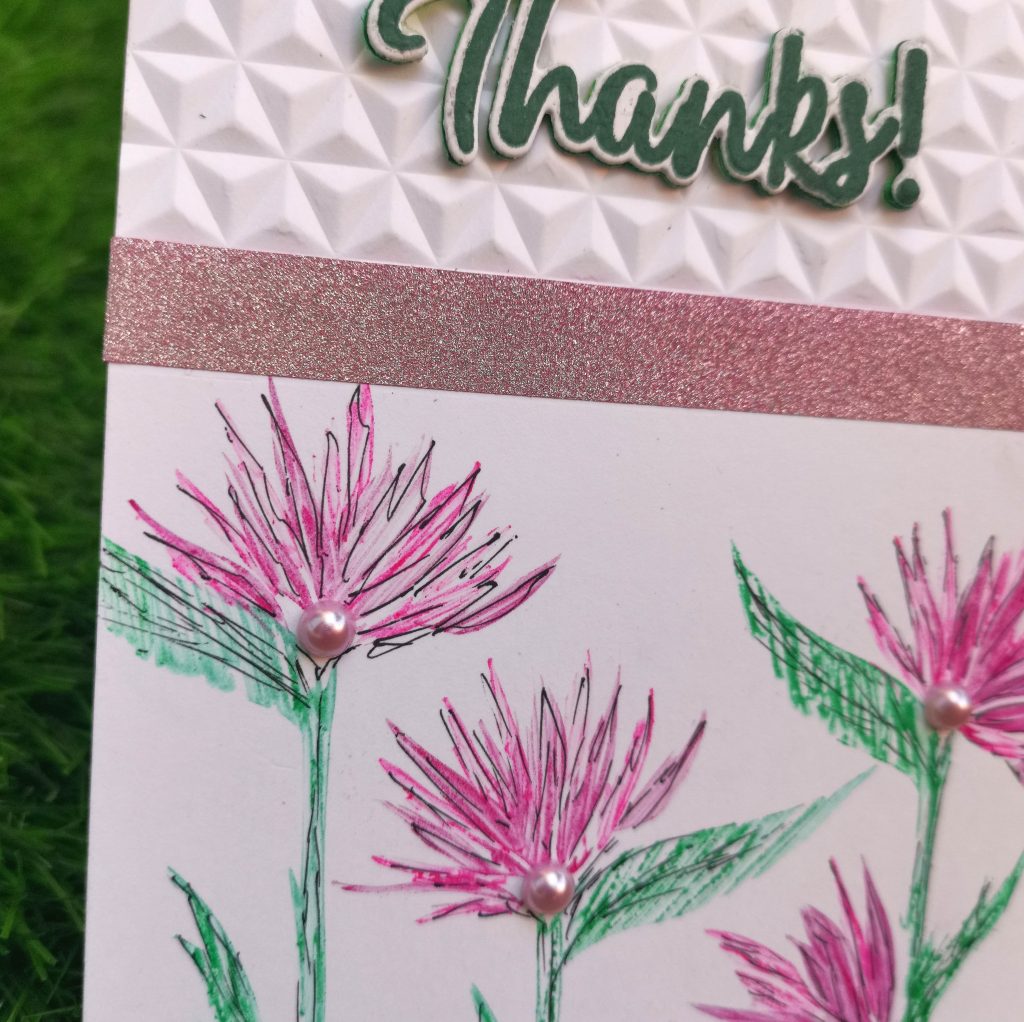
Here is my second take , on this class. I have tried sticking the sentiment to the acetate sheet for this card.
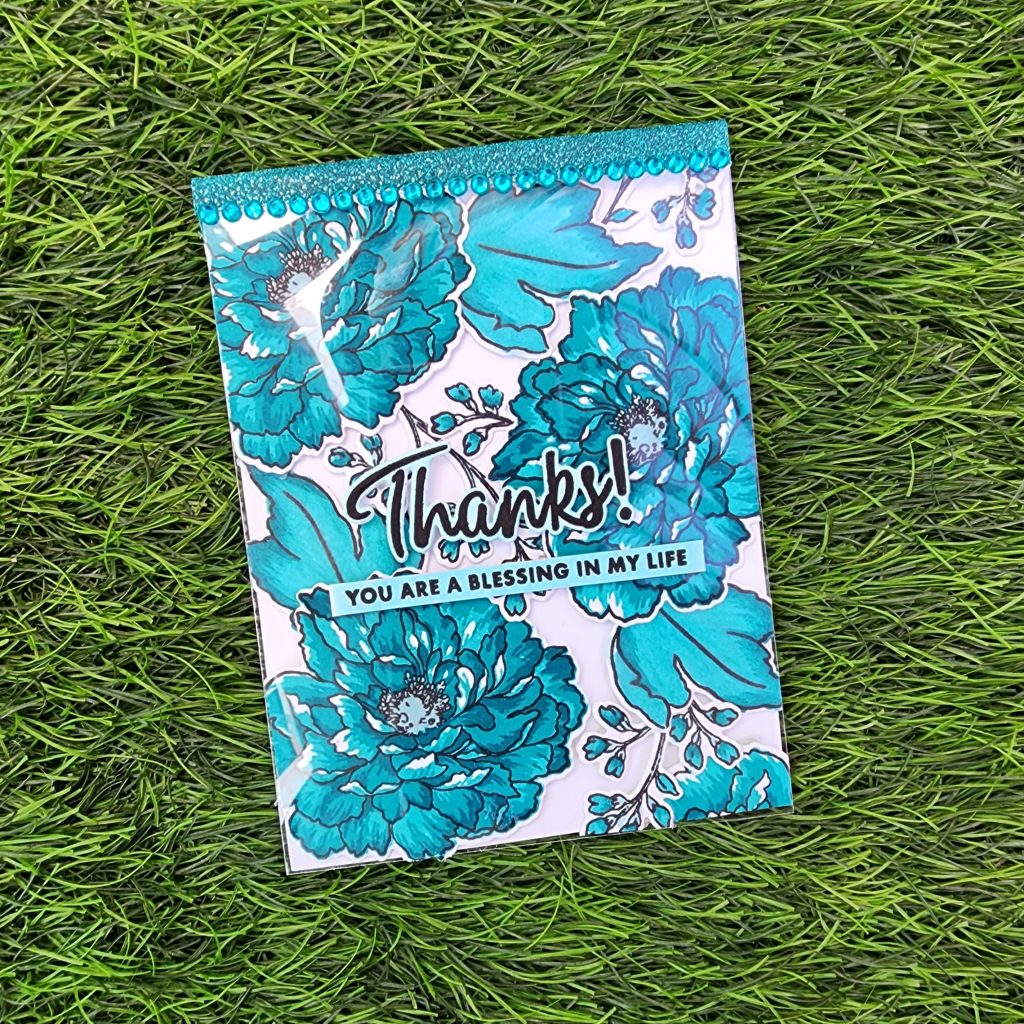
INSTRUCTIONS
- Take the flower stamps from the Build-A-Flower: Tree Peony Layering Stamp Set and stamp the base layer in Dew Drops Crisp dye Ink onto a piece of white cardstock.
- Followed by Aqualicious Crisp dye Ink, Teal Cave Crisp dye Ink ,Galactic Stream Crisp dye Ink respectively.
- Stamp the outline layer of the flower and leaves with versa fine onyx black
- For the leaves, Color it with the similar shades of Artist Alcohol Marker
- Stamp several of these images for the project and use the coordinating dies to die cut them.
- Create a 4 ¼” x 5 ½” card base and set it aside.
- On a 4 ¼” x 5 ½” panel, start arranging the florals and adhere them with foam tape.
- Use glue tape to adhere the leaves.
- Cut off the excess pieces that are going off the edges.
- Take a 4 ¼” x 5 ½” piece of acetate sheet and place it above the card.
- Trim a similar shade of Teal Glitter washi tape and stick it over the Acetate sheet joining the back part of the card.
- Stick a layer of teal gem stones as a border to the washi tape.
- Stamp and Die cut “Thanks” from Halftone Circles Stamp & Die Bundle over a cardstock colored in Dew Drops Crisp dye Ink .
- Stick it on the middle of the acetate sheet.
- Stamp the sentiment from Build a Garden: Tulips & Friends with versa fine onyx black Ink on a thin strip of cardstock colored in Dew Drops Crisp dye Ink. Stick it below the die cut.
SUPPLIES
- Classic Crest Solar White Cardstock.
- Sizzix big shot die cutting machine
- Build-A-Flower: Tree Peony Layering Stamp & Die Set
- Build a Garden: Tulips & Friends
- Halftone Circles Stamp & Die Bundle
- Teal Glitter washi tape
- Acetate sheet
- Versa fine onyx black
- Dew Drops Crisp dye Ink
- Aqualicious Crisp dye Ink
- Teal Cave Crisp dye Ink
- Galactic Stream Crisp dye Ink
- Dew Drops Artist Alcohol Marker
- Aqualicious Artist Alcohol Marker
- Teal Cave Artist Alcohol Marker
- Galactic Stream Artist Alcohol Marker
Thank You!
Hope you liked my card. Have a wonderful day and I hope to see you all soon with another project from AECP. Until then happy stamping and thanks for stopping by! If you like what you’ve seen from me, please give me a follow over on my Instagram (@shahicreationz) and/or subscribing to my vlog and YouTube if you haven’t already.
-shahi
AECP – level 2 Final challenge (Part 1)
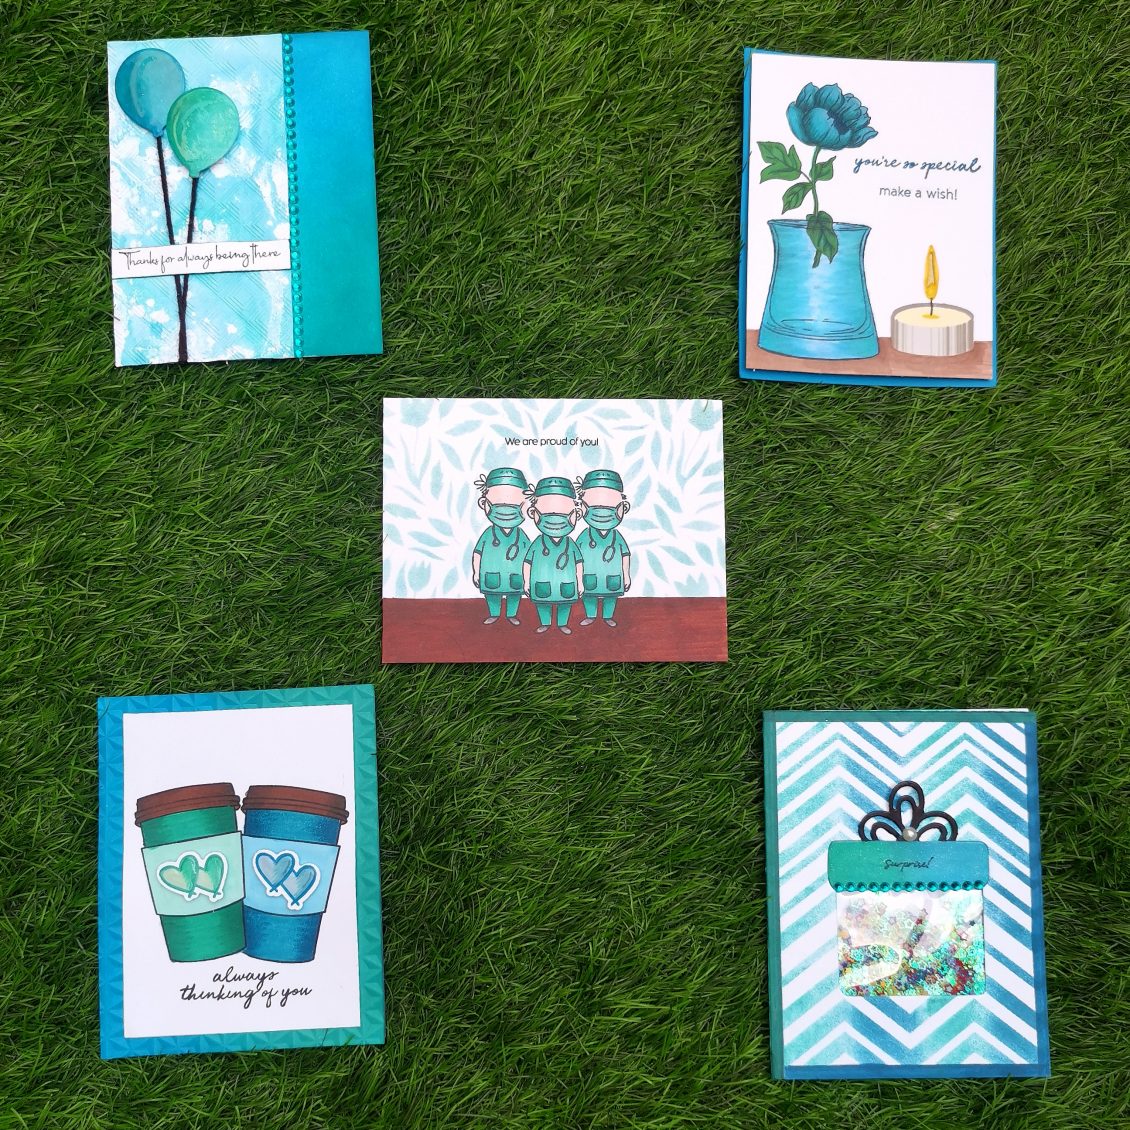
Welcome to this blog post in celebration of my AECP Level 2 Final Challenge. I am so excited to share my projects with you and look forward to your feedback. The final challenge gives AECP Participants the wings to explore and showcase their personal design style as well as use the techniques and tips absorbed during the 20 class curriculum required to reach this level. For my final project, I was asked to create 4 masculine cards with the themes of love/thinking of you, encouragement, anniversary and birthday using any 3 components from the classes in Level 1 or 2. As well as an altered item/upcycled, project.
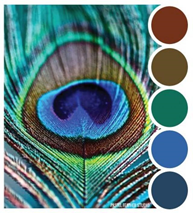
As a part of basic planning, i decided to set a theme for my masculine card sets. For that, I decided to use a peacock theme to organize my color pallet and designs.
Here, i am planning to introduce the cards according to their theme, and they are as follows:
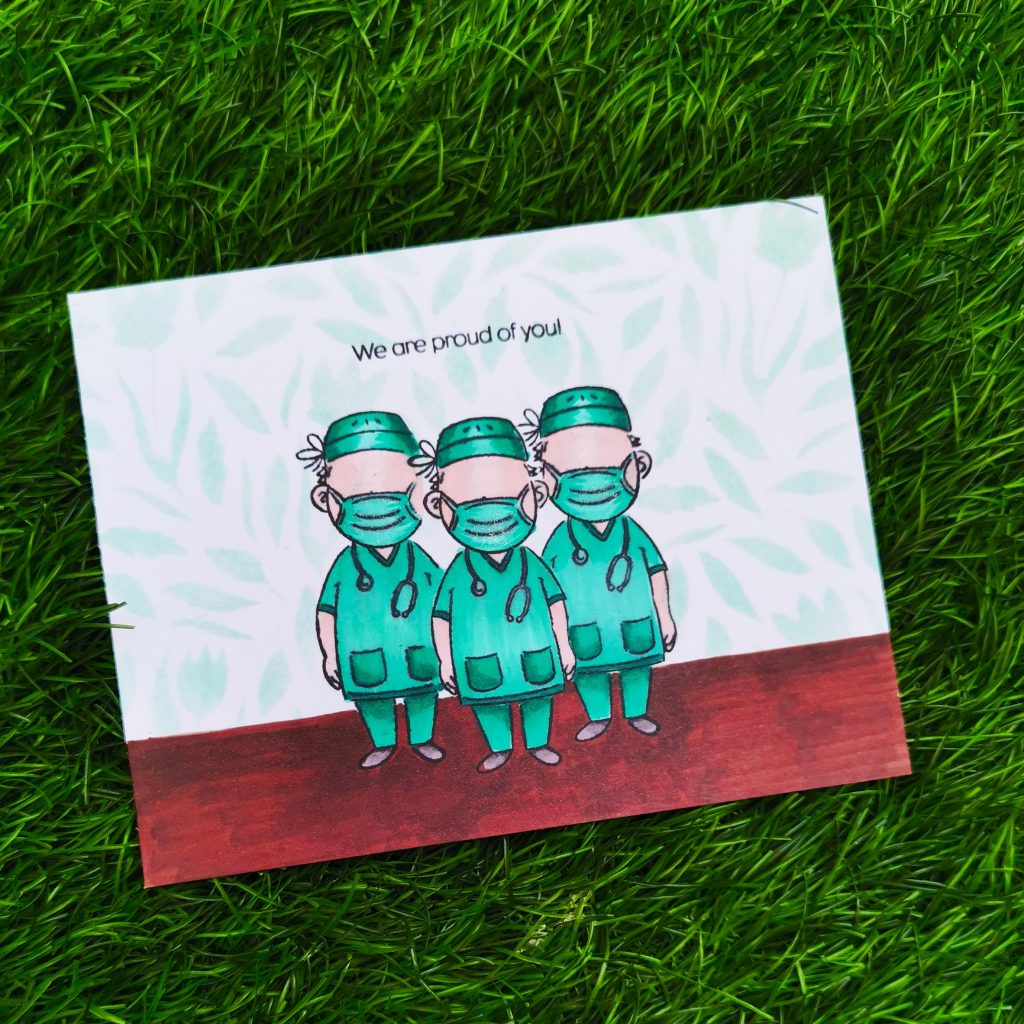
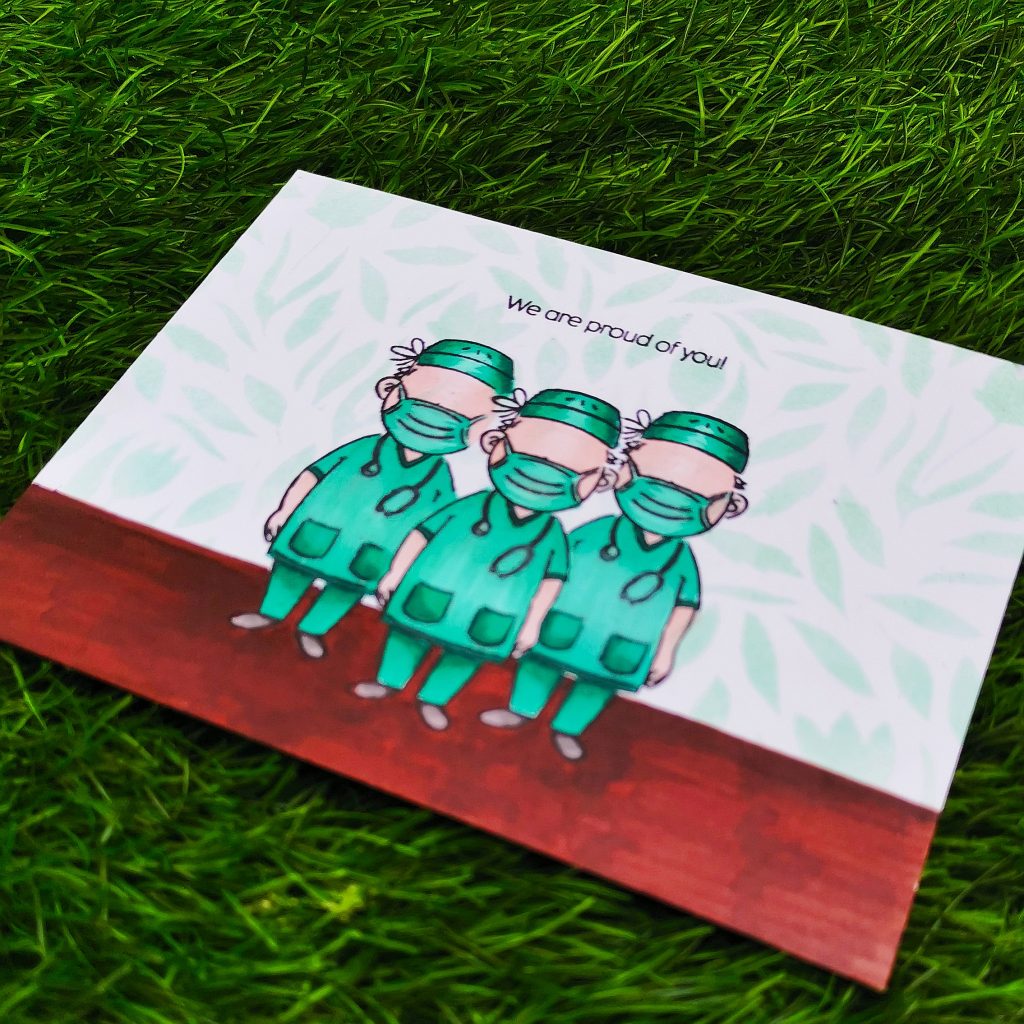
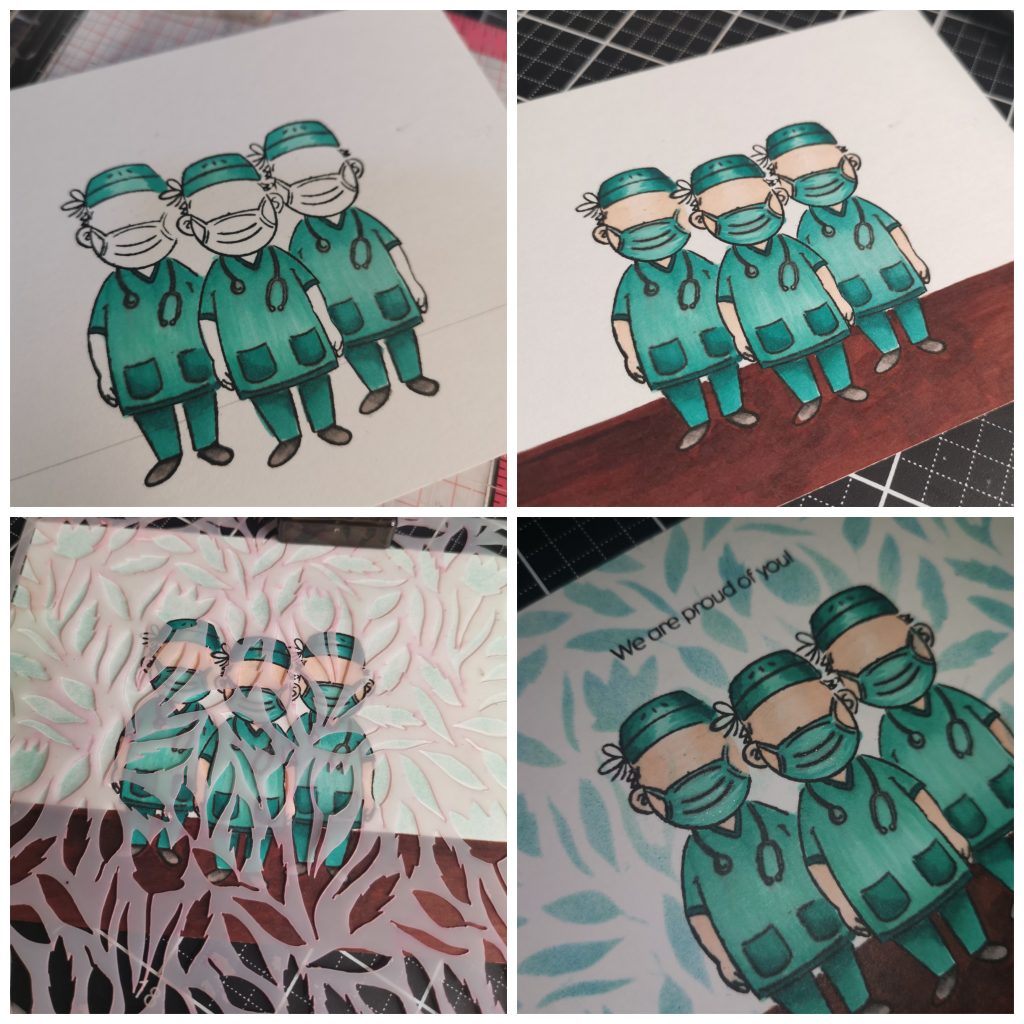
1. Encouragement Card
Telling someone that they have been a blessing for you is like making them feel happy of their existence in your life. This card is something like that. I am dedicating this card to all the healthcare superheroes who are working 24 * 7 beneath this covid 19 situation .
SUPPLIES
ALTENEW PRODUCTS-
- Spring garden stencil
- Healthcare heroes stamp and die set
- Mountain mist crisp dye ink
- Jet black crisp dye ink
- Mountain Mist Artistic Marker
- Volcano Lake Artistic Marker
- Emerald Artistic Marker
- Dark chocolate Artistic Marker
- Peach Perfect Artistic Marker
- Blush Artistic Marker
- Evening Gray Artistic Marker
- Pure Graphite Artistic Marker
OTHER –
- Neenah classic crest white card stock
- Misti stamping tool
- Sizzix big shot
- Guillotine Paper Trimmer
- Sheer Shimmer craft spray
- Masking paper
- Glue stick
- Scissors
TECNIQUES ADDOPTED-
- Masking Unleashed (Basic Masking)
- Color Your Day (70 / 20 / 10)
- Celebration: Stencil Techniques
- Let It Shine (Shimmer & Sparkle Pens)
- For The Guys (Cards for Boys)
- Easy Die Cutting Techniques ( Stamps and Matching Dies )
- Clean & Simple Boutique Cards (Simple styling)
- Seasonal Scene Building (Background Building)
INSTRUCTIONS
Create a 4 ¼” x 5 ½” card base from Classic Crest Solar White Cardstock. Stamp the male doctor stamp on the cardstock with jet black ink and mask it with masking paper. Stamp 2 more of the same image on its right and left. Color them with artist markers. Draw a floor background with artist makers and fill it with the same color. Place the stencil over the card and pat the blending tool over it. Make sure that you don’t blend the color. Then stamp the sentiment on the top middle of the card. To add dimensions, you may use metallic shimmer on the mask of the doctors.
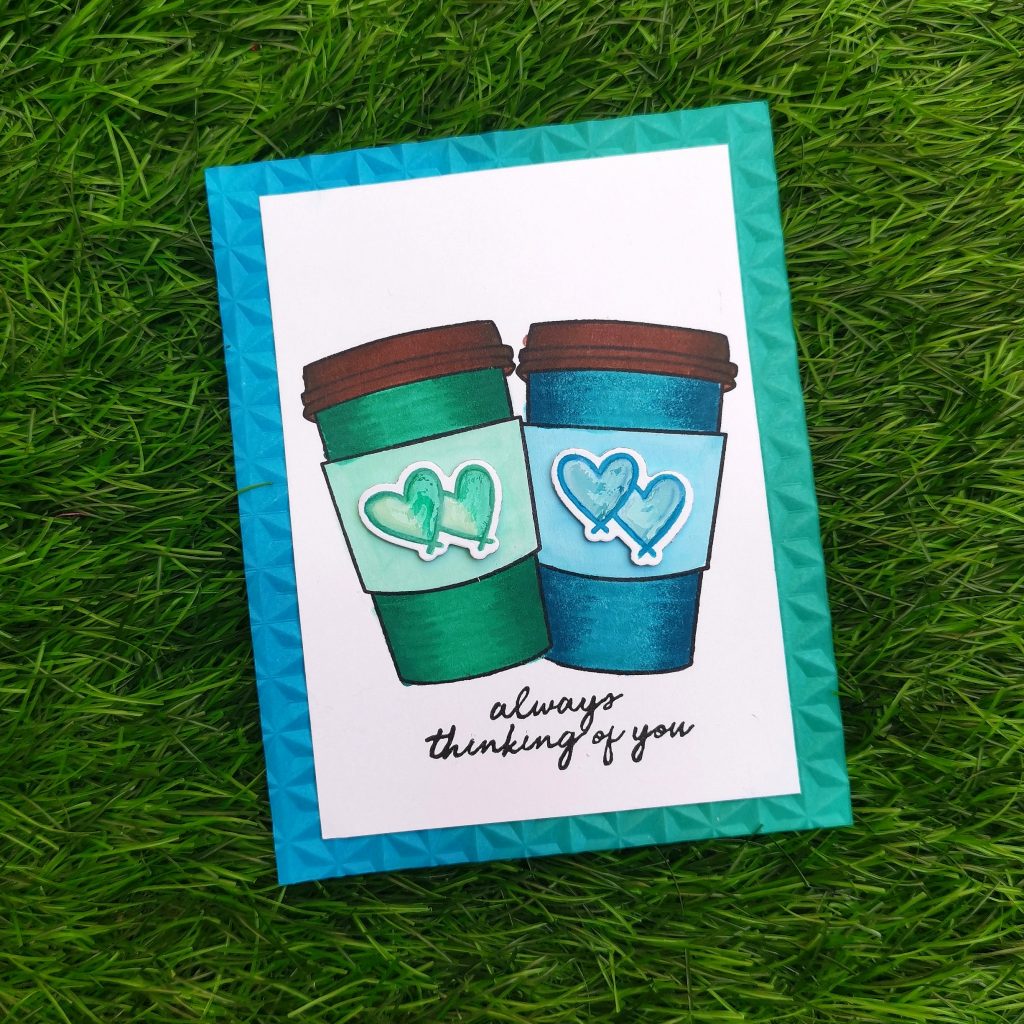
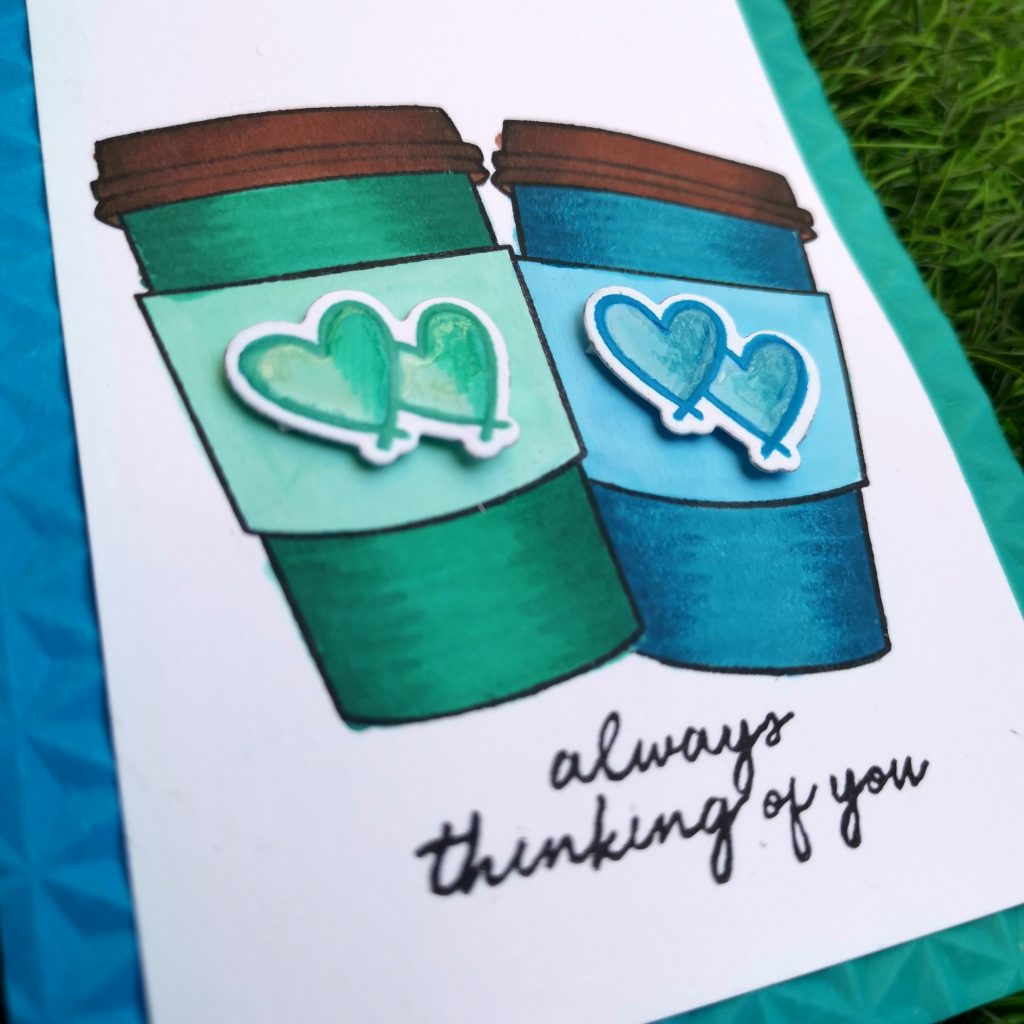
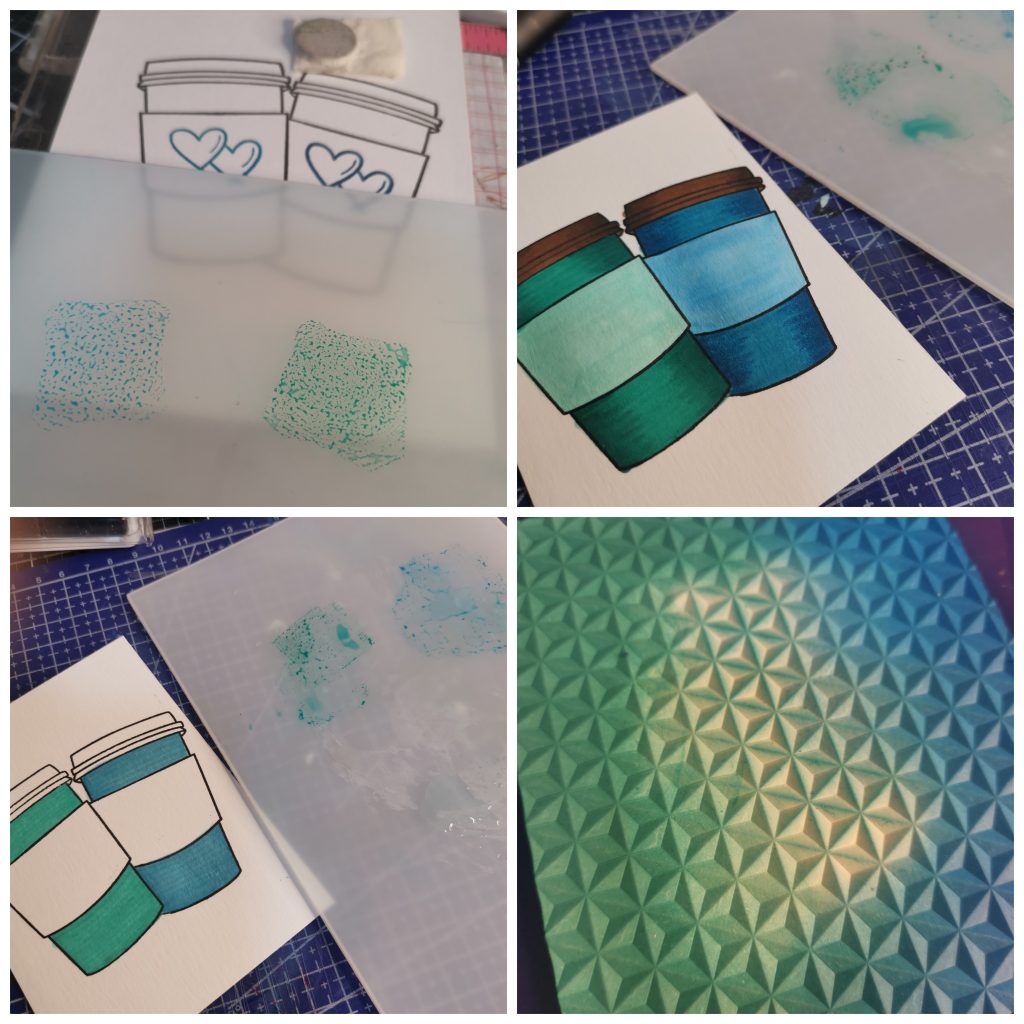
2. Thinking of you Card
We often miss people in various points of our life. You might think about them because something that is happening now is the same or different from something that happened when you were with them. If you are noticing signs, someone is thinking about you, it could trigger thoughts and feelings in you, too. This card represents something like that.
SUPPLIES
ALTENEW PRODUCTS-
- Watercolor palette
- Watercolor brush
- Sea breeze crisp dye ink
- Volcano lake crisp dye ink
- Tide blue crisp dye ink
- Lagoon crisp dye ink
- Dusk crisp dye ink
- Aqualicious crisp dye ink
- Galactic stream crisp dye ink
- Starlight crisp dye ink
- Versatile vase Stamp set
- Friends forever Stamp and die set
- Moca Artistic Marker
- Espresso Artistic Marker
- Volcano lake Artistic Marker
- Emerald lake Artistic Marker
- Desert night Artistic Marker
OTHER –
- Neenah classic crest white card stock
- Sizzix big shot
- Misti stamping tool
- Double sided foam tape
- Guillotine Paper Trimmer
- Nuvo crystal glaze
- Glue stick
- Scissors
TECNIQUES ADDOPTED-
- Masking Unleashed (Basic Masking)
- Color Your Day (How Much Color?)
- Let It Shine (Shimmer & Sparkle Pens)
- For The Guys (Cards for Boys)
- Easy Ink Blending Techniques ( Painting with Ink pads )
- Easy Die Cutting Techniques ( Stamps and Matching Dies )
- Clean & Simple Boutique Cards (Simple styling)
INSTRUCTIONS
Create a 4 ¼” x 5 ½” card base from Classic Crest Solar White Cardstock. Ink blend it with both the shades vertically. And run it through your sizzix bigshot and emboss it using 3d embossing folder. Take another cardstock measuring 3 ½ x 4 ¾. Stamp the coffee cup stamp from Friends forever stamp set. Masking it stamp one more towards its right side. Then applying some crisp die inks on to the watercolor pallet and paint the coffee cups with it. I used my artist markers to add more dimensions to them. Then Stamp the hearts on another cardstock and die cut it with its coordinating dies. Paint them as you did the coffee cups and stick it on to the cardstock with double-sided foam tape. Stamp the sentiment below the coffee cups with jet black ink.
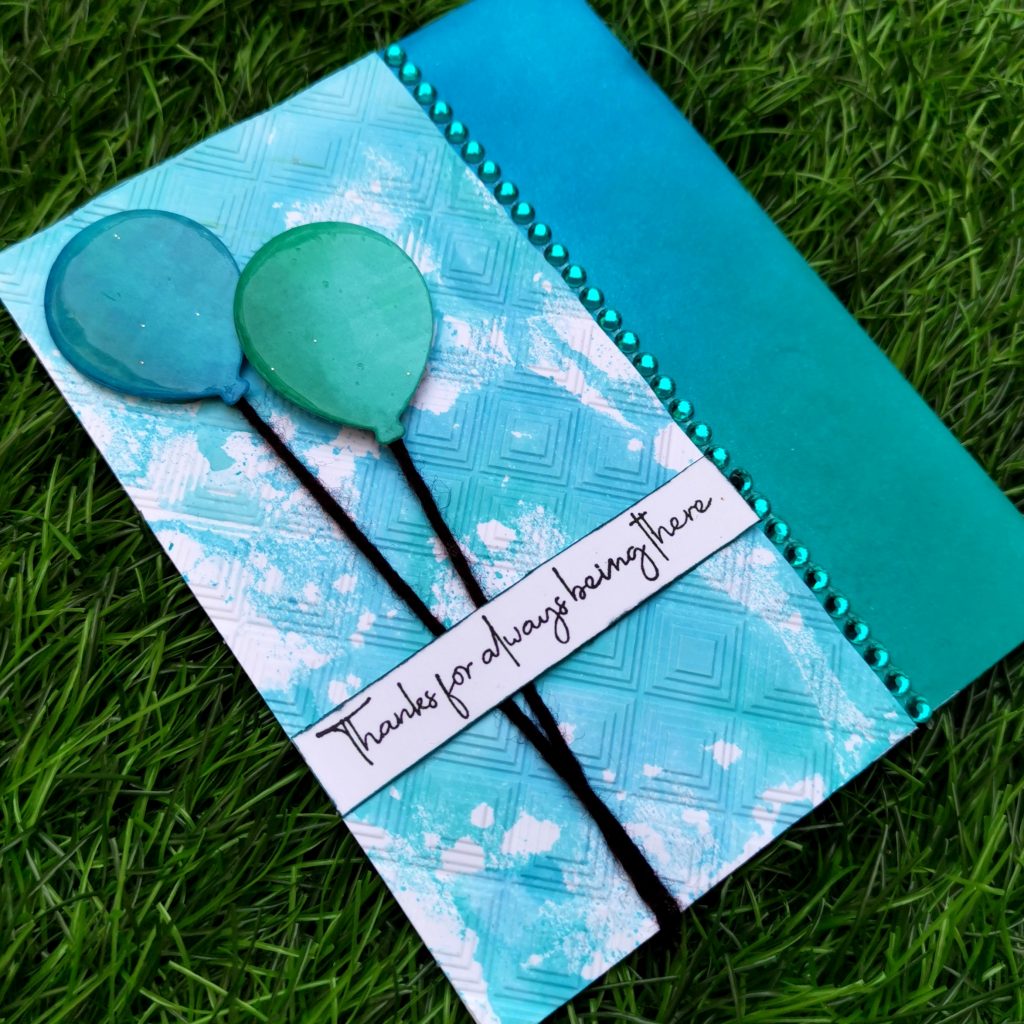
3. Anniversary card
Anniversary is a day when we remember or celebrate something important that happened on that day in a previous year. Most important thing for a married couple is to stick on together forever. Here I have set my anniversary card on that theme of being there for one another throughout the journey of life.

SUPPLIES
ALTENEW PRODUCTS-
- Friends forever stamp set
- Birthday greetings stamp and die set
- Tide blue crisp dye ink
- Aqualicious crisp dye ink
- Teal care crisp dye ink
- Dusk Artistic Marker
- Mountain mist Artistic Marker
- Volcano lake Artistic Marker
- Dessert night Artistic Marker
- Ocean waves Artistic Marker
OTHER –
- Neenah classic crest white card stock
- Sizzix big shot
- Misti stamping tool
- Double sided foam tape
- Guillotine Paper Trimmer
- versa fine pigment ink
- peacock crystal sticker
- black woolen thread
- Heat gun
- Versa mark watermark stamp pad
- Hero Arts clear Embossing powder
- Glue stick
- Scissors
TECNIQUES ADDOPTED-
- Color Your Day (Adding Color )
- Let It Shine (Embossing Powder , Embellishments)
- For The Guys (Cards for Boys)
- Easy Die Cutting Techniques ( Stamps and Matching Dies )
- Clean & Simple Boutique Cards (Simple styling)
- Easy Ink Blending Techniques (Ink Blend a Card Stock)
- Creative Watercolor Media (Altenew Crisp Dye Inks)
INSTRUCTIONS
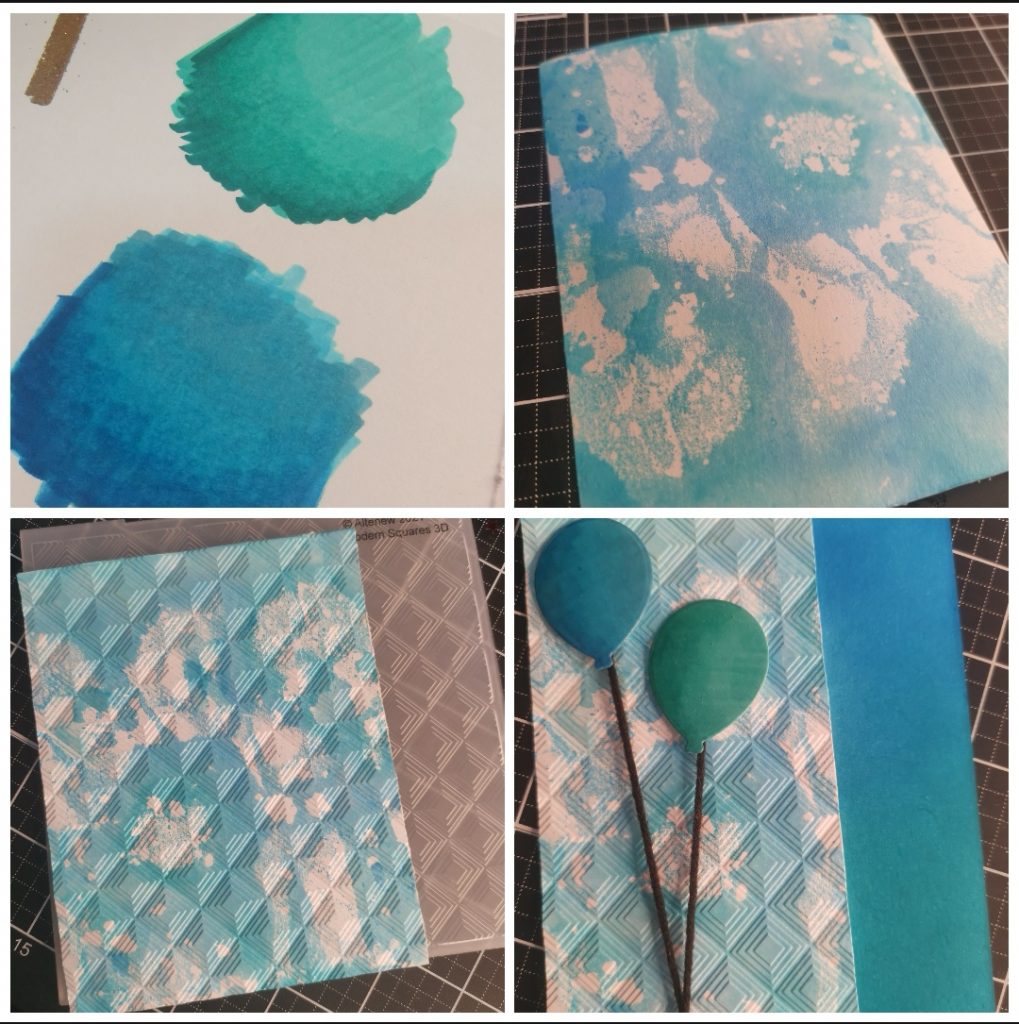
Create a 4 ¼” x 5 ½” card base from Classic Crest Solar White Cardstock. Put down the lightest shade of crisp dye ink set on to some cellophane or on Altenew watercolor palette, then sprayed with water and smooshed on to the paper. Then run it through the 3D embossing folder. Trim 1 ½ inches from the cardstock. Take another 4 ¼” x 5 ½” card base and ink blend it. Stamp the balloons on a cardstock and ink blend it with artistic markers and die cut them with its coordinating die set. Stamp Versa mark watermark over it and heat emboss it with clear embossing folder. Take 2 pieces of woolen thread and stick it along with the bottom of the balloons. Turn the card and adhere the tread to the back of the card. Then Stick the embossed cardstock on top of this cardstock towards the right side. Stick a strip of crystal sticker towards the end of the cardstock separating them. Stamp the sentiment on a piece of white cardstock and Adhere it above the black thread.
4. Birthday Card
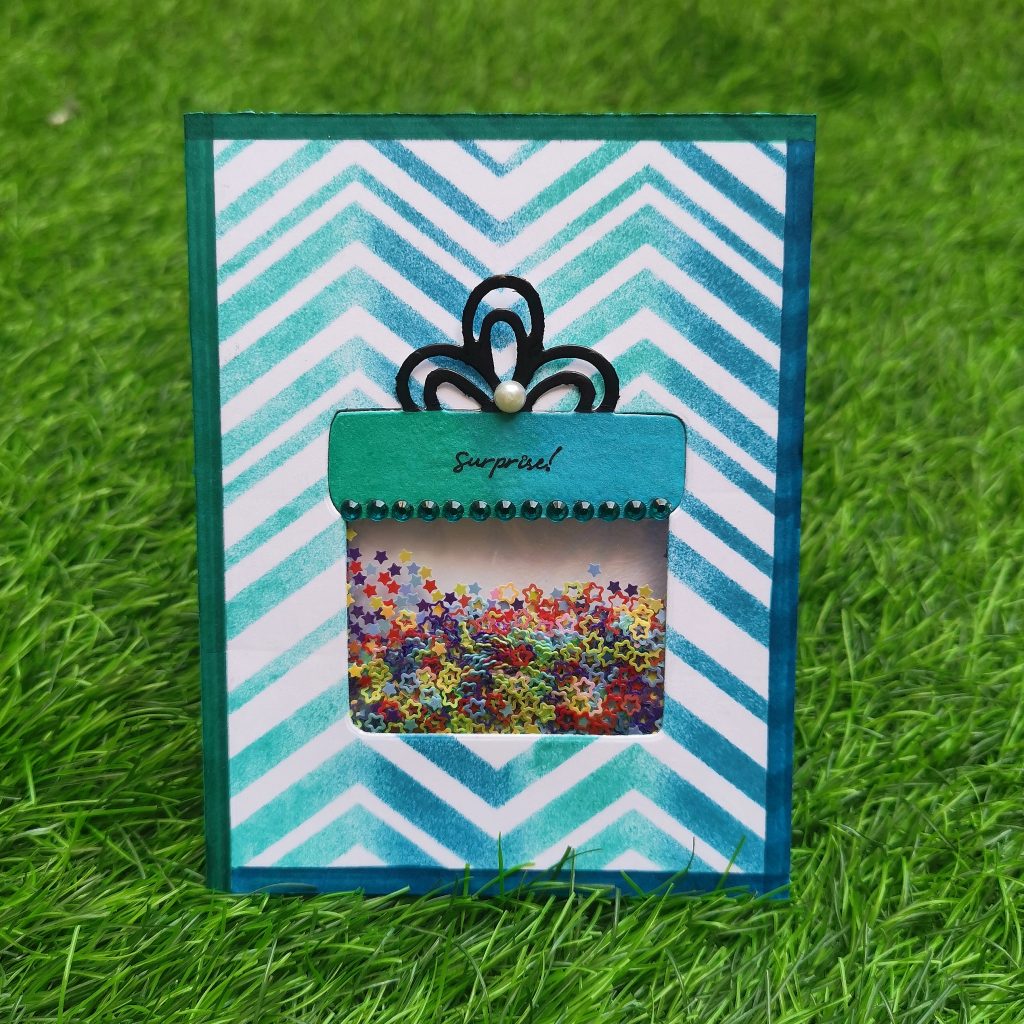
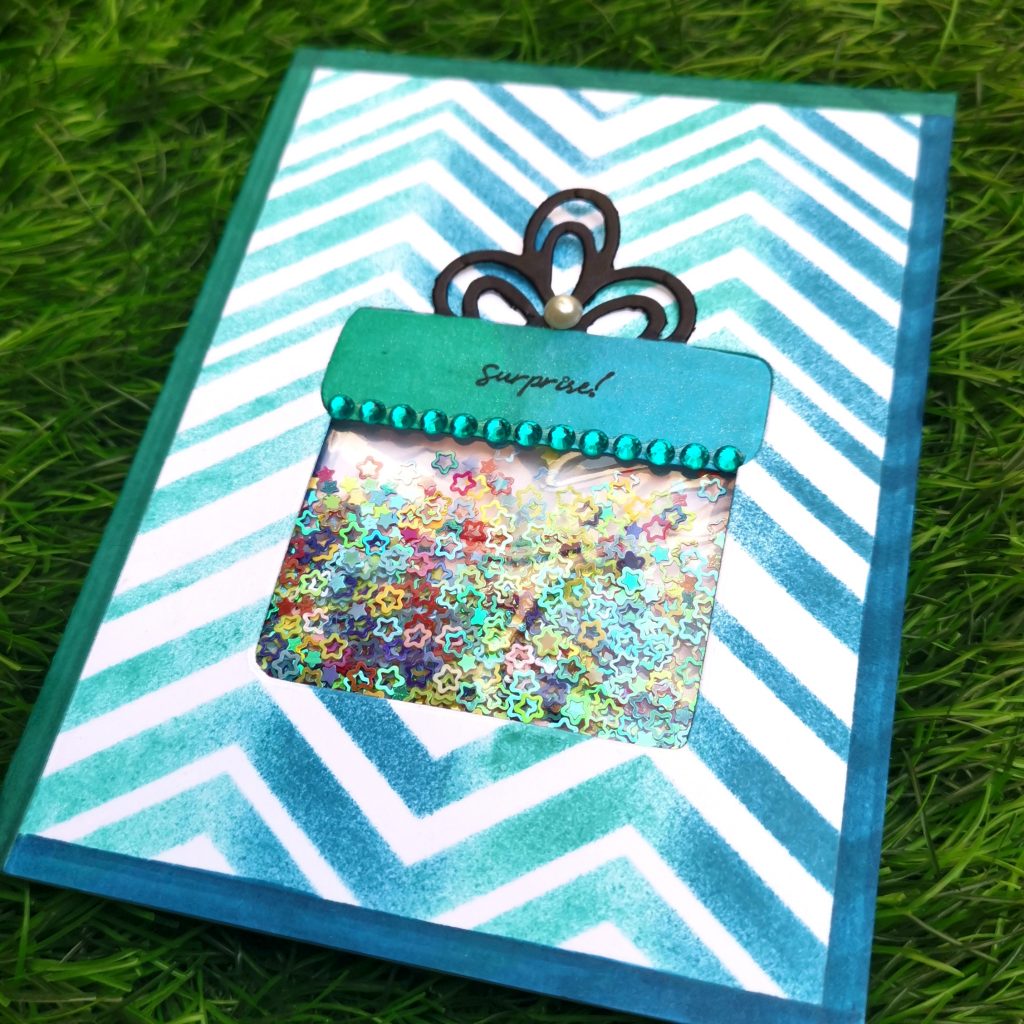
I decided to make 2 birthday interactive cards for my project. Here I choose shaker card and a light up card.
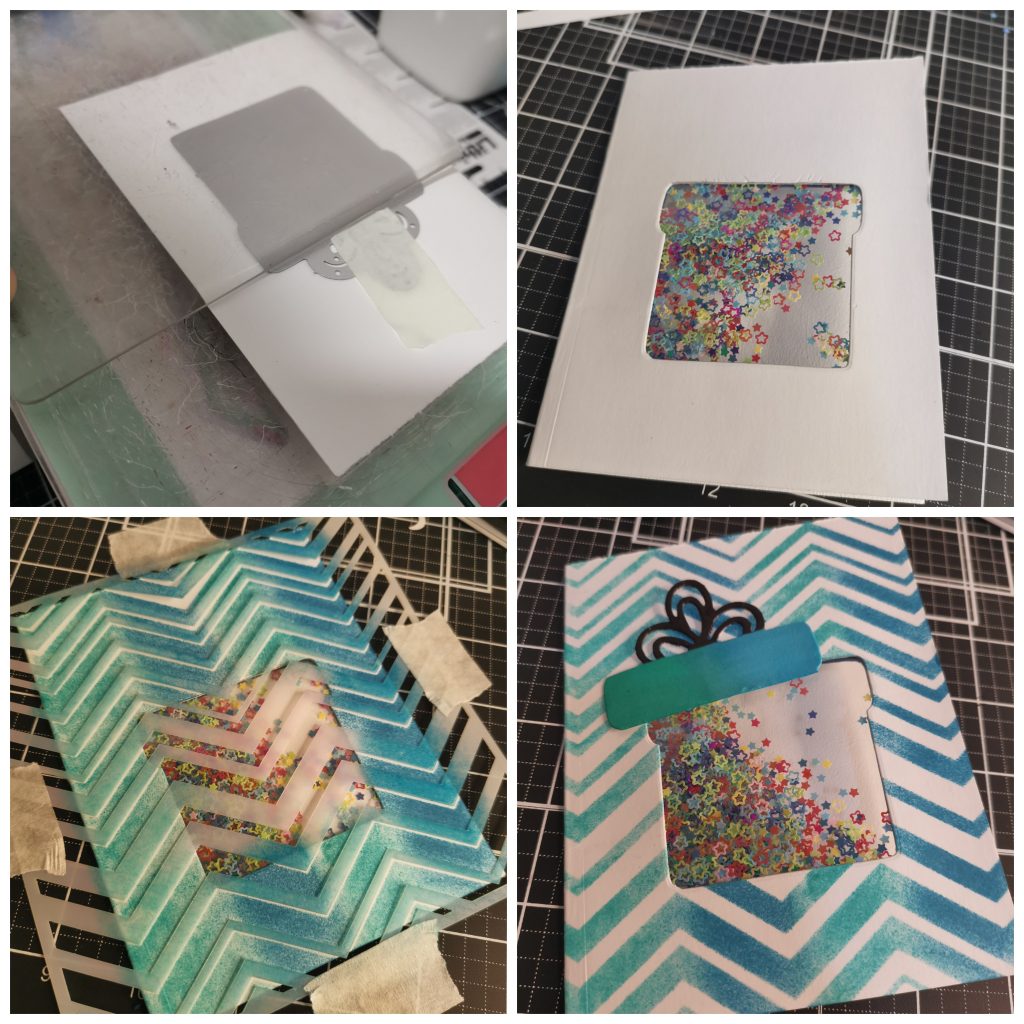
CARD 1 – Shaker card
SUPPLIES
ALTENEW PRODUCTS-
- Emerald Artistic Marker
- Desert night Artistic Marker
- Jet Black Artistic Marker
- Emerald crisp dye ink
- Desert night crisp dye ink
- lagoon crisp dye ink
- ocean waves crisp dye ink
- Layered Gift Tag – Present Die Set
OTHER –
- Neenah classic crest white card stock
- Sizzix big shot
- Misti stamping tool
- Double sided foam tape
- Guillotine Paper Trimmer
- versa fine pigment ink
- Acetate sheet
- 6 Color glittering Star
- Sheer shimmer craft spray
- Peacock crystal sticker
- Glue stick
- Scissors
TECNIQUES ADDOPTED-
- Creative Watercolor Media (Altenew Crisp Dye Inks)
- For The Guys (Interactive)
- Let It Shine (Shimmer & Sparkle Pens)
- With A Twist ( Acetate with a Twist! )
INSTRUCTIONS
Create a 4 ¼” x 5 ½” foldable card base from Classic Crest Solar White Cardstock. Place the Layered Gift Tag – Present Die Set on the middle of the card and partial die cut it from the top of the gift bow. Trim the excess part. Create a “ 4 ¼” x 5 ½ ” top folding card base from Classic Crest Solar White Cardstock .Trace out the previous die cut image into this card stock. Place the die on this panel and die cut the shape. Die cut another piece of the same die cut and cut out the top part of the box including the ribbon. Color the ribbon with jet black ink. Then applying the lighter shades of crisp die inks on to the watercolor pallet , paint the top part of the gift box. Once dry ,apply the shimmer spray over it. Stick peacock crystal stickers towards its bottom. Stick an acetate sheet on the back of the main card and create a boundary using double sided tape. tap in some shaker stars into it and stick an another piece of acetate over it. Adhere the second panel over it. Mask the die cut piece and place the stencil over the card . apply the crisp die ink over the card in vertical way. Shade the borders of the card with the darker shade of artist marker. Then stick the top part of the gift box on it’s place. Add embellishments according to your liking.
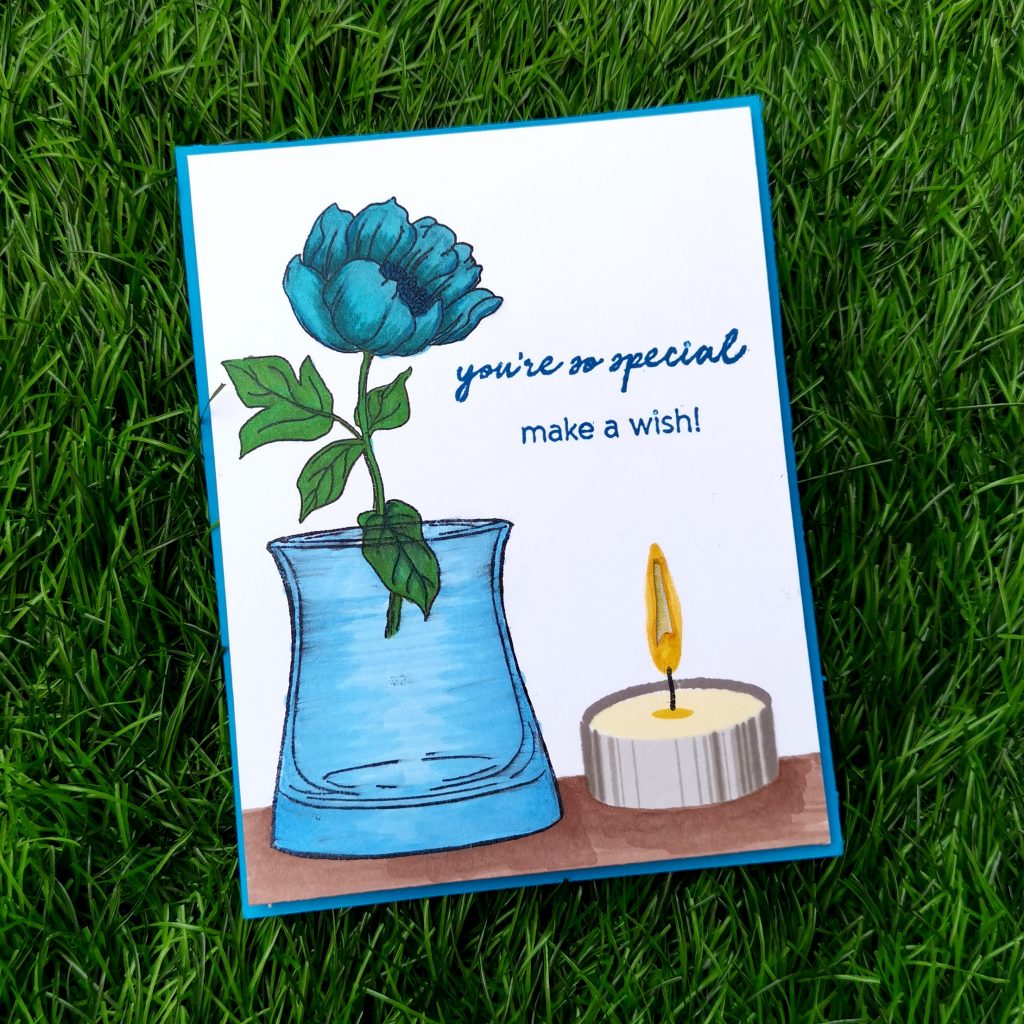
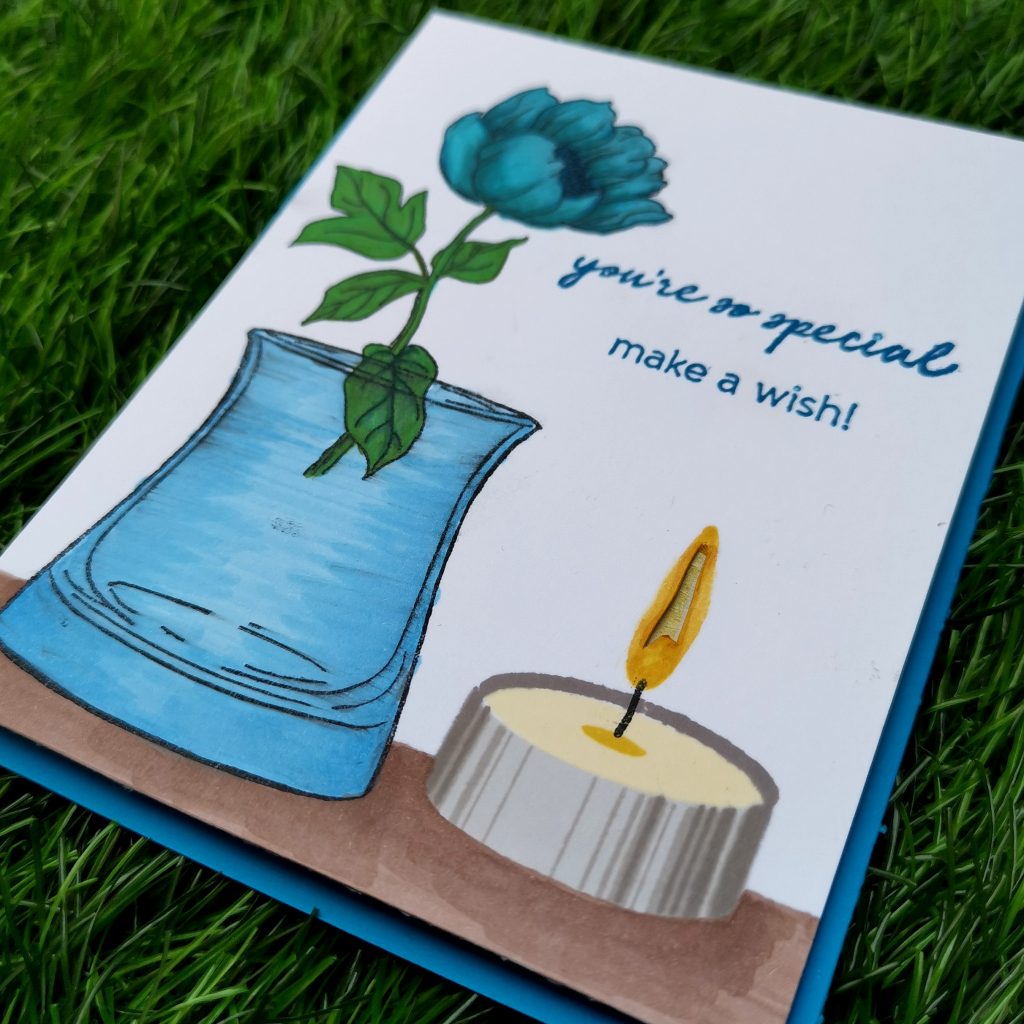
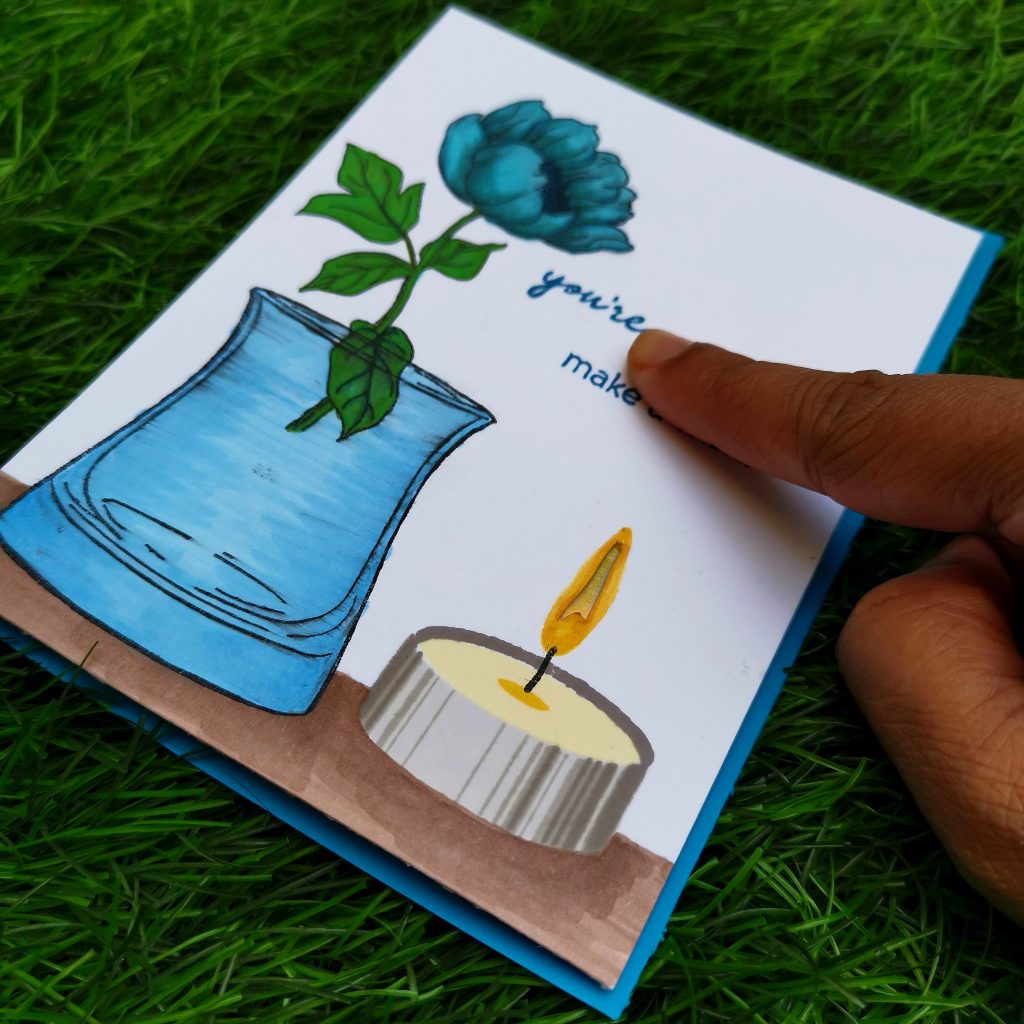
CARD 2 – Light up Card
SUPPLIES
ALTENEW PRODUCTS-
- Wild flora Stamp set
- Versatile vases Stamp set
- Candlelight Stamp set
- Buttercream crisp dye ink
- Honey drizzle crisp dye ink
- Autumn Blaze crisp dye ink
- Morning Frost crisp dye ink
- Evening Gray crisp dye ink
- Moon Rock crisp dye ink
- Lava rock crisp dye ink
- Starlight crisp dye ink
- Desert night Artistic Marker
- Warm sunshine Artistic Marker
- Dusk Artistic Marker
- Caribbean sky Artistic Marker
- Forest Glades Artistic Marker
- Mocha Artistic Marker
OTHER –
- Neenah classic crest white card stock
- Sizzix big shot
- Misti stamping tool
- Double sided foam tape
- Guillotine Paper Trimmer
- versa fine pigment ink
- Copper tape
- LED Sticker light
- Coin-cell battery
- Glue stick
- Scissors
TECNIQUES ADDOPTED-
- For The Guys (Interactive)
- Clean & Simple Boutique Cards (Simple styling)
- Masking Unleashed (Basic Masking)
- Color Your Day (How Much Color?)
- Let It Shine (Shimmer & Sparkle Pens)
- Seasonal Scene Building (Background Building)
INSTRUCTIONS
Create a 4 x 5 ¼ card base from Classic Crest Solar White Cardstock. Stamp the flower and the vase with jet black ink. Color them with Artistic markers. Then using the layering stamps, stamp the candle light. Cut out the inner part of the flame. Use shimmer pens around the flame to create a shinning look. Position the sentiment and stamp it near the vase. Mask the vase and candle light and create a background. Here I have created a table top scene using Mocha artist marker.
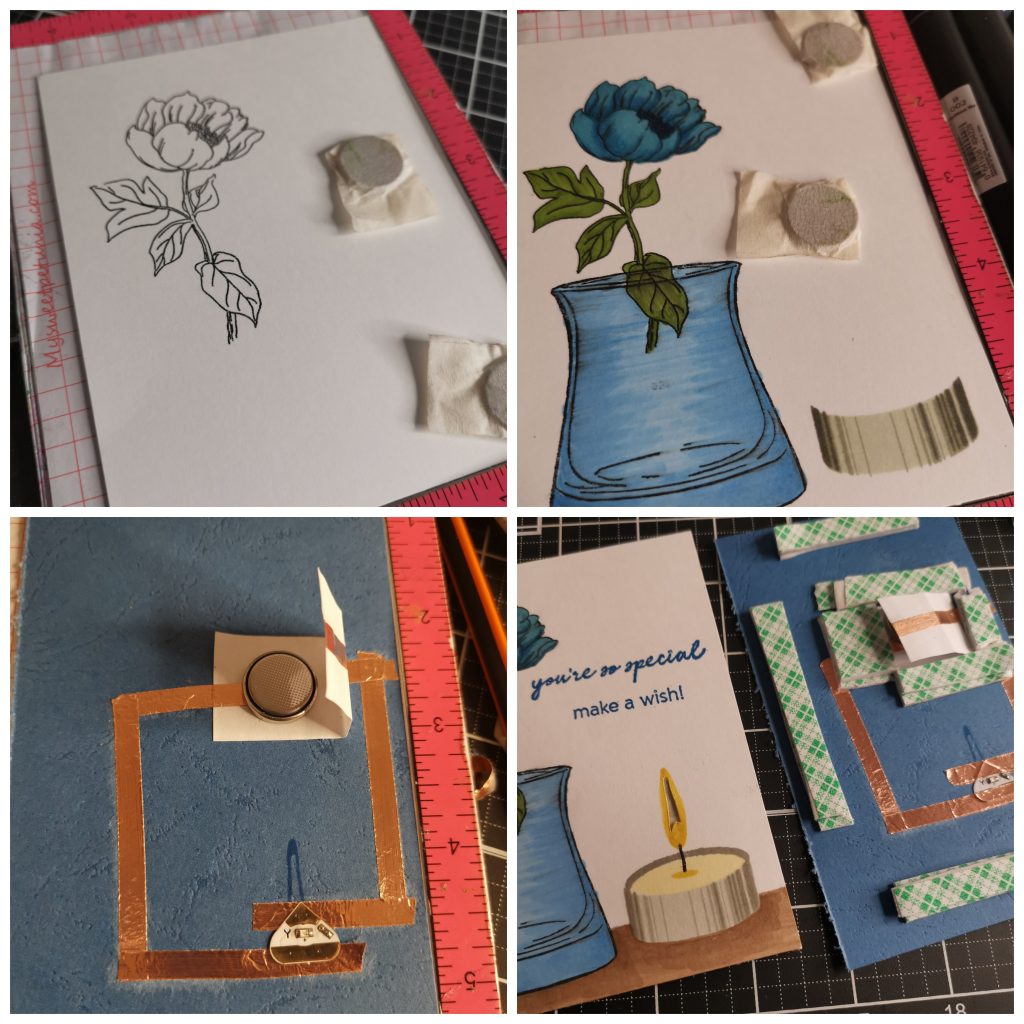
Once the front of the card is decorated, Place it on a blue card stock paper measuring 4 ¼” x 5 ½ . Using a pencil, carefully mark a point on the blue card stock for the LED light . Then mark a place for the coin-cell battery on the blue cardstock. (This place is determined based on the position you press to switch on the light.) Here I wanted my light to be lit when I click on the sentiment. So i positioned it accordingly.
On the blue cardstock , use the pencil to draw out the circuit you want to make, so that a line runs from each LED leg to the battery. The battery has a plus (positive terminal) or minus (negative terminal) symbol on each side. The LED also has positive and negative terminals — the longer leg is positive (anode) and the shorter one is negative (cathode). To make the LED light up, you will connect the negative side of the battery to the negative leg of the LED and the positive side of the battery to the positive leg of the LED.
Tape down your copper tape over the lines you drew, carefully folding the tape to “turn” any corners. Using clear tape, secure the legs of the LED so that they are on top of the copper tape. Take a piece of folded lightweight cardstock paper and Place the battery in its designated spot on the circuit , inside the paper. Make sure that each line of copper tape makes contact with appropriate terminal of the battery. When the main cardstock paper is pressed, it also forces the lightweight cardstock paper to close the circuit. Thus it lights up the led light.
When we take the hands off the card, the pressure is released and the lightweight cardstock paper does not touch the battery. Thus the circuit is open and the led light turns off. If the paper is loose, the LED will not light up or blink .
That’s the end of my cards for level 2. Your next step is to my upcycled project. Please check out my next post for seeing my take on it.
Thank You so much!
Hope you liked my cards. Have a wonderful day and I hope to see you all soon with another project from AECP. Until then happy stamping and thanks for stopping by! If you like what you’ve seen from me, please give me a follow over on my Instagram (@shahicreationz) and/or subscribing to my vlog and YouTube if you haven’t already.
-shahi
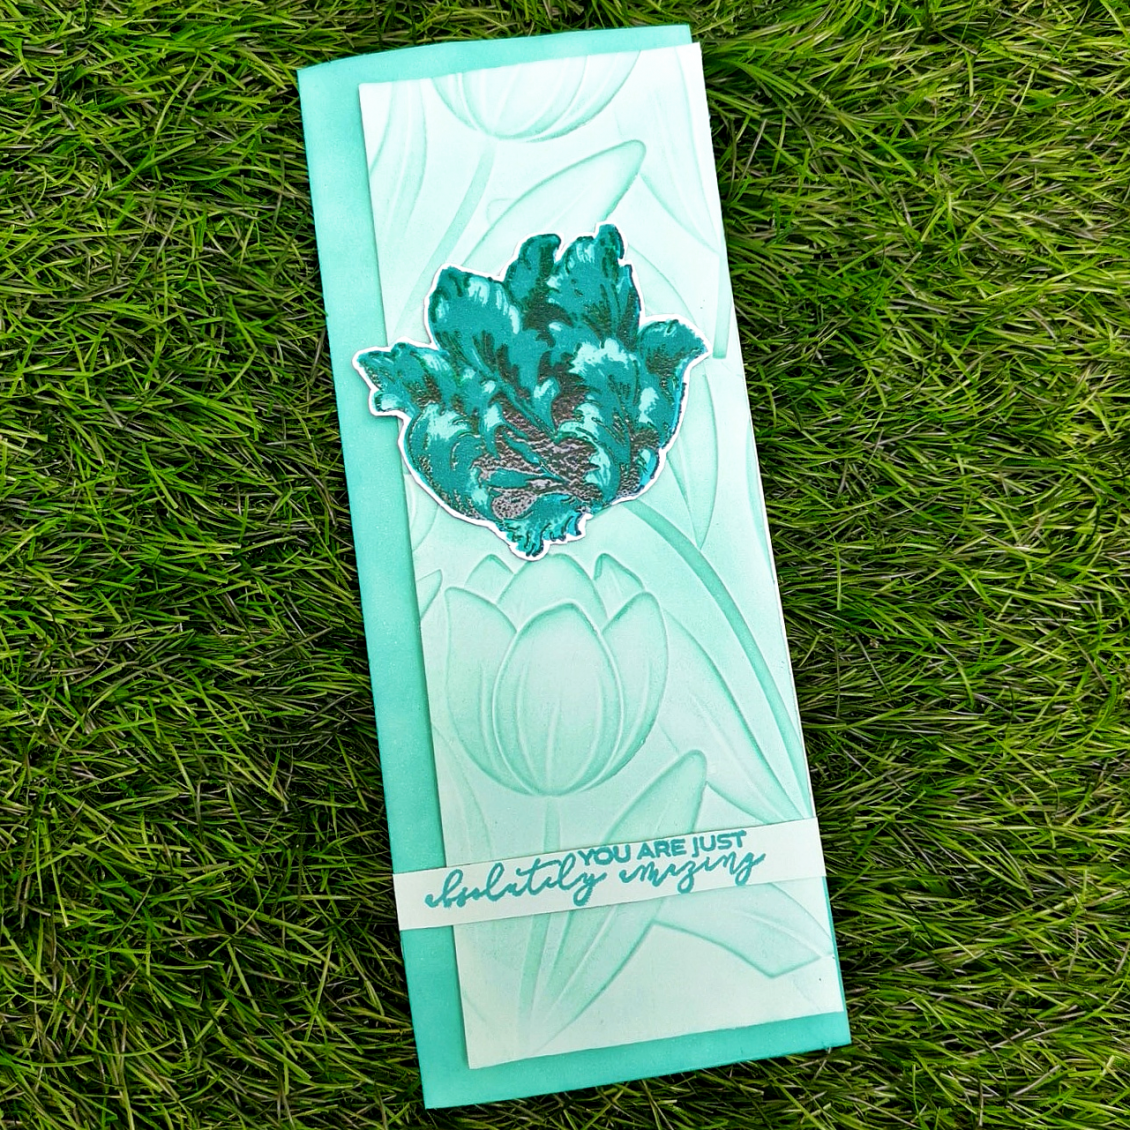
Altenew : Impressive Heat Embossing Techniques
Alhamdullilah , I have successfully completed my 20 th class on AECP. Next step is my Level 2 Final Challenge. Before that, let’s have a look at the Impressive Heat Embossing Techniques taught at the Altenew Academy. In this course, Svetlana Marchenko shares some creative and unique tips on how to use embossing powders to make gorgeous cards, and I absolutely loved the beautiful cards she made using these techniques. For my card, I followed the tips from lesson 4 – Layered heat embossing.
INSTRUCTIONS
- Create a 3.5″ x 8.5″ slimline card base from an aquamarine Cardstock.
- Trim half inch from all the four sides
- And run it through the embossing folder
- Apply Volcano Lake die ink on a blending tool and apply it over the embossed part.
- Stamp Parrot Tulips on a classic crest white cardstock with Sea Shore ink set
- Stamp the last layer with Versa Mark ink and sprinkle some clear embossing powder and heat set it with a heat gun
- Trim the flower and stick it on the 3D embossing folder design
- Apply foam tape in-between the layers to get dimensions
- Stamp the sentiment on a strip of aquamarine Cardstock and stick it over the card.
TIPS
- Before stamping, use an Anti-Static Pouch tool to remove static from your paper so the powder doesn’t stick where you don’t want it.
- Make at least one layer of your flower heat embossed to make it shine
- There are different types of embossing powders, and they have different textures. Some, for example, the fine or detail embossing powders have a smoother finish while others, for example, the glitter or chunky embossing powders have a textured finish. So, it is always helpful to create swatches.
- Use various ink colors with clear embossing powder if you do not have needed embossing powder color
SUPPLIES
- Sizzix Bigshot die cutting Machine
- Neenah Paper 4456 Neenah 110lb Classic Crest Cardstock
- Misti stamping tool
- Aquamarine Cardstock
- Tulip 3D embossing folder
- Build-A-Flower: Parrot Tulips
- Build-A-Flower: Hawaiian Coral
- Tsukineko Versamark EMBOSS INK PAD Watermark VM-001
- Ranger Sf Clear-Embossing Powder
- Sea Shore Crisp Dye Ink Mini Cube Set
Thank You!
Hope you liked my card. Have a wonderful day and I hope to see you all soon with another project from AECP. Until then happy stamping and thanks for stopping by! If you like what you’ve seen from me, please give me a follow over on my Instagram (@shahicreationz) and/or subscribing to my vlog and YouTube if you haven’t already.
-shahi
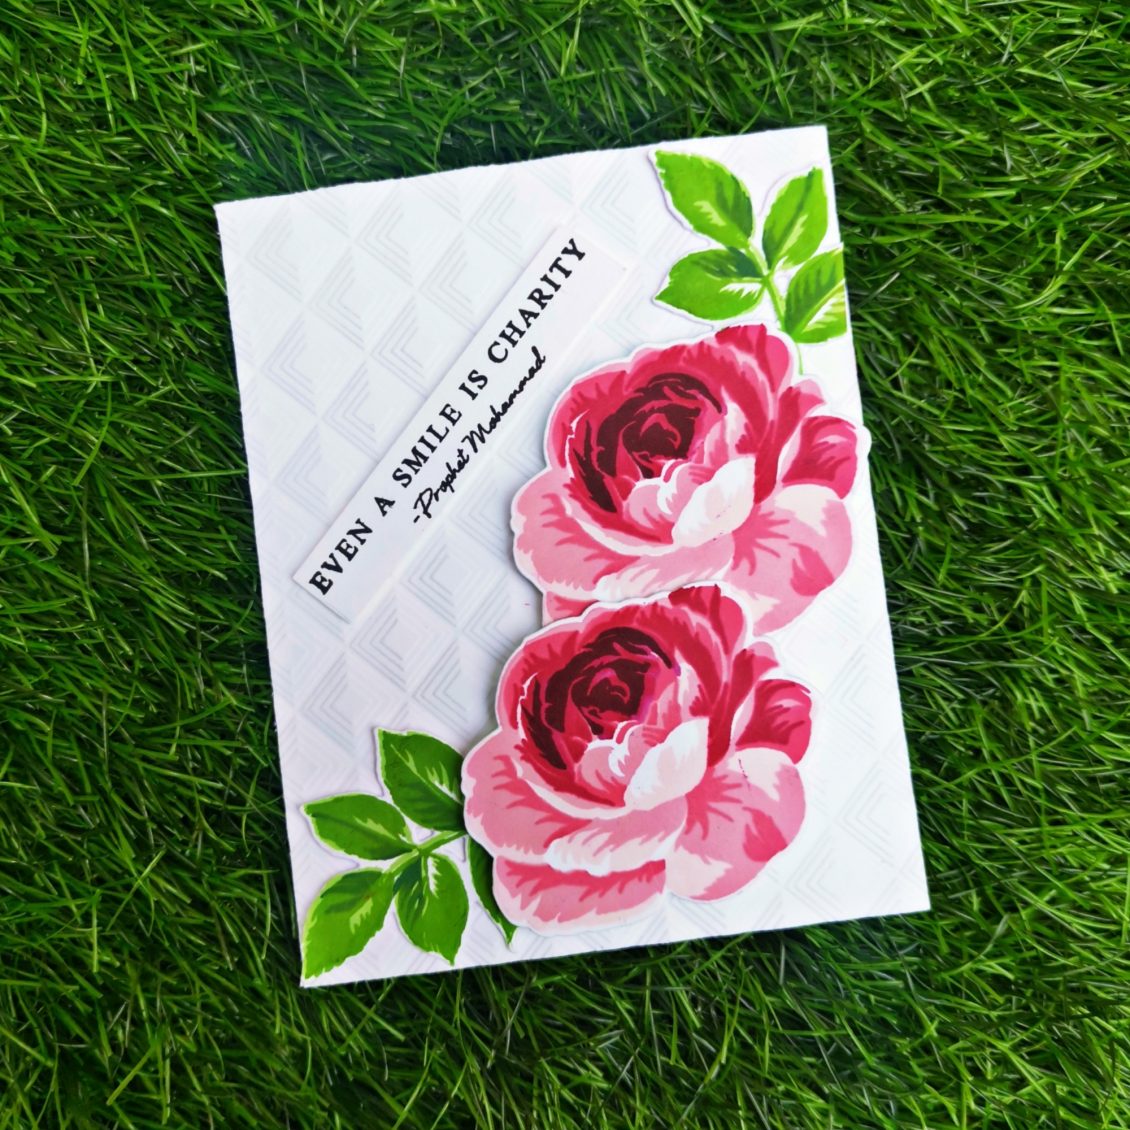
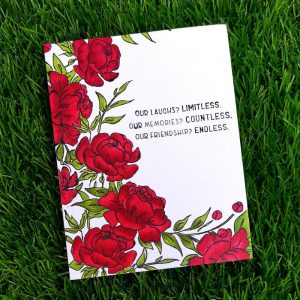
Altenew : Polychromatic
Playing with the colors red and green Today, I am sharing a card project that I created for the Altenew Academy Polychromatic class taught by Nina-Marie Trapani. In this class, Nina discussed tips and tricks to effectively use multi-colors and color combinations to make cards that pop. One of the simplest, and one of my most favorite ways to add color, is to have a crisp white background to balance out the bright hues and allow them to take center stage. So, I chose a simple layering stamp set to play with a color combo of red and green popping up in the white background.
INSTRUCTIONS
- Create a “4 1/4 x 5 1/2 ” card base from Classic Crest Solar White Cardstock.
- Run it through the 3D embossing folder
- Stamp the floral image on a Classic Crest Solar White Cardstock
- Stamp different layers of rose and the leaf in different variations of the same color
- Stick them on the main cardstock using double sided foam tapes
- Stamp the sentiment on a thin strip of cardstock and stick it on the base card
SUPPLIES
- Sizzix Bigshot die cutting Machine
- Neenah Paper 4456 Neenah 110lb Classic Crest Cardstock
- Misti stamping tool
- Modern Squares 3D embossing folder
- Build-A-Flower: Rose
- Frosty Pink Crisp dye ink
- Cotton Candy Crisp dye ink
- Coral Berry Crisp dye ink
- Ruby Red Crisp dye ink
- Purple Wine Crisp dye ink
- Cosmic Berry Crisp dye ink
- Grass filed Crisp dye ink
- Mountain pine Crisp dye ink
- Shadow creek Crisp dye ink
Thank You!
Hope you liked my card. Have a wonderful day and I hope to see you all soon with another project from AECP. Until then happy stamping and thanks for stopping by! If you like what you’ve seen from me, please give me a follow over on my Instagram (@shahicreationz) and/or subscribing to my vlog and YouTube if you haven’t already.
-shahi
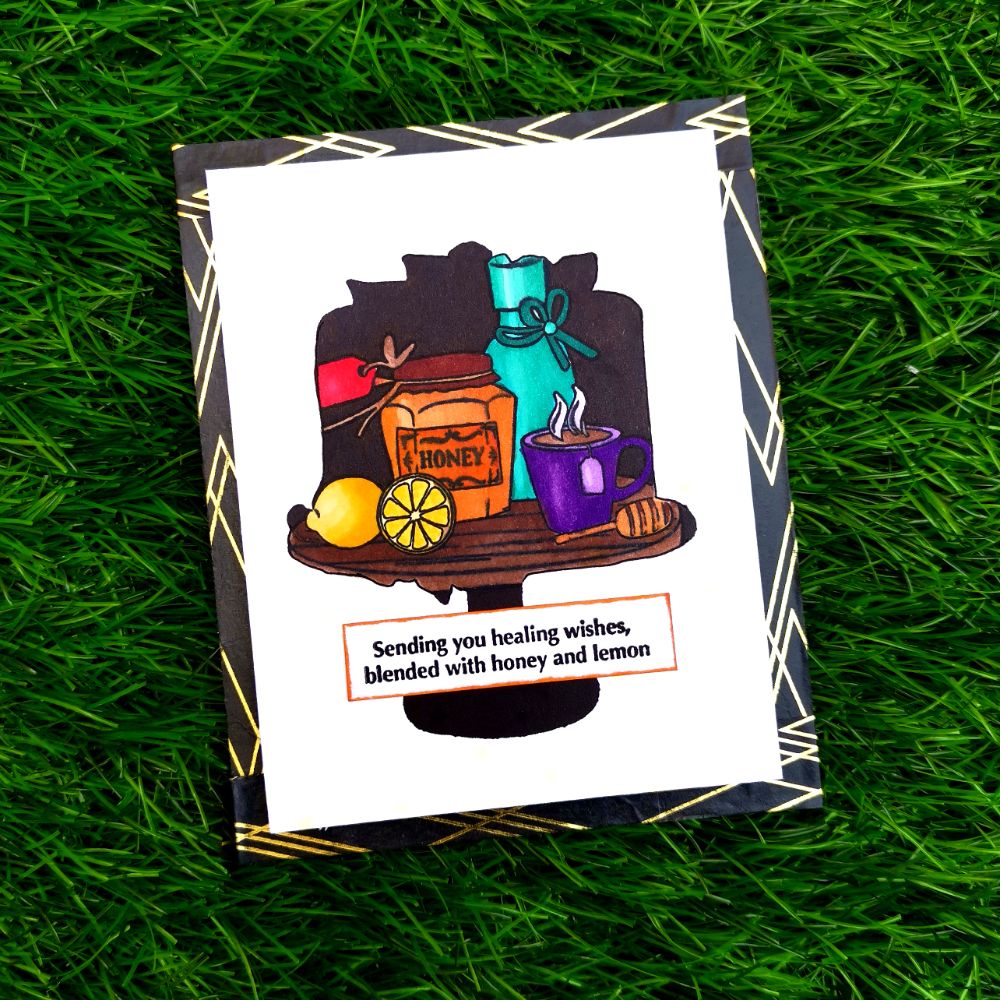
Altenew : Masking Unleashed
Masking requires a certain level of patience and forethought. The class, Masking Unleashed, helps to explain how to think ahead and plan a project so you get all of the masking in place when you need it. There’s lots of fantastic ideas on using masks creatively, as well as how to use different materials for various masks. If masking is something you want to get better at, or if you want a helping hand in exploring this technique and all the results you can achieve, this class is definitely for you!
INSTRUCTIONS
- Create a “4 1/4 x 5 1/2 ” card base from Classic Crest Solar White Cardstock.
- Stick washi tape and all the 4 sides.
- Take a masking sheet and place the layering gift tag die on it and die cut it.
- Take out the die cut and mask the negative
- Stick it on the cardstock
- Stamp the picture from get well soon stamp set
- Color it with artistic markers
- Fill in the remaining parts with black artistic marker
- Remove the masking sheet
- Draw the border of the picture using a black pen
- Trim the sides of the cardstock
- Stamp the sentiment using versa fine onyx black pigment ink on a strip of cardstock and shade the borders with orange cream artistic marker and stick it on the cardstock
- Stick this cardstock with double sided foam tape on to the card with washi tape on the borders.
TIPS
- Before stamping, use an Anti-Static Pouch tool to remove static from your paper so the powder doesn’t stick where you don’t want it.
- Plan ahead the order in which you want to have the elements of your scene. Stamp and mask in this order.
- When you form a shape by stamping through the negative mask you want to cross the edges of your shape with stamping as much as possible. This will define those edges and your shape will be recognizable.
- You may draw an outline of your negative image to give a perfect look to the picture

SUPPLIES
- Sizzix Bigshot die cutting Machine
- Neenah Paper 4456 Neenah 110lb Classic Crest Cardstock
- Misti stamping tool
- Get well soon Stamp Set
- Layering gift Tag cake die set
- Deco lines washi tape
- Versa fine onyx black pigment ink
- Jet Black Artist Marker
- Mango Smoothie Artist Marker
- Buttercream Artist Marker
- Warm Sunshine Artist Marker
- Mountain Mist Artist Marker
- Volcano Lake Artist Marker
- Lagoon Artist Marker
- Emerald Artist Marker
- Lavender Fields Artist Marker
- Deep Iris Artist Marker
- Rocky Shore Artist Marker
- Dark Chocolate Artist Marker
- Mocha Artist Marker
- Caramel Toffee Artist Marker
- Orange Cream Artist Marker
- Autumn Blaze Artist Marker
Another project I have done on this technique is this floral card.
INSTRUCTIONS
- Create a “4 1/4 x 5 1/2 ” card base from Classic Crest Solar White Cardstock.
- Stamp flowers and leaves from Precious Peony Stamp Set
- Stamp the same design on a masking sheet too and stick it over the flowers on the base card
- Repeat the process until u get the desired look
- color the flowers and leaf with Artistic markers
- Stamp the sentiment towards the center right side of the card with versa fine onyx black pigment ink
SUPPLIES
- Sizzix Bigshot die cutting Machine
- Neenah Paper 4456 Neenah 110lb Classic Crest Cardstock
- Misti stamping tool
- Precious Peony Stamp Set
- Friends Forever Stamp Set
- Velvet Artist Alcohol Markers
- Ruby red Artist Alcohol Markers
- Forest glades Artist Alcohol Markers
- Versa fine onyx black pigment ink

Thank You!
Hope you liked my card. Have a wonderful day and I hope to see you all soon with another project from AECP. Until then happy stamping and thanks for stopping by! If you like what you’ve seen from me, please give me a follow over on my Instagram (@shahicreationz) and/or subscribing to my vlog and YouTube if you haven’t already.
-shahi
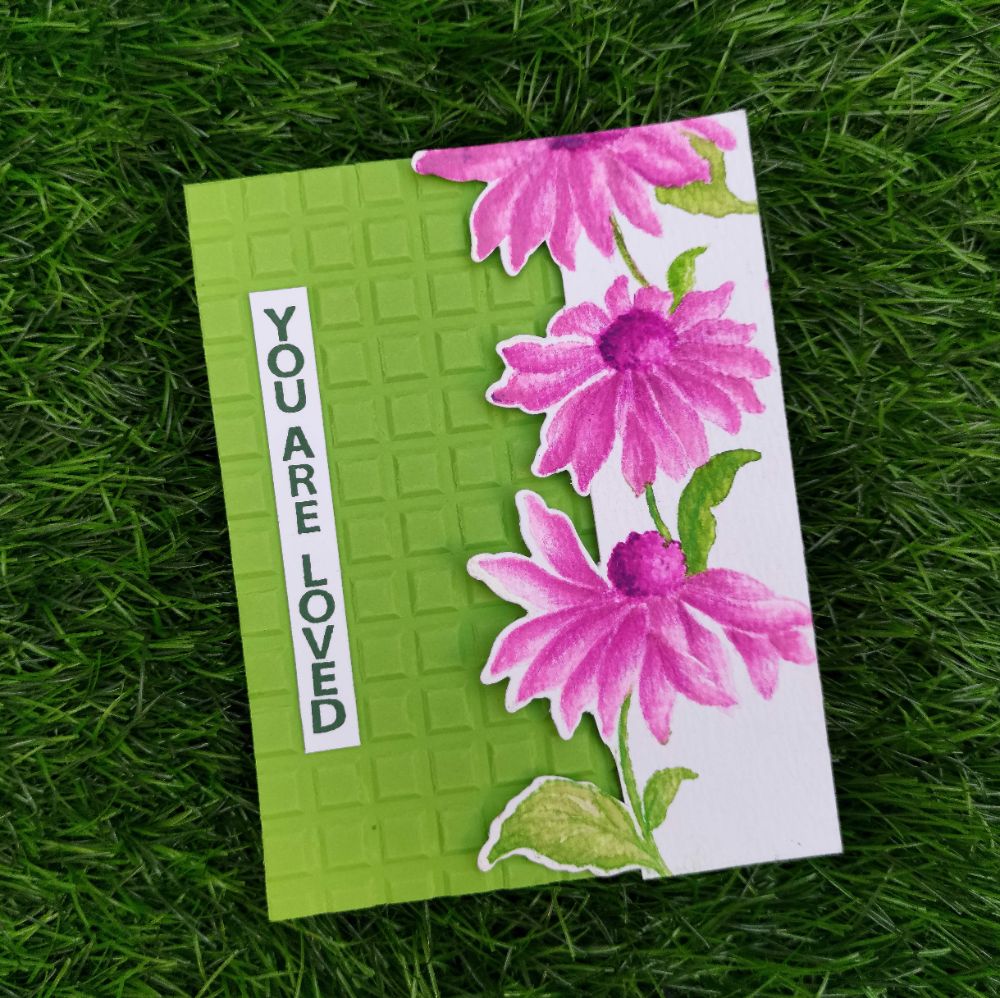
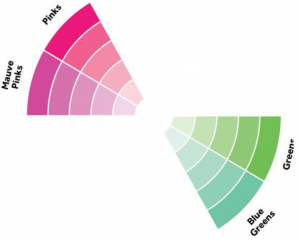
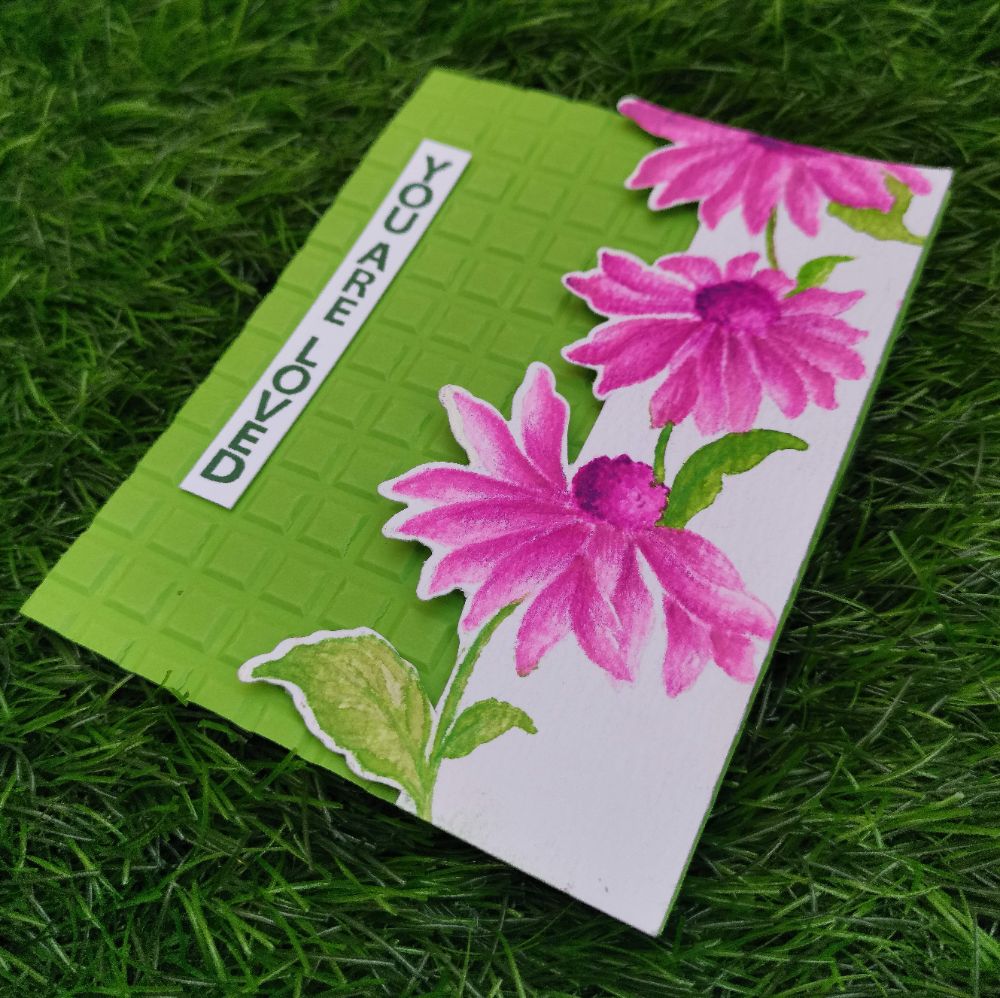
Altenew: Color Your Day
Hello Crafty Friends! Today I have a card I made for the Altenew Color Your Day class. This class is taught by Therese Calvird and is a must take class. A bit of color can brighten up anyone’s day! She presented how to add splash of colors to our projects with this fun class filled with fresh inspirations, tips, and techniques perfectly. It really made me think about composition more when creating. Combining colors together can be daunting so it’s time to take the guess work out of it and one of the easiest ways to do that is to use a Color Wheel. These handy little tools can take your color combinations to the next level!
To begin with, I selected the color pink from the color wheel, and choose it’s complementary color green.
INSTRUCTIONS
- Take a White watercolor Cardstock measuring “4 1/4 x 5 1/2 ”
- Stamp the flower from Build a flower- Coneflower stamp set on it with antique linen distress ink.
- Mask and stamp other flowers and leaves according to your design
- Put your ink pads on a watercolor palate and use a water color brush to color your flowers and leaves.
- Position the coordinating dies over the flowers and do partial die cut.
- Take a lime green 4 1/4 x 5 1/2 cardstock and place it in between the embossing folder
- Keep the paper on one side and Spray the opposite side of the folder with water and close the folder and run it through the die cutting machine.
- Stick the painted floral cardstock over green cardstock paper with double sided tape
- Stamp the sentiment on a white strip of cardstock and stick it over the green cardstock
TIPS
- Put your inkpads to another use by using them as paints! This is a great way to color in stamped images, creating perfectly matched colors
- Before stamping, use an Anti-Static Pouch tool to remove static from your paper so the powder doesn’t stick where you don’t want it.
- A water brush (with an empty barrel) or a fine-tip paint brush both work beautifully for this technique.
- If you don’t have a water color palette, you may use a craft sheet as a palette for your inkpads. If you don’t have one, a plastic page protector can also do the trick
SUPPLIES
- Antique linen distress Ink
- Rose quartz Crisp Dye Ink
- Pluffy heart Crisp Dye Ink
- Purple wine Crisp Dye Ink
- Cosmic berry Crisp Dye Ink
- Firefly Crisp Dye Ink
- Grass field Crisp Dye Ink
- Shadow creek Crisp Dye Ink
- Mountain pine Crisp Dye Ink
- Build a flower- Coneflower stamp and die set
- Hello hydrangea stamp set
- Rows of squares 3d embossing folder
This was one of my favorite class from AECP. I always find it difficult to choose my color combination. And taking this class made me more excited. So I choose this class for our AECP Instagram hope. I came out of our comfort zone and made my first video tutorial with it.
Thank You!
Hope you liked my cards. Have a wonderful day and I hope to see you all soon with another project from AECP. Until then happy stamping and thanks for stopping by! If you like what you’ve seen from me, please give me a follow over on my Instagram (@shahicreationz) and/or subscribing to my vlog and YouTube if you haven’t already.
-shahi
Altenew : Beautiful Details
Hi, my dear crafty friends, welcome to my blog. I made today’s card for the Beautiful Details Course by Altenew Academy. Don’t know why, I was procrastinating this class this long. In fact I did take this class weeks back, but had a fear to give it a try. I could really feel that this was completely out of my comfort zone.
INSTRUCTIONS
- Create a “4 1/4 x 5 1/2 ” card base from Classic Crest Solar White Cardstock.
- Choose a solid stamp set and color it with a brush marker and using generational stamping
- Use various shades of the similar color and stamp them in various generations
- I have used shades of pink for the flowers
- And a darker shade of green for the leaf and stem.
- Lighter shades of the petals gives a illusion that there are more petals in the back
- I shaded the markers in the same direction, so that it brings a uniform direction to the flowers, stems and leaves
- I liked the flowers as such but decided to add few strokes of black as taught in the class.
- To completely change the look of the card, I ran the top part of the card through my die cutting machine and created a 3d dimension using Diamond stars 3D embossing folder
- Stick a matching shade of washi tape at the end point differentiating the 3 dimensional part and the flowers below.
- As an added interest, I Stuck matching pearl embellishments as the buds of the flowers.
- As the sentiment, I stamped “Thanks” on a classic crest solar white cardstock and die cut it
- Stick that die cut over the top positioning to the center of the center over the 3 dimensional part of the flower.
- Once the stamping is done, we are ready to add the details.
- I liked the flowers as such, so had a fear of going ahead of adding strokes to the flowers.(But wanted to give it a try)
- Add few strokes over the flower using a black ink pen (Here I used a black ball pen)
- The strokes are drawn according to ones personal interest. You may draw it in any shape or sizes. It can be drawn whereever you want.
TIPS
- Remember to leave gaps between the strokes.
- Use a stamping tool to stamp your florals. It makes stamping large solid images so much easier since you can double and triple stamp in various generations
- The included bar magnet can be used to quickly and easily position your cardstock, and the included grid paper makes it easy for you to lay out and align your card’s design.
- Before stamping, use an Anti-Static Pouch tool to remove static from your paper so the powder doesn’t stick where you don’t want it.
- Try other stamp sets and try to see your solid stamps in a new way. There are lot of fun things to be found!
- Try other stamping mediums and stamping techniques for creating the base layer for example markers, kissing technique etc.
SUPPLIES
- Sizzix Bigshot die cutting Machine
- Neenah Paper 4456 Neenah 110lb Classic Crest Cardstock
- Misti stamping tool
- Bird of Paradise Stamp Set
- Evergreen Mixed Media Ink
- Pink Faber castell fiber tip color marker
- Deep pink Faber castell fiber tip color marker
- Sap green Faber castell fiber tip color marker
- Flamingo pearl embellishments
- Glitter washi tape
- Halftone circles stamp set
- Halftone circles die
- Diamond stars 3D embossing folder
Thank You!
Hope you liked my card. Have a wonderful day and I hope to see you all soon with another project from AECP. Until then happy stamping and thanks for stopping by! If you like what you’ve seen from me, please give me a follow over on my Instagram (@shahicreationz) and/or subscribing to my vlog and YouTube if you haven’t already.
-shahi
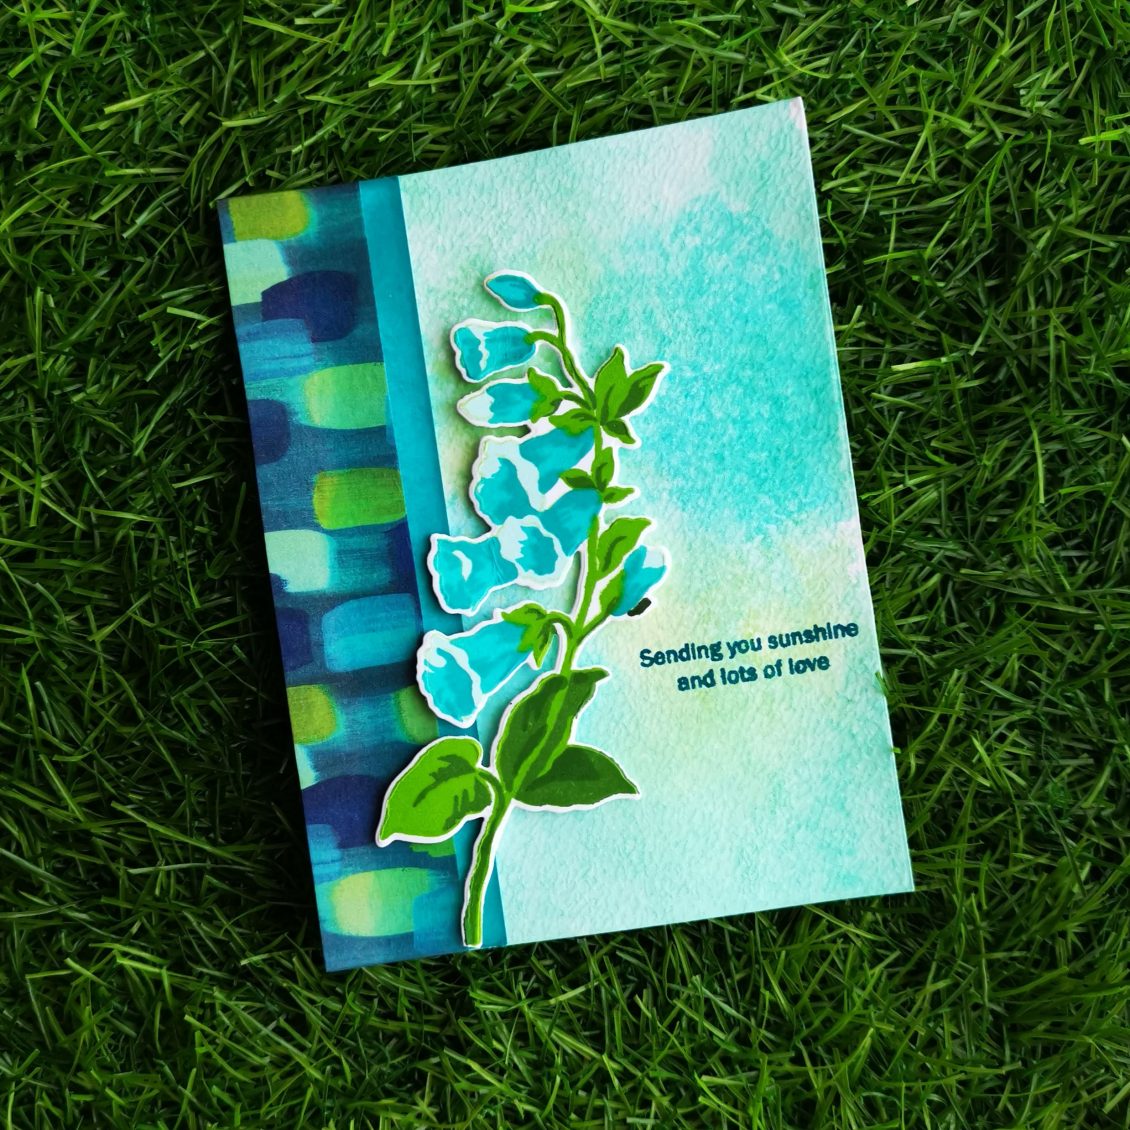
Altenew : Creative Watercolor Media
My next take is on the aecp lesson, Creative Watercolor Media. This class helps us in giving your coloring supplies a new life! In this class, you will learn to take inks, re-inkers, and sprays and turn them into fun watercolor mediums! This is great for any crafter, new and seasoned, to enjoy more use out of their existing Altenew supplies. Here, Jennifer Rzasa, Debby Hughes, and Laura Bassen have really done a great job by explaining us the things in detail. With such a line up of teachers you can imagine the quality of the class!
INSTRUCTIONS
- Take a Classic Crest Solar White Cardstock and stamp the Canterbury Bells on it with sweet dreams and green valley crisp dye ink set.
- Die cut it with the coordinating die set from Altenew.
- Take a strip of Classic Crest Solar White Cardstock and ink blend it with Teal Cave crisp dye ink
- Stick the washi tap towards the right corner, and trim the cardstock leaving a thin strip of color border near the washi tape.
- Create a “4 1/4 x 5 1/2 ” card base from Classic Crest Solar White Cardstock.
- Put down the lightest shade of sweet dreams and green valley crisp dye ink set on to some cellophane or on Altenew water color palette , then sprayed with water and smooshed on to the paper
- Once the card was thoroughly dry, stick the strip of cardstock with washi tape over it aligning it towards the left side of the card.
- Stick the Canterbury Bells over it. with some sticky dots.
- Stamp the sentiment with the darkest color from sweet dreams crisp dye ink set .

TIPS
- Use a stamping tool to stamp your florals. It makes stamping large solid images so much easier since you can double and triple stamp. the included bar magnet can be used to quickly and easily position your cardstock, and the included grid paper makes it easy for you to lay out and align your card’s design.
- Before stamping, use an Anti-Static Pouch tool to remove static from your paper so the powder doesn’t stick where you don’t want it.
- When doing stamp layering, start with the lightest ink color first and then build up to the darkest.
SUPPLIES
- Sizzix Bigshot die cutting Machine
- Neenah Paper 4456 Neenah 110lb Classic Crest Cardstock
- Misti stamping tool
- Teal cave Crisp dye ink
- Grass Field Crisp dye ink
- Green valley Crisp dye ink (set)
- Sweet dreams Crisp dye ink (set)
- Build a flower- Canterbury Bells
- Enjoy the Ride Washi Tape Set
Thank You!
Hope you liked my card. Have a wonderful day and I hope to see you all soon with another project from AECP. Until then happy stamping and thanks for stopping by! If you like what you’ve seen from me, please give me a follow over on my Instagram (@shahicreationz) and/or subscribing to my vlog and YouTube if you haven’t already.
-shahi
 CASE your fellow AECP Crafter
  Clean & Simple Boutique Cards
  Easy Die Cutting Techniques
  Graduation card
  Let it shine
Recent Comments