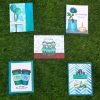
Welcome to this blog post in celebration of my AECP Level 2 Final Challenge. I am so excited to share my projects with you and look forward to your feedback. The final challenge gives AECP Participants the wings to explore and showcase their personal design style as well as use the techniques and tips absorbed during the 20 class curriculum required to reach this level. For my final project, I was asked to create 4 masculine cards with the themes of love/thinking of you, encouragement, anniversary and birthday using any 3 components from the classes in Level 1 or 2. As well as an altered item/upcycled, project.
As a part of basic planning, i decided to set a theme for my masculine card sets. For that, I decided to use a peacock theme to organize my color pallet and designs.
Here, i am planning to introduce the cards according to their theme, and they are as follows:
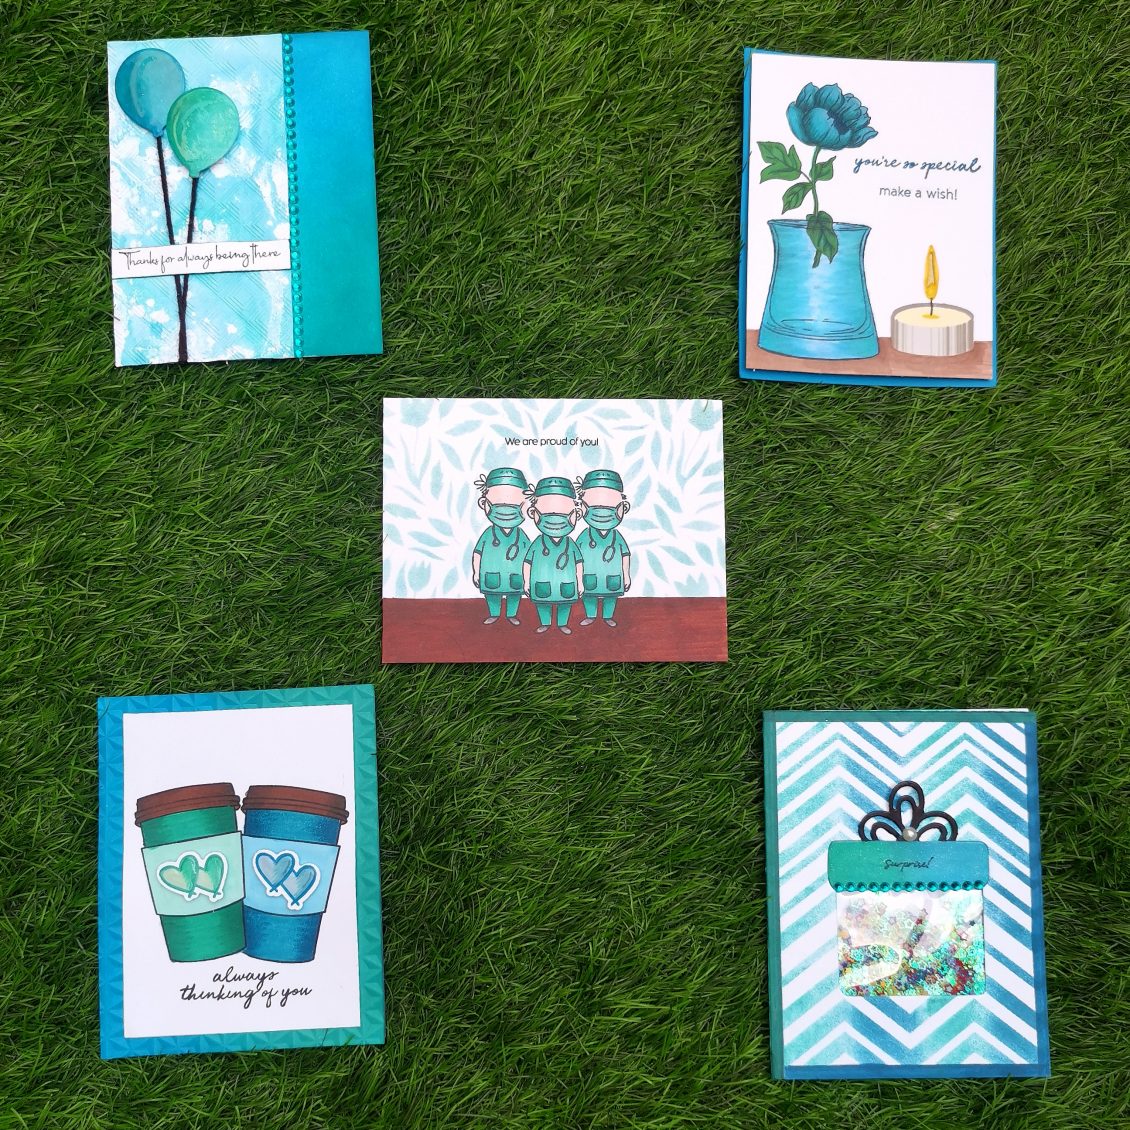
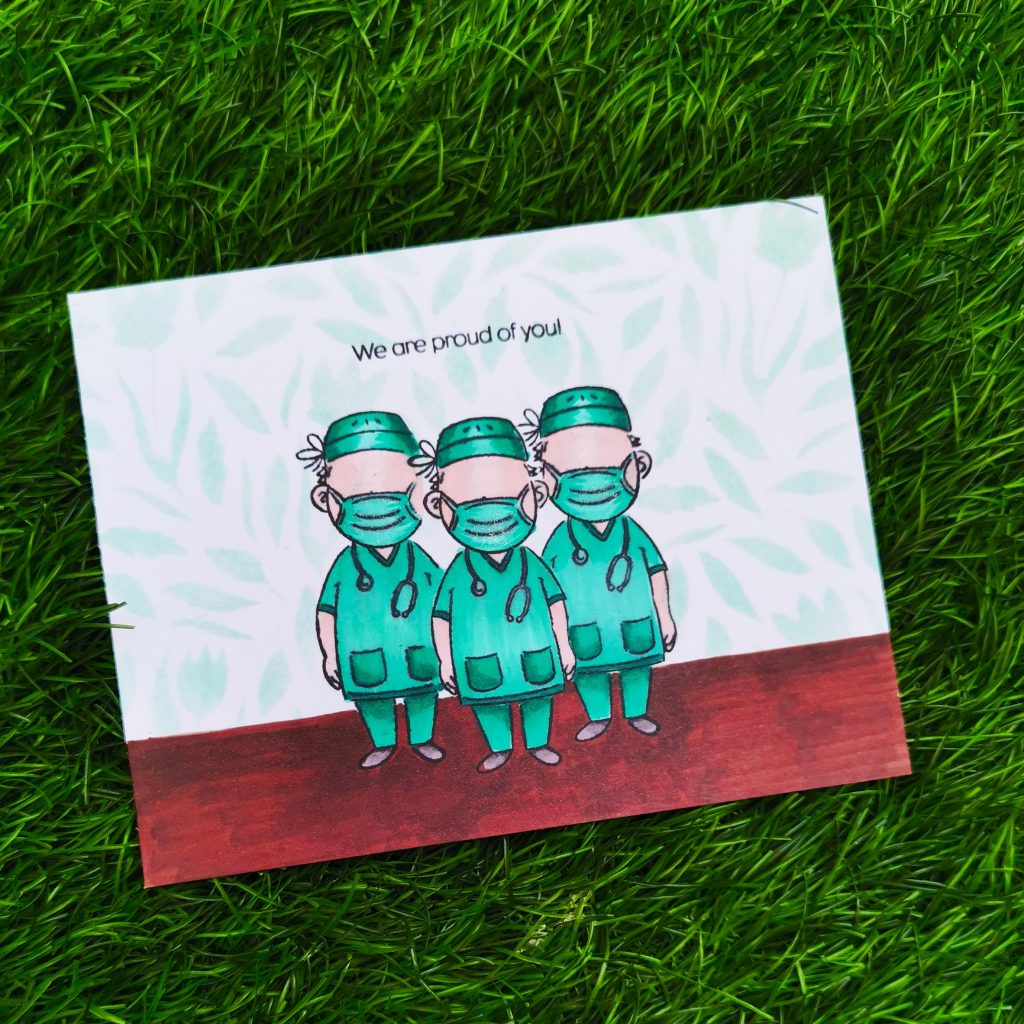
1. Encouragement Card
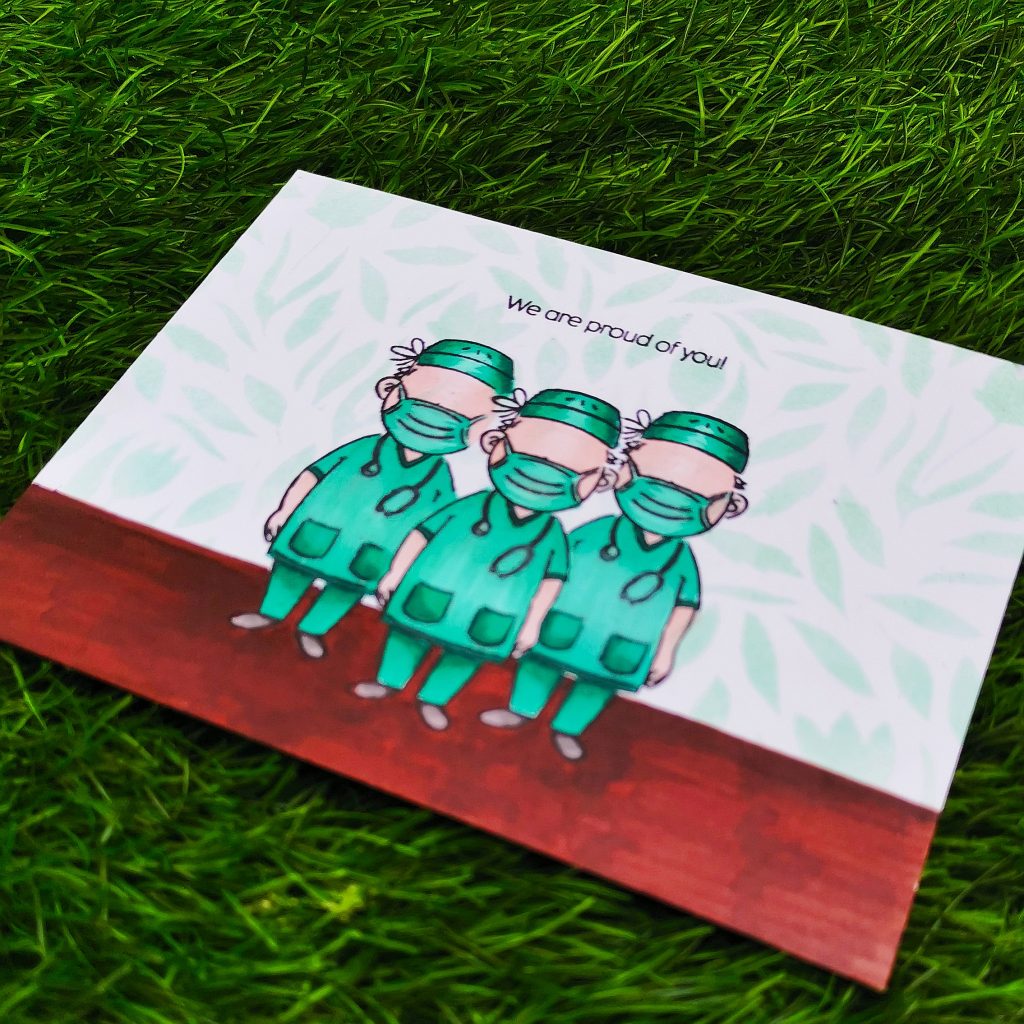
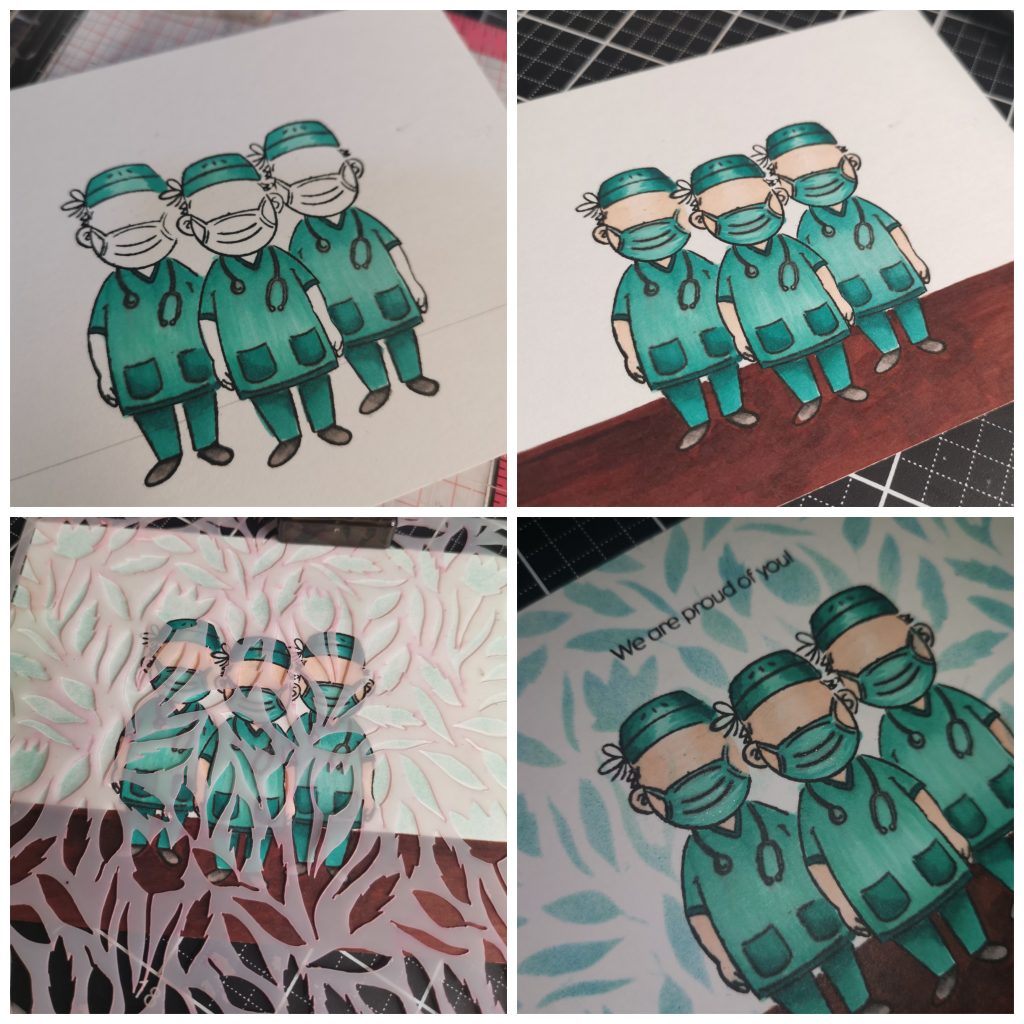
Telling someone that they have been a blessing for you is like making them feel happy of their existence in your life. This card is something like that. I am dedicating this card to all the healthcare superheroes who are working 24 * 7 beneath this covid 19 situation .
SUPPLIES
ALTENEW PRODUCTS-
- Spring garden stencil
- Healthcare heroes stamp and die set
- Mountain mist crisp dye ink
- Jet black crisp dye ink
- Mountain Mist Artistic Marker
- Volcano Lake Artistic Marker
- Emerald Artistic Marker
- Dark chocolate Artistic Marker
- Peach Perfect Artistic Marker
- Blush Artistic Marker
- Evening Gray Artistic Marker
- Pure Graphite Artistic Marker
OTHER –
- Neenah classic crest white card stock
- Misti stamping tool
- Sizzix big shot
- Guillotine Paper Trimmer
- Sheer Shimmer craft spray
- Masking paper
- Glue stick
- Scissors
TECNIQUES ADDOPTED-
- Masking Unleashed (Basic Masking)
- Color Your Day (70 / 20 / 10)
- Celebration: Stencil Techniques
- Let It Shine (Shimmer & Sparkle Pens)
- For The Guys (Cards for Boys)
- Easy Die Cutting Techniques ( Stamps and Matching Dies )
- Clean & Simple Boutique Cards (Simple styling)
- Seasonal Scene Building (Background Building)
INSTRUCTIONS
Create a 4 ¼” x 5 ½” card base from Classic Crest Solar White Cardstock. Stamp the male doctor stamp on the cardstock with jet black ink and mask it with masking paper. Stamp 2 more of the same image on its right and left. Color them with artist markers. Draw a floor background with artist makers and fill it with the same color. Place the stencil over the card and pat the blending tool over it. Make sure that you don’t blend the color. Then stamp the sentiment on the top middle of the card. To add dimensions, you may use metallic shimmer on the mask of the doctors.
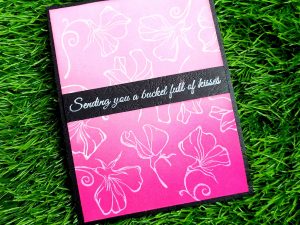
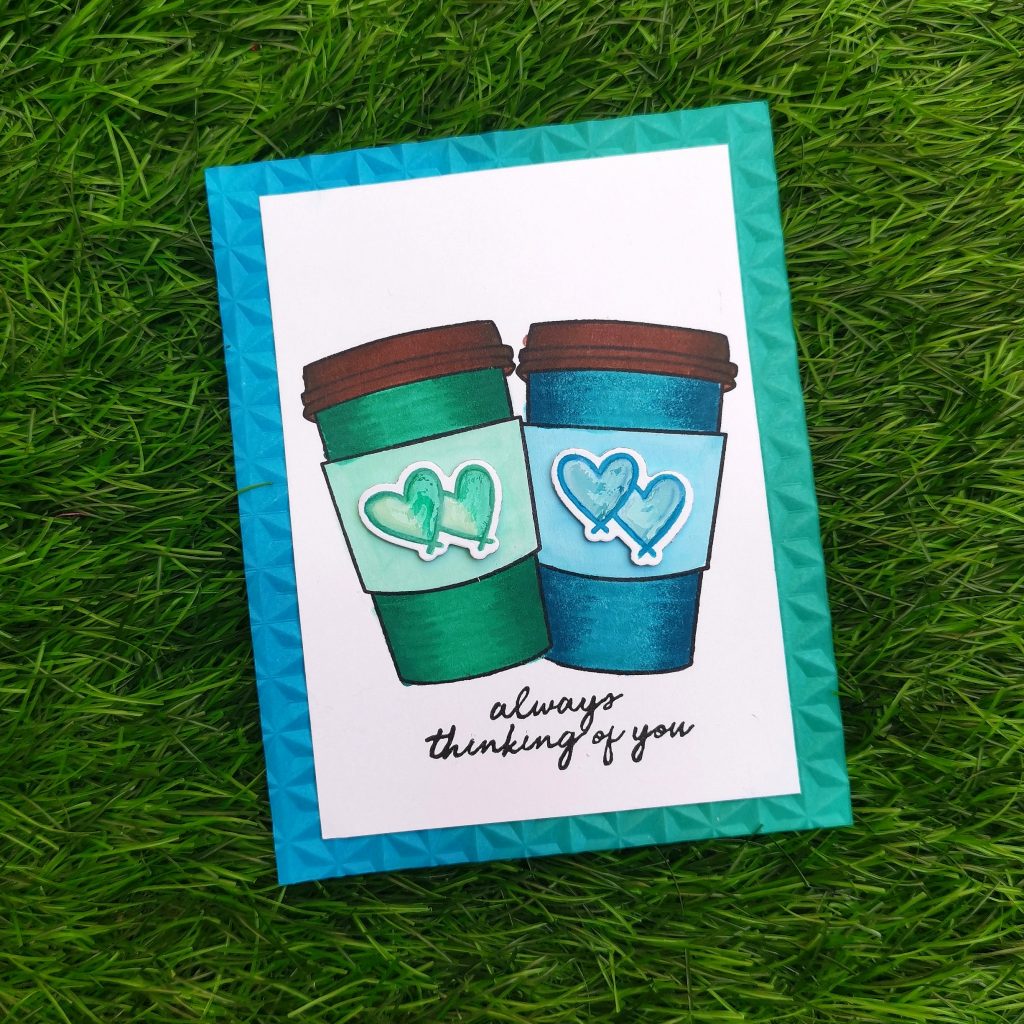
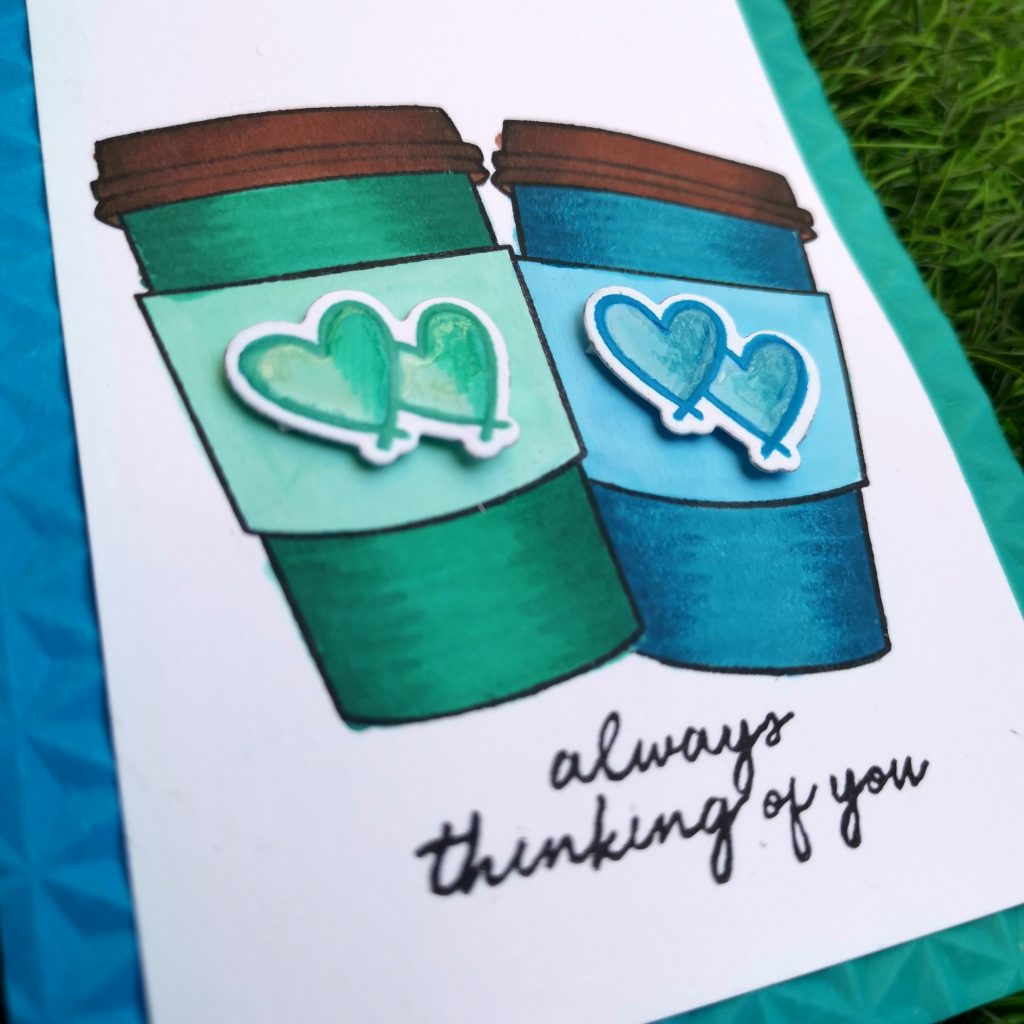
2. Thinking of you Card
We often miss people in various points of our life. You might think about them because something that is happening now is the same or different from something that happened when you were with them. If you are noticing signs, someone is thinking about you, it could trigger thoughts and feelings in you, too. This card represents something like that.
SUPPLIES
ALTENEW PRODUCTS-
- Watercolor palette
- Watercolor brush
- Sea breeze crisp dye ink
- Volcano lake crisp dye ink
- Tide blue crisp dye ink
- Lagoon crisp dye ink
- Dusk crisp dye ink
- Aqualicious crisp dye ink
- Galactic stream crisp dye ink
- Starlight crisp dye ink
- Versatile vase Stamp set
- Friends forever Stamp and die set
- Moca Artistic Marker
- Espresso Artistic Marker
- Volcano lake Artistic Marker
- Emerald lake Artistic Marker
- Desert night Artistic Marker
OTHER –
- Neenah classic crest white card stock
- Sizzix big shot
- Misti stamping tool
- Double sided foam tape
- Guillotine Paper Trimmer
- Nuvo crystal glaze
- Glue stick
- Scissors
TECNIQUES ADDOPTED-
- Masking Unleashed (Basic Masking)
- Color Your Day (How Much Color?)
- Let It Shine (Shimmer & Sparkle Pens)
- For The Guys (Cards for Boys)
- Easy Ink Blending Techniques ( Painting with Ink pads )
- Easy Die Cutting Techniques ( Stamps and Matching Dies )
- Clean & Simple Boutique Cards (Simple styling)
INSTRUCTIONS
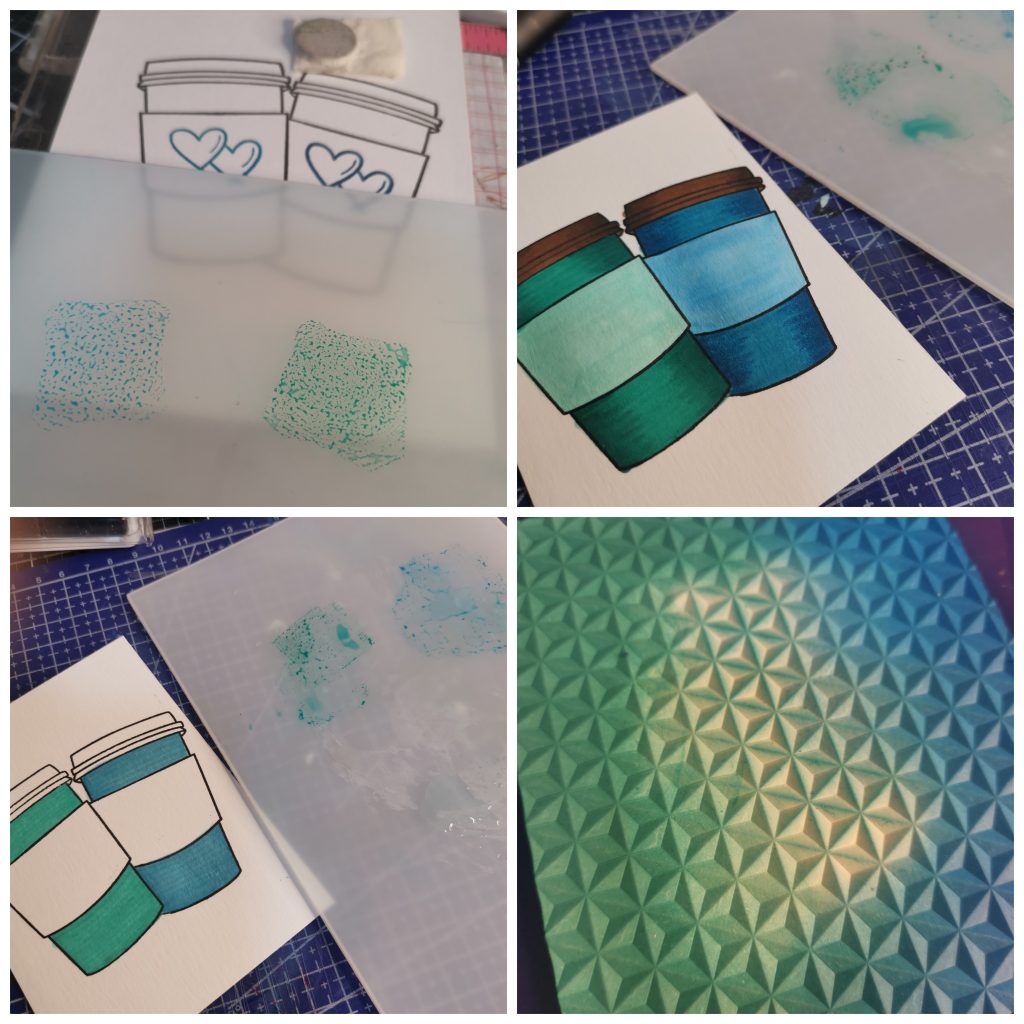
Create a 4 ¼” x 5 ½” card base from Classic Crest Solar White Cardstock. Ink blend it with both the shades vertically. And run it through your sizzix bigshot and emboss it using 3d embossing folder. Take another cardstock measuring 3 ½ x 4 ¾. Stamp the coffee cup stamp from Friends forever stamp set. Masking it stamp one more towards its right side. Then applying some crisp die inks on to the watercolor pallet and paint the coffee cups with it. I used my artist markers to add more dimensions to them. Then Stamp the hearts on another cardstock and die cut it with its coordinating dies. Paint them as you did the coffee cups and stick it on to the cardstock with double-sided foam tape. Stamp the sentiment below the coffee cups with jet black ink.
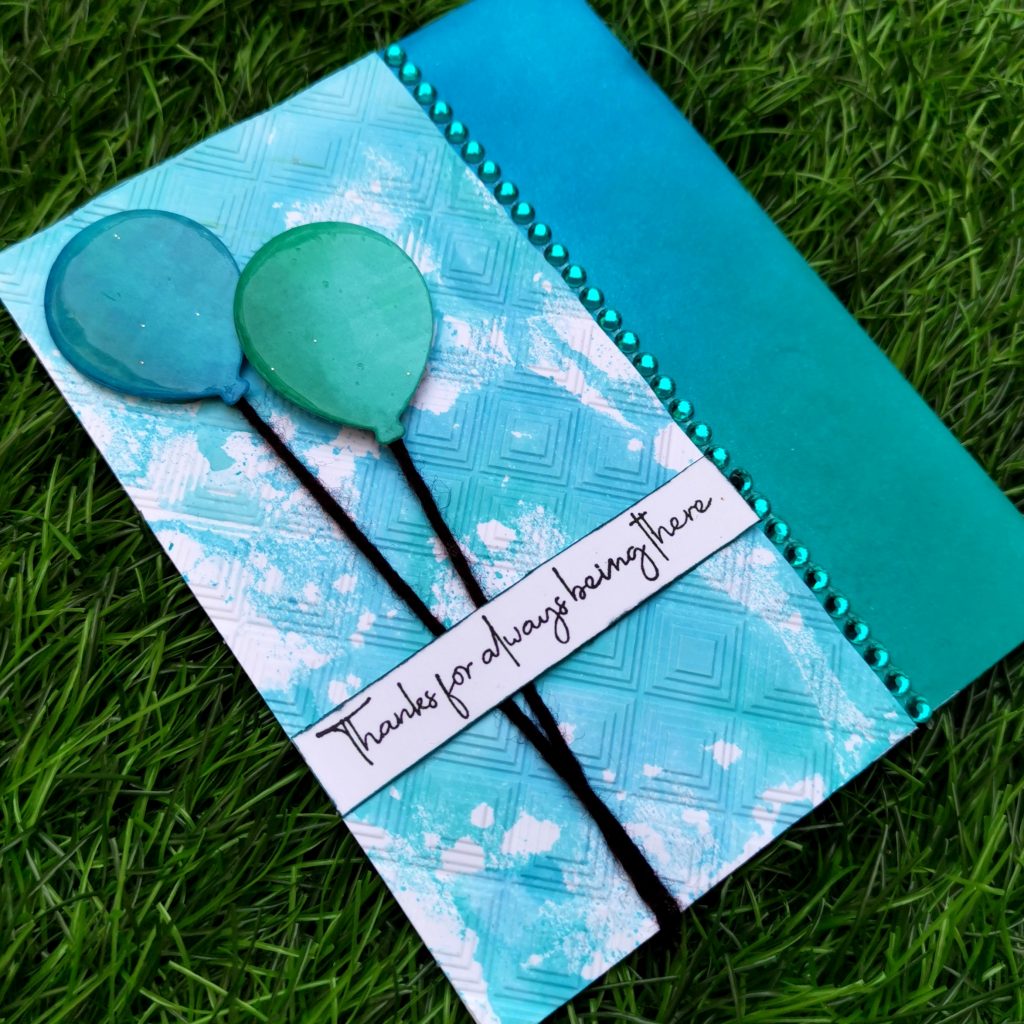
3. Anniversary card
Anniversary is a day when we remember or celebrate something important that happened on that day in a previous year. Most important thing for a married couple is to stick on together forever. Here I have set my anniversary card on that theme of being there for one another throughout the journey of life.

SUPPLIES
ALTENEW PRODUCTS-
- Friends forever stamp set
- Birthday greetings stamp and die set
- Tide blue crisp dye ink
- Aqualicious crisp dye ink
- Teal care crisp dye ink
- Dusk Artistic Marker
- Mountain mist Artistic Marker
- Volcano lake Artistic Marker
- Dessert night Artistic Marker
- Ocean waves Artistic Marker
OTHER –
- Neenah classic crest white card stock
- Sizzix big shot
- Misti stamping tool
- Double sided foam tape
- Guillotine Paper Trimmer
- versa fine pigment ink
- peacock crystal sticker
- black woolen thread
- Heat gun
- Versa mark watermark stamp pad
- Hero Arts clear Embossing powder
- Glue stick
- Scissors
TECNIQUES ADDOPTED-
- Color Your Day (Adding Color )
- Let It Shine (Embossing Powder , Embellishments)
- For The Guys (Cards for Boys)
- Easy Die Cutting Techniques ( Stamps and Matching Dies )
- Clean & Simple Boutique Cards (Simple styling)
- Easy Ink Blending Techniques (Ink Blend a Card Stock)
- Creative Watercolor Media (Altenew Crisp Dye Inks)
INSTRUCTIONS
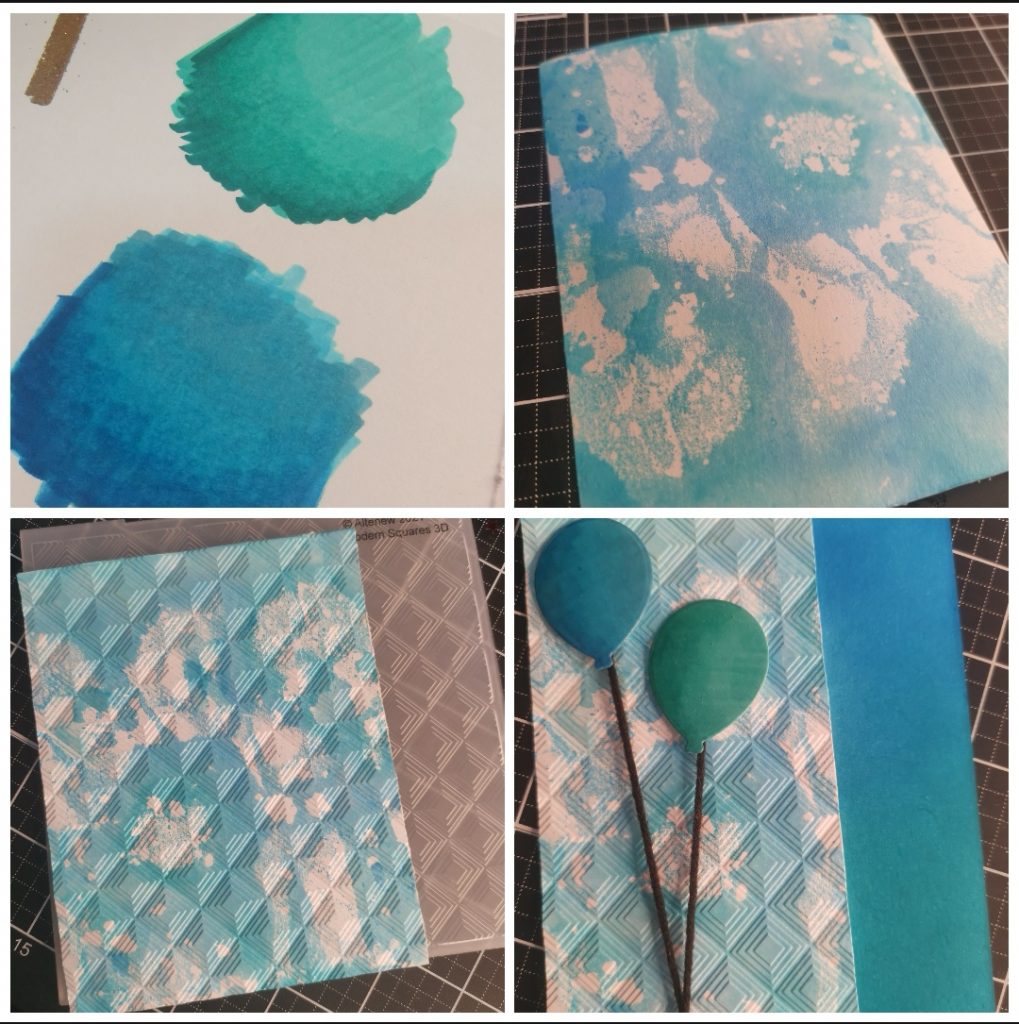
Create a 4 ¼” x 5 ½” card base from Classic Crest Solar White Cardstock. Put down the lightest shade of crisp dye ink set on to some cellophane or on Altenew watercolor palette, then sprayed with water and smooshed on to the paper. Then run it through the 3D embossing folder. Trim 1 ½ inches from the cardstock. Take another 4 ¼” x 5 ½” card base and ink blend it. Stamp the balloons on a cardstock and ink blend it with artistic markers and die cut them with its coordinating die set. Stamp Versa mark watermark over it and heat emboss it with clear embossing folder. Take 2 pieces of woolen thread and stick it along with the bottom of the balloons. Turn the card and adhere the tread to the back of the card. Then Stick the embossed cardstock on top of this cardstock towards the right side. Stick a strip of crystal sticker towards the end of the cardstock separating them. Stamp the sentiment on a piece of white cardstock and Adhere it above the black thread.
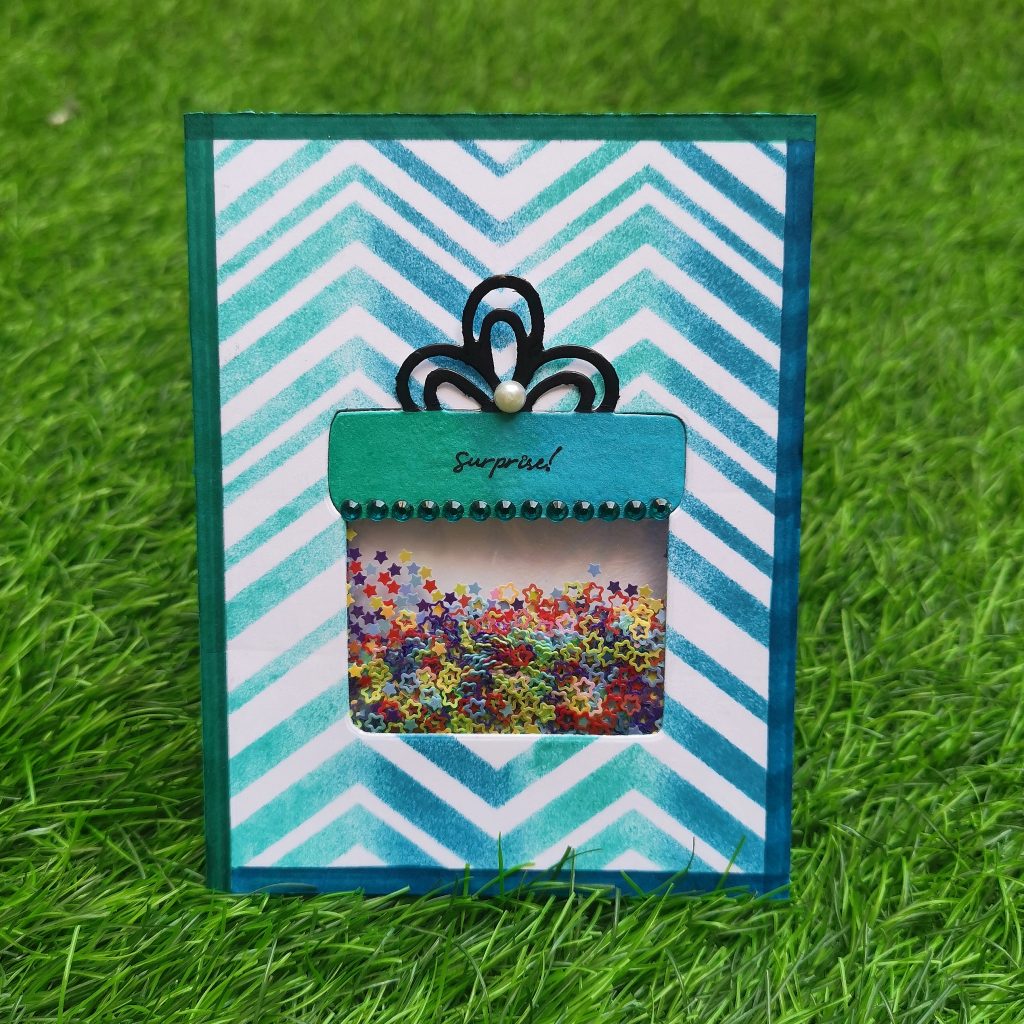
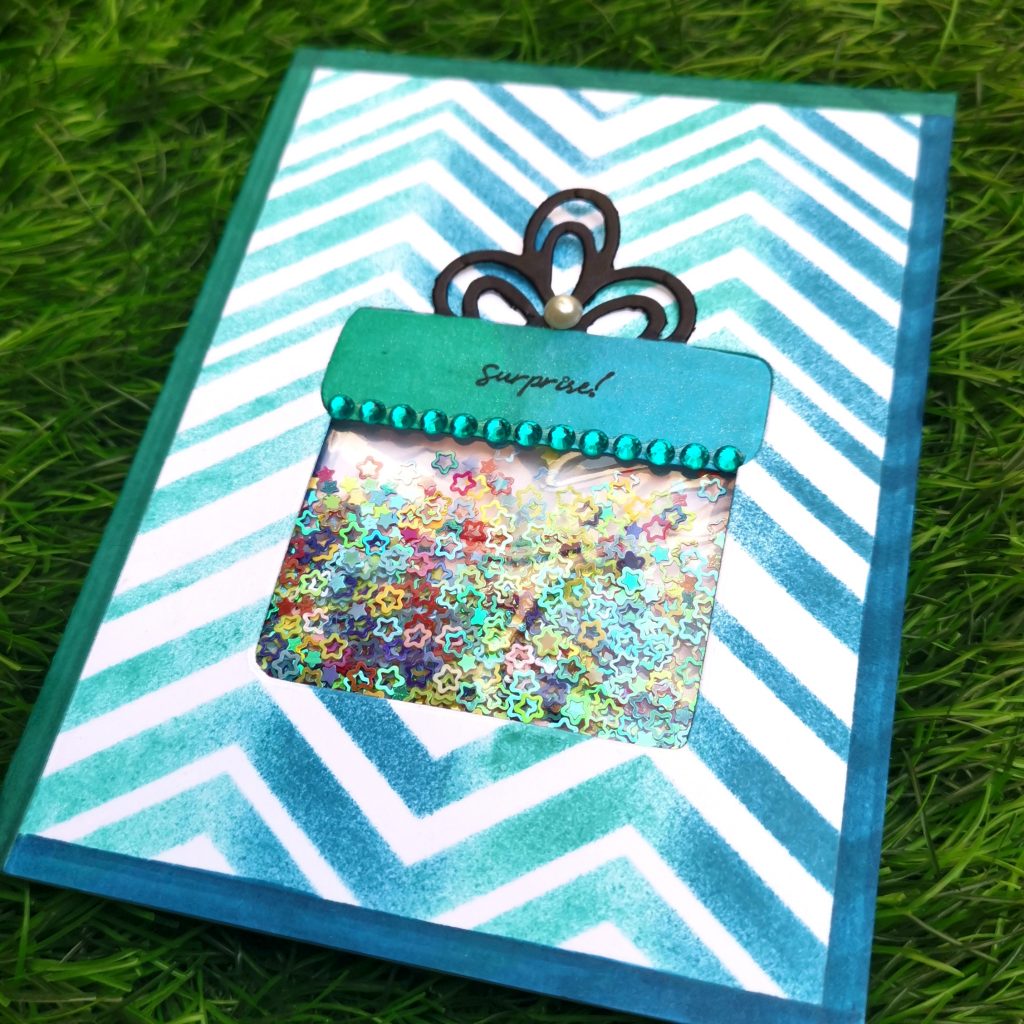
4. Birthday Card
I decided to make 2 birthday interactive cards for my project. Here I choose shaker card and a light up card.
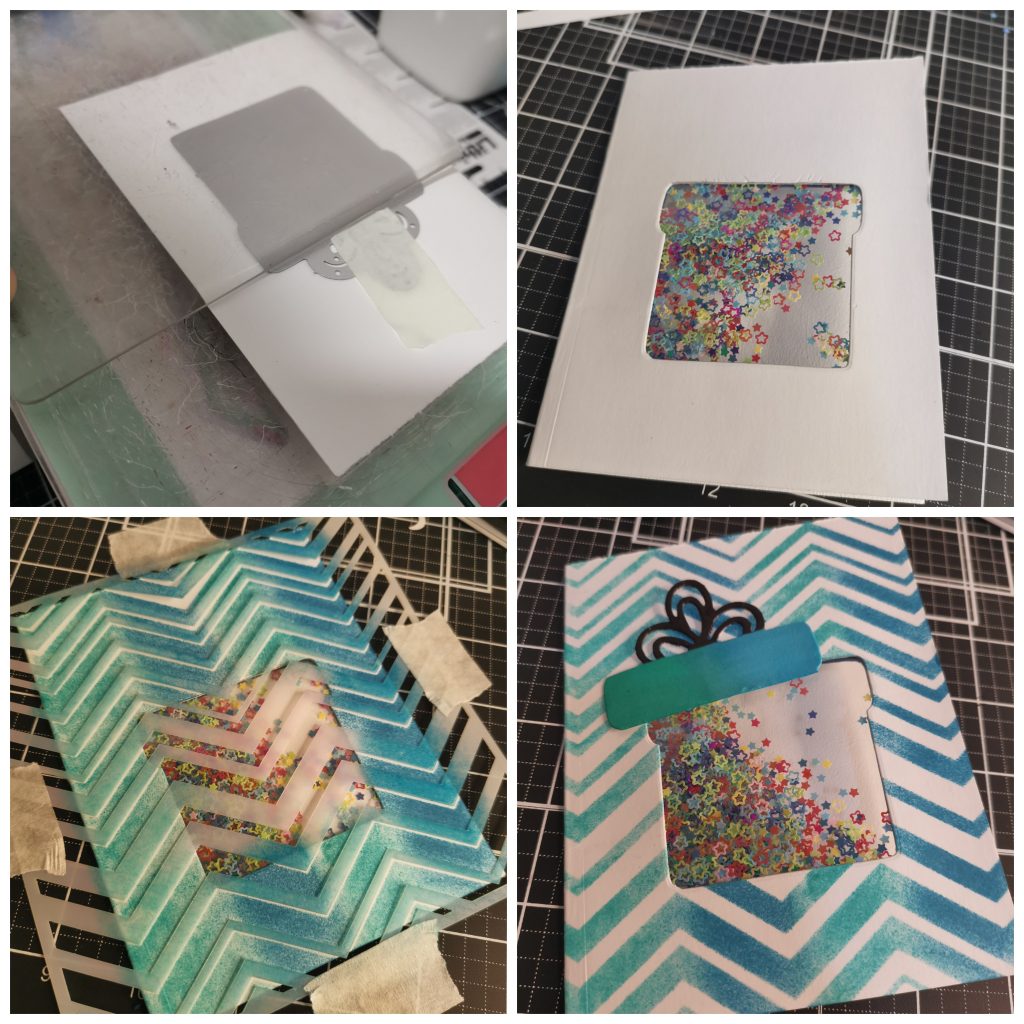
CARD 1 – Shaker card
SUPPLIES
ALTENEW PRODUCTS-
- Emerald Artistic Marker
- Desert night Artistic Marker
- Jet Black Artistic Marker
- Emerald crisp dye ink
- Desert night crisp dye ink
- lagoon crisp dye ink
- ocean waves crisp dye ink
- Layered Gift Tag – Present Die Set
OTHER –
- Neenah classic crest white card stock
- Sizzix big shot
- Misti stamping tool
- Double sided foam tape
- Guillotine Paper Trimmer
- versa fine pigment ink
- Acetate sheet
- 6 Color glittering Star
- Sheer shimmer craft spray
- Peacock crystal sticker
- Glue stick
- Scissors
TECNIQUES ADDOPTED-
- Creative Watercolor Media (Altenew Crisp Dye Inks)
- For The Guys (Interactive)
- Let It Shine (Shimmer & Sparkle Pens)
- With A Twist ( Acetate with a Twist! )
INSTRUCTIONS
Create a 4 ¼” x 5 ½” foldable card base from Classic Crest Solar White Cardstock. Place the Layered Gift Tag – Present Die Set on the middle of the card and partial die cut it from the top of the gift bow. Trim the excess part. Create a “ 4 ¼” x 5 ½ ” top folding card base from Classic Crest Solar White Cardstock .Trace out the previous die cut image into this card stock. Place the die on this panel and die cut the shape. Die cut another piece of the same die cut and cut out the top part of the box including the ribbon. Color the ribbon with jet black ink. Then applying the lighter shades of crisp die inks on to the watercolor pallet , paint the top part of the gift box. Once dry ,apply the shimmer spray over it. Stick peacock crystal stickers towards its bottom. Stick an acetate sheet on the back of the main card and create a boundary using double sided tape. tap in some shaker stars into it and stick an another piece of acetate over it. Adhere the second panel over it. Mask the die cut piece and place the stencil over the card . apply the crisp die ink over the card in vertical way. Shade the borders of the card with the darker shade of artist marker. Then stick the top part of the gift box on it’s place. Add embellishments according to your liking.
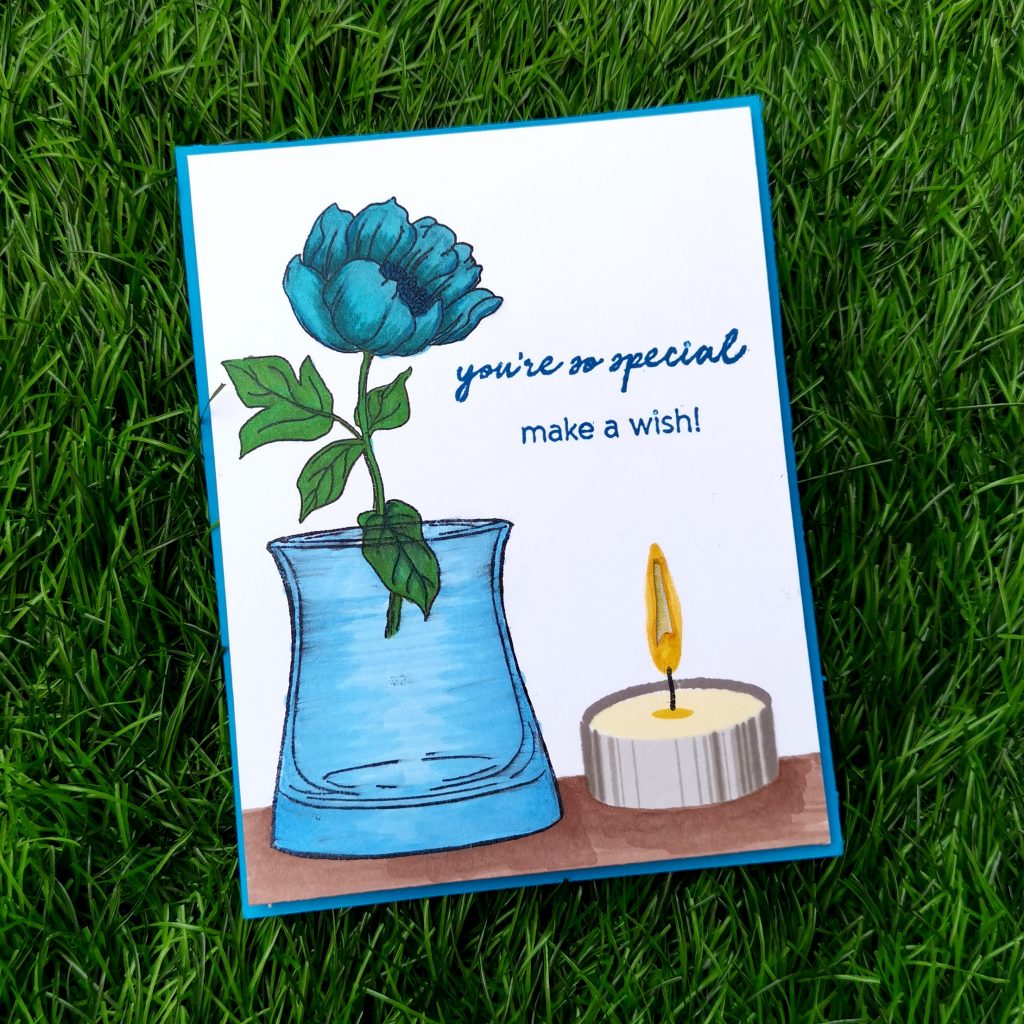
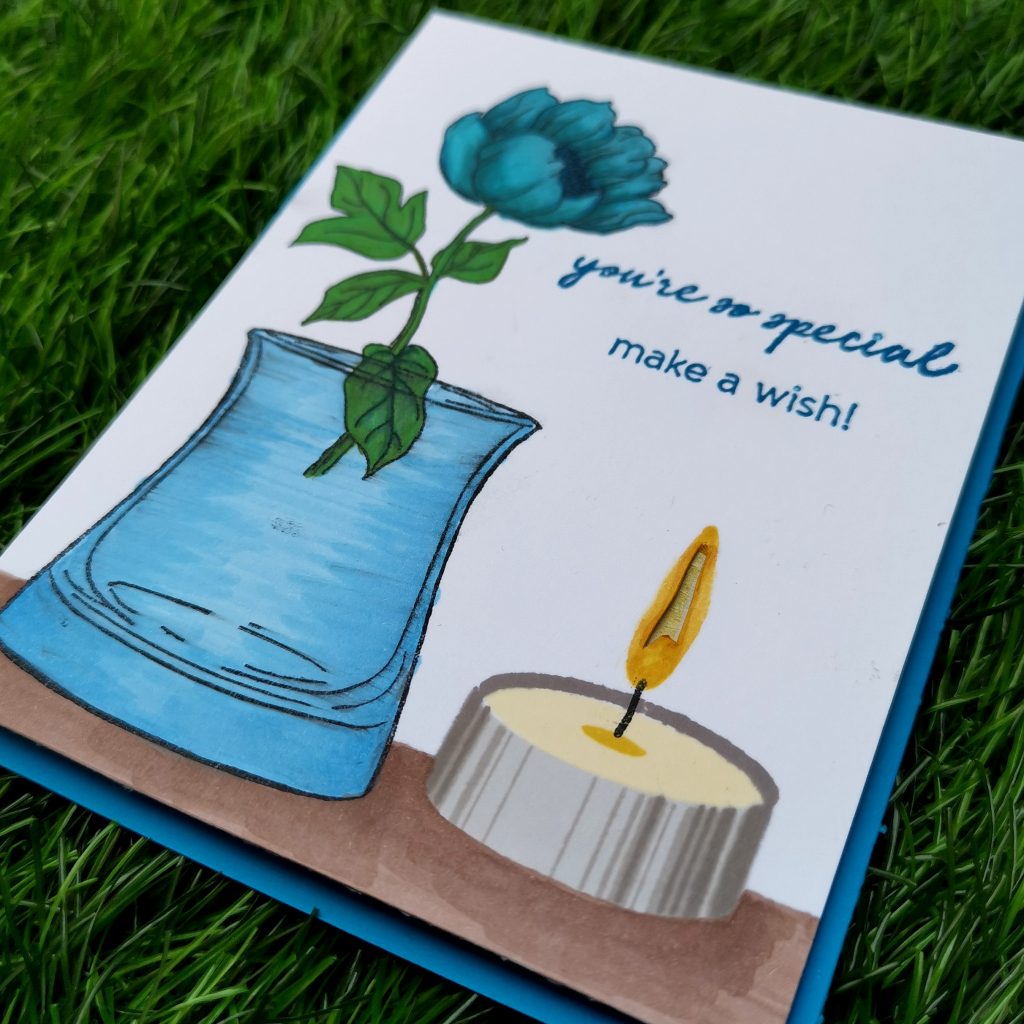
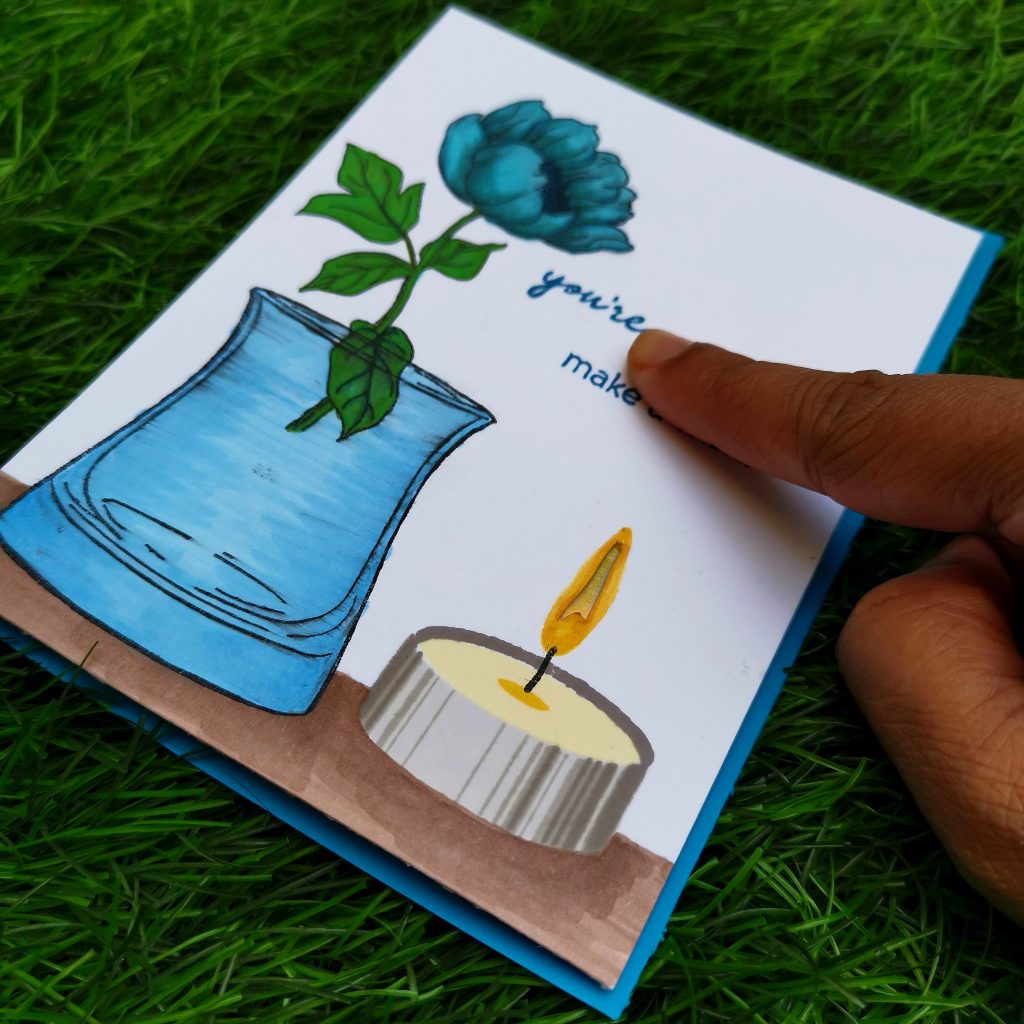
CARD 2 – Light up Card
SUPPLIES
ALTENEW PRODUCTS-
- Wild flora Stamp set
- Versatile vases Stamp set
- Candlelight Stamp set
- Buttercream crisp dye ink
- Honey drizzle crisp dye ink
- Autumn Blaze crisp dye ink
- Morning Frost crisp dye ink
- Evening Gray crisp dye ink
- Moon Rock crisp dye ink
- Lava rock crisp dye ink
- Starlight crisp dye ink
- Desert night Artistic Marker
- Warm sunshine Artistic Marker
- Dusk Artistic Marker
- Caribbean sky Artistic Marker
- Forest Glades Artistic Marker
- Mocha Artistic Marker
OTHER –
- Neenah classic crest white card stock
- Sizzix big shot
- Misti stamping tool
- Double sided foam tape
- Guillotine Paper Trimmer
- versa fine pigment ink
- Copper tape
- LED Sticker light
- Coin-cell battery
- Glue stick
- Scissors
TECNIQUES ADDOPTED-
- For The Guys (Interactive)
- Clean & Simple Boutique Cards (Simple styling)
- Masking Unleashed (Basic Masking)
- Color Your Day (How Much Color?)
- Let It Shine (Shimmer & Sparkle Pens)
- Seasonal Scene Building (Background Building)
INSTRUCTIONS
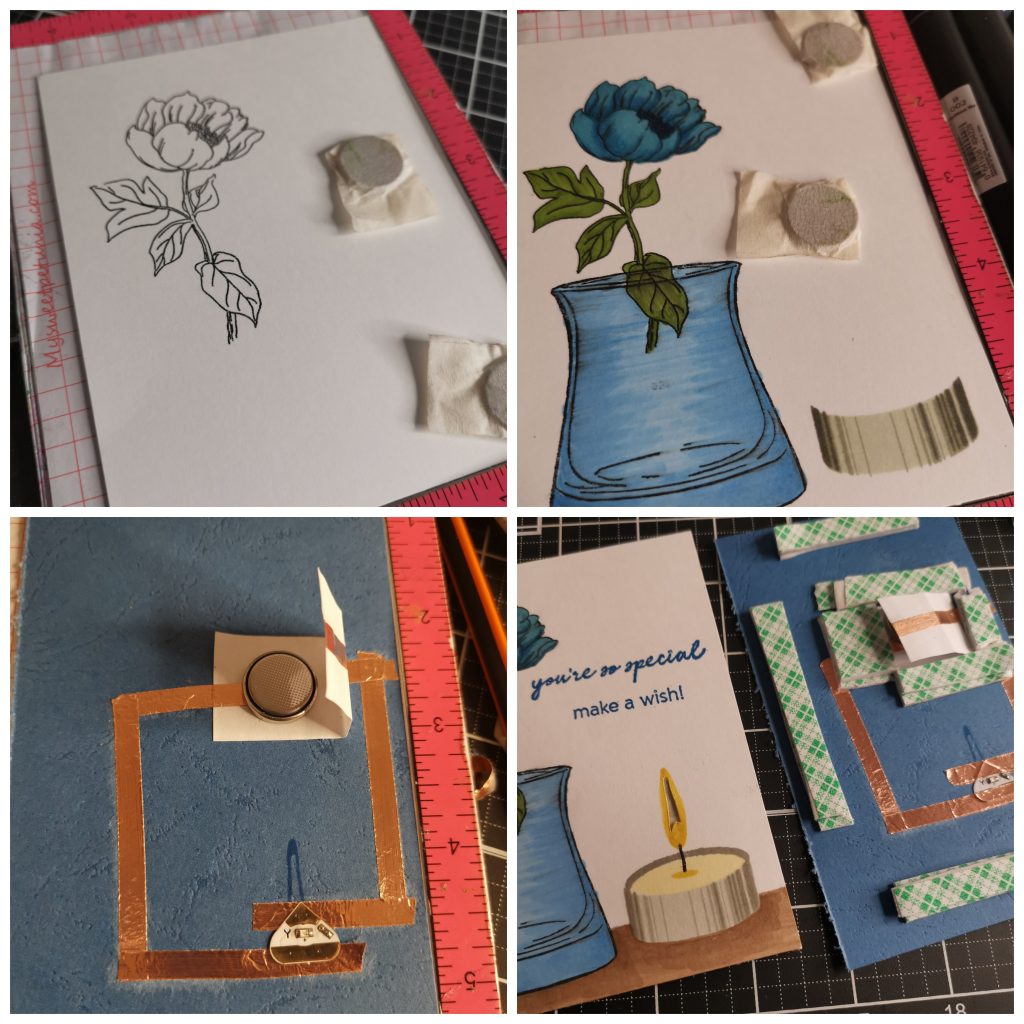
Create a 4 x 5 ¼ card base from Classic Crest Solar White Cardstock. Stamp the flower and the vase with jet black ink. Color them with Artistic markers. Then using the layering stamps, stamp the candle light. Cut out the inner part of the flame. Use shimmer pens around the flame to create a shinning look. Position the sentiment and stamp it near the vase. Mask the vase and candle light and create a background. Here I have created a table top scene using Mocha artist marker.
Once the front of the card is decorated, Place it on a blue card stock paper measuring 4 ¼” x 5 ½ . Using a pencil, carefully mark a point on the blue card stock for the LED light . Then mark a place for the coin-cell battery on the blue cardstock. (This place is determined based on the position you press to switch on the light.) Here I wanted my light to be lit when I click on the sentiment. So i positioned it accordingly.
On the blue cardstock , use the pencil to draw out the circuit you want to make, so that a line runs from each LED leg to the battery. The battery has a plus (positive terminal) or minus (negative terminal) symbol on each side. The LED also has positive and negative terminals — the longer leg is positive (anode) and the shorter one is negative (cathode). To make the LED light up, you will connect the negative side of the battery to the negative leg of the LED and the positive side of the battery to the positive leg of the LED.
Tape down your copper tape over the lines you drew, carefully folding the tape to “turn” any corners. Using clear tape, secure the legs of the LED so that they are on top of the copper tape. Take a piece of folded lightweight cardstock paper and Place the battery in its designated spot on the circuit , inside the paper. Make sure that each line of copper tape makes contact with appropriate terminal of the battery. When the main cardstock paper is pressed, it also forces the lightweight cardstock paper to close the circuit. Thus it lights up the led light.
When we take the hands off the card, the pressure is released and the lightweight cardstock paper does not touch the battery. Thus the circuit is open and the led light turns off. If the paper is loose, the LED will not light up or blink .
That’s the end of my cards for level 2. Your next step is to my upcycled project. Please check out my next post for seeing my take on it.
Thank You so much!
Hope you liked my cards. Have a wonderful day and I hope to see you all soon with another project from AECP. Until then happy stamping and thanks for stopping by! If you like what you’ve seen from me, please give me a follow over on my Instagram (@shahicreationz) and/or subscribing to my vlog and YouTube if you haven’t already.
-shahi