Month: September 2022
AECP: Cards in Motion
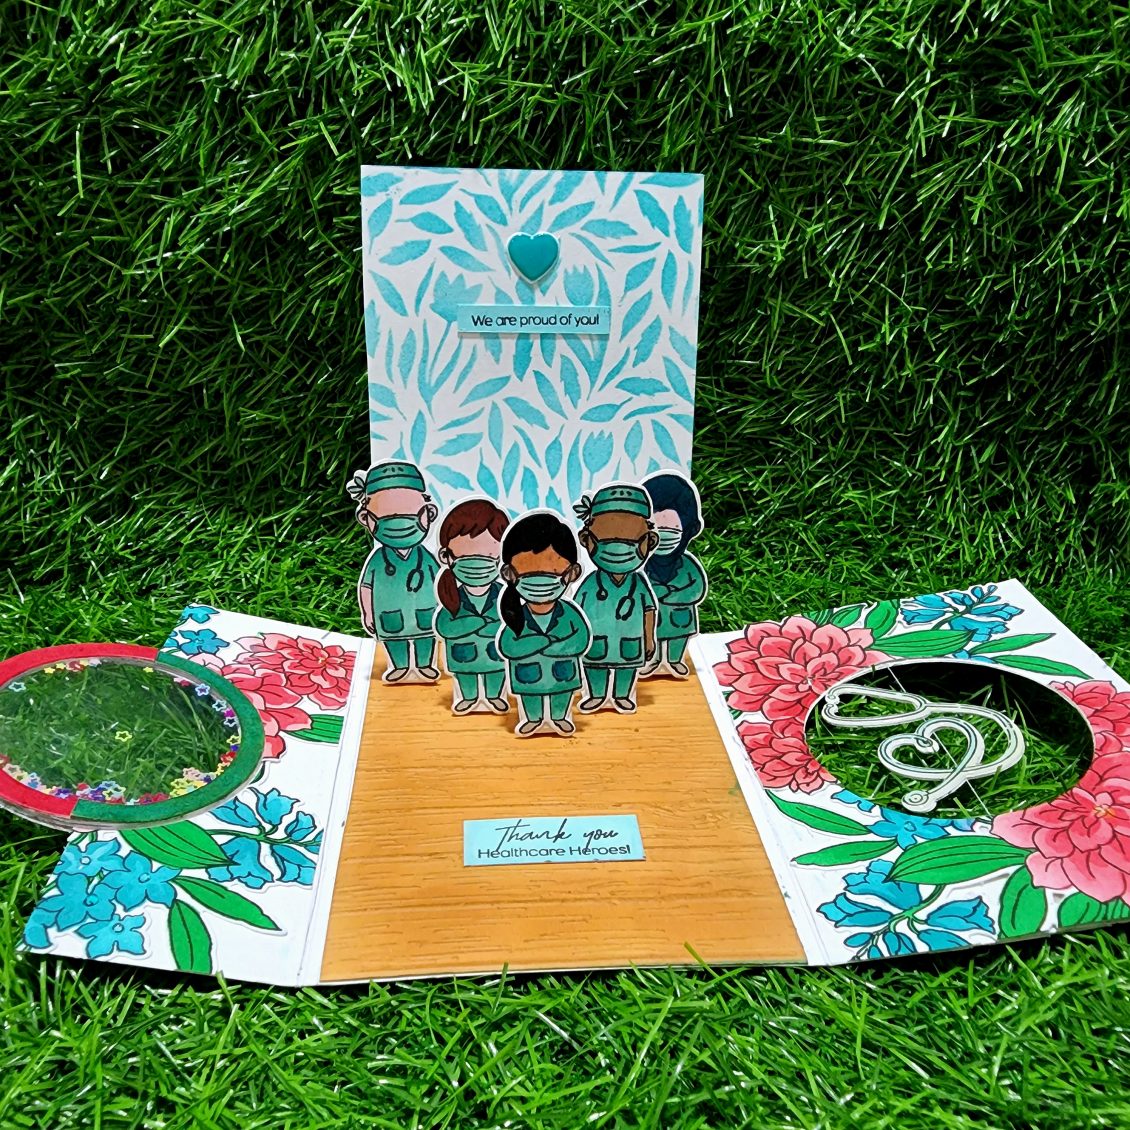
Finally, I’m here with my 5th class of level 3. Ashley Tucker has named it as “Cards in Motion” This class is filled with wonderful inspirations and ideas, cool tips, and tricks on how to create various interactive cards to boost your creativity . Grab a chair because this is going to be a huge one. I can definitely say that this is the most interactive and time consuming project I have done for a class. Those who know me, knows that I am in love with interactive cards. This is going to be my last Class. Next step is the Ultimate one. Final Challenge, Live session. So I’m very much excited for the card. Today I’m going to follow LESSON 7 – Combination of All Lessons . Here, I’m trying to inculcate 3 interactive features on this card. They are, Shaker element, pop up feature and String Spinner. So let’s get started.
INSTRUCTIONS
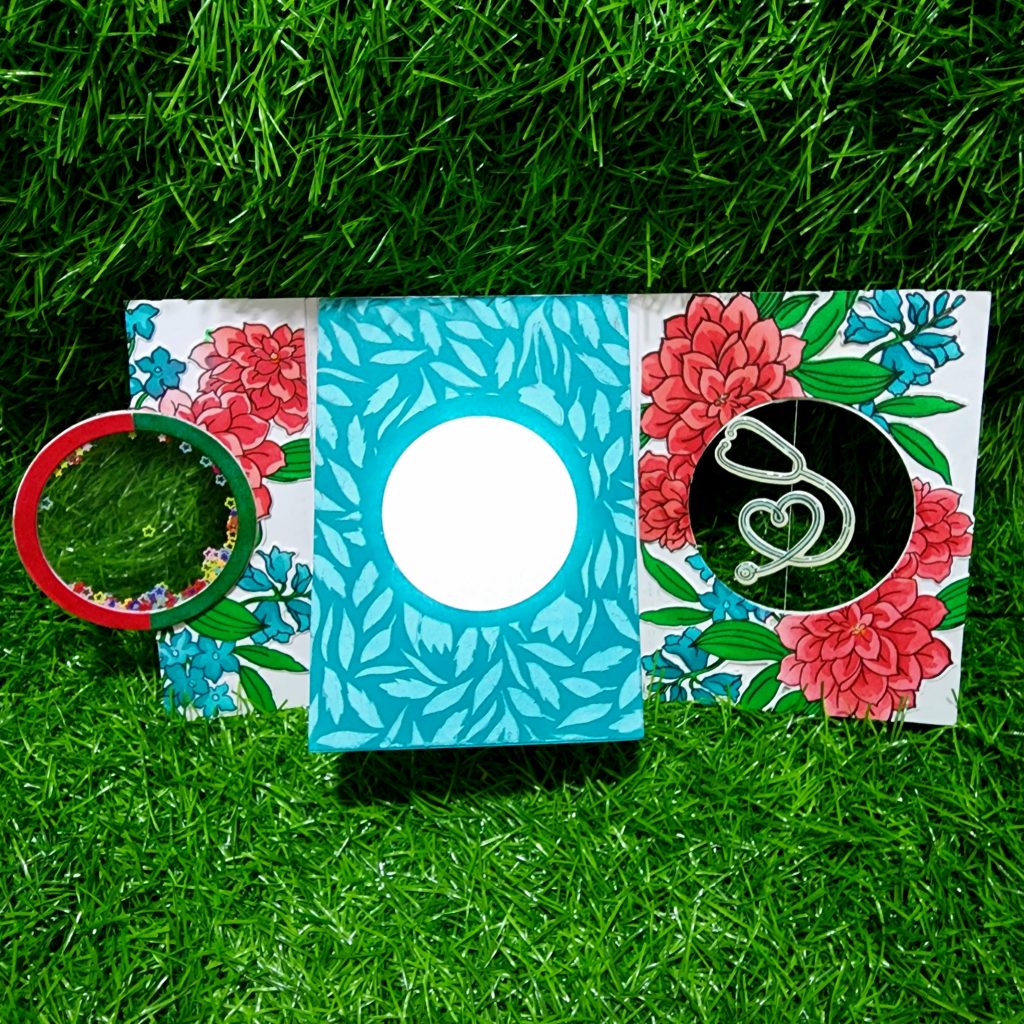
- Take a 5 ½” x 10 ¾” cardstock. Score at 2 ⅛” and fold. Flip the cardstock over with the folded edge on the left-hand side, score at 4 ¼”, and flip the cardstock again. Then, fold along the scored line.
- When you try to fold, it won’t fold over the cardstock, so mark and trim off the excess cardstock from the half panel. You will end up with the card base.
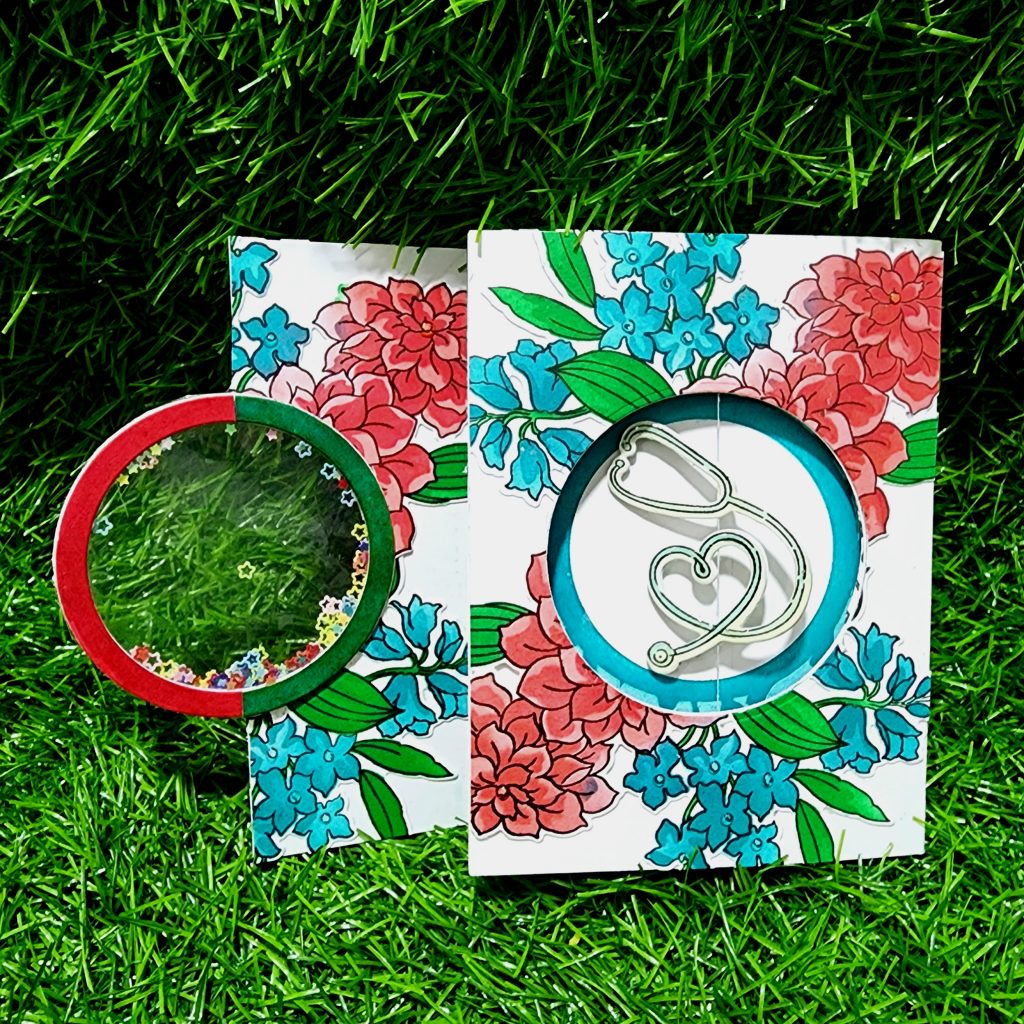
- Take two dies from the Halftone Circles Die Set, secure them together, onto the card front with the half flap, and run it through the die cutting machine.
- Remove the die from the half panel, close the panel, and place the die right back into the circle you just cut, but this time, secure the die to the panel underneath the flap. Very carefully, pull out the half panel and open up the card base. Run this through the die cutting machine.
- Die cut a piece of acetate using the larger of the circle dies.
- Apply liquid adhesive at the back of the frame, and adhere a piece of acetate to it.
- Now, double the layer of your foam tape, and adhere it to the back of the circle frame.
- Put some sequins onto the stamped panel.
- Adhere the frame over it, and you have your shaker piece
- Place a acetate sheet, facing down in your stamp positioner where your cardstock normally goes.
- Now, stamp on it the image of the stethoscope from Healthcare heroes stamp set in Permanent Black Crisp Ink. Stamp a few times till you get a good crisp image.
- Place a cardstock over this, and press it a bit so that the image from the stamp transfers onto it. This is how you can get a mirror image of your stamp.
- Now stamp another stethoscope but this time directly on the cardstock in Permanent Black Crisp Ink
- Use Artist Marker, B802 to color the stethoscope
- Once done, die cut the normal stamped image, flip it over, and then use any light source to place the mirror stamped image on it, and then fussy cut it out.
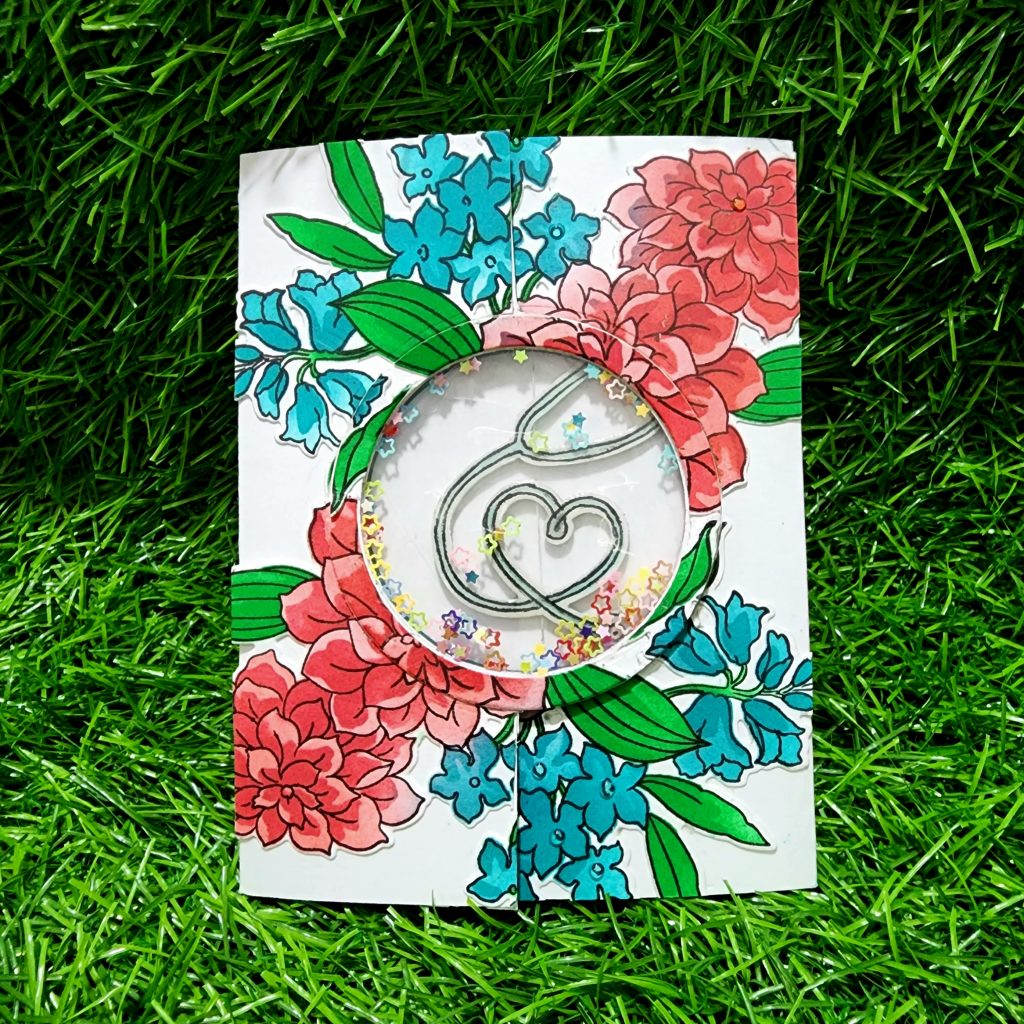
- To make your spinner element on the panel with the circle cut-out, adhere a thread with tape right above and below the die-cut; make sure this is taut. To make it last, pull the string back over on itself, and add another tape over it. Repeat with the other side, as well .
- Adhere the stethoscope images together with the thread in between to complete the spinner.
- To create better dimension apply nuvo crystal glaze over it.,
- Make a 5 ¼” x 4” top folding card ,Trace out the shape and size of the circle from the spinner element and mask it using a masking paper.
- Place Spring Garden Stencil over card base and mask outlines with masking tape.
- Take some embossing paste on the watercolor palette and add few drops of Aqualicious Alcohol Ink and blend it well
- Apply the paste on the cardstock over the stencil.
- Wait until the paste dries , blend Aqualicious Crisp Dye ink over it
- Remove the masking.
- Open the card, and Place Spring Garden Stencil over the top part of the card base and mask outlines with masking tape.
- Blend over with Aqualicious Crisp Dye ink
- Trim out a piece of 5 ¼ x 4 and blend Paper bag Crisp dye ink over it and run it through the die cutting machine placing it in between Deck Planks Embossing Folder
- Grab a piece of cardstock and stamp 5 doctors with Healthcare heroes stamp on the cardstock with jet black ink
- Color them with artist markers. You may make small changes to make the doctors look like from different ethnicities.
- Take 5 piece of strip of half inch width.
- Score two of them at 1/2 , 2 1/2 , 3,5 1/2 and 6
- Take another 2 strips and score them at 1/2, 3, 3 1/2, 6 and 6 1/2
- Take the last strip and score it at 1/2, 3 1/2, 4, 7 1/2 and 8
- Trim the ends and adheres the overlapping flaps to form a rectangular shape.
- Adhere it to the base of the card in order and close the card. Once its fully stuck, stick the die cut of the doctors .
- Add sentiment strips to the card.
- Color the cardstock with Artistic marker and stamp the sentiment from the same stamp set with Black artistic marker.
- U may use small die cuts or stamps as embellishments.
- Just stamp the image and die cut it. Add nuvo crystal glaze or nuvo crystal drops to create dimension to it.
- Adhere the completed 5 ¼” x 4” top folding card to the middle section on the inside of the card.
- Take a classic crest white card stock and stamp the main flower from Build a Garden: Dear Dahlias set using jet black ink
- Place its coordinating Stencil over card base and secure it with tape.
- Add patterns to your project by ink blending with, Paper bag Crisp dye ink, Aqualicious Crisp Dye ink , Vineyard Crisp Dye ink , Just Green and Crisp Dye ink Coral Bliss Crisp Dye ink .
- Gently pull the stencil off from the project area to see the result
- Using the coordinating dies, die cut 4 bunch of flowers.
- Position it over the card and trace out the circle part.
- Place the circle nesting dies and cut out the circle part
- Stick the remaining part of the flower to your main card base.
- Make sure that you have sufficient flowers for the inside part of the card too.
- Thus your interactive card is ready you may use nuvo drops to create droplets over the flowers.
SUPPLIES
- Neenah classic crest white card stock
- Misti stamping tool
- Sizzix big shot die cutting machine
- Guillotine Paper Trimmer
- Glue stick
- Scissors
- Masking paper
- Double sided foam tape
- Nuvo crystal glaze
- Nuvo Crystal Drops
- Glittering Star
- Aqualicious Alcohol ink
- Spring garden stencil
- Healthcare heroes stamp and die set
- Build a Garden: Dear Dahlias bundle set
- Fine liner pen
- Acetate sheet
- Paper bag Crisp dye ink
- Jet black crisp dye ink
- Aqualicious Crisp Dye ink
- Vineyard Crisp Dye ink
- Coral Bliss Crisp Dye ink
- Just Green Crisp Dye ink
- Jet black Artistic Marker
- Mountain Mist Artistic Marker
- Volcano Lake Artistic Marker
- Emerald Artistic Marker
- Peach Perfect Artistic Marker
- Ruby Red Artistic Marker
- Rocky Shore Artistic Marker
- Mocha Artistic Marker
- Dark Chocolate Artistic Marker
- Limestone Artistic Marker
- Lagoon Artistic Mar sssssssssker
- Morning Frost Artistic Marker
- Galactic Stream Artistic Marker
- Sea glass Artistic Marker
- Volcano lake Artistic Marker
- Blush Artistic Marker
- Deck Planks Embossing Folder
- Circle Nesting Die
- Score Board
- Bone Folder
Thank You!
Hope you liked my card. Have a wonderful day and I hope to see you all soon with another project from AECP. Until then happy stamping and thanks for stopping by! If you like what you’ve seen from me, please give me a follow over on my Instagram (@shahicreationz) and/or subscribing to my vlog and YouTube if you haven’t already.
-shahi

AECP: Exploring Watercolor Medium
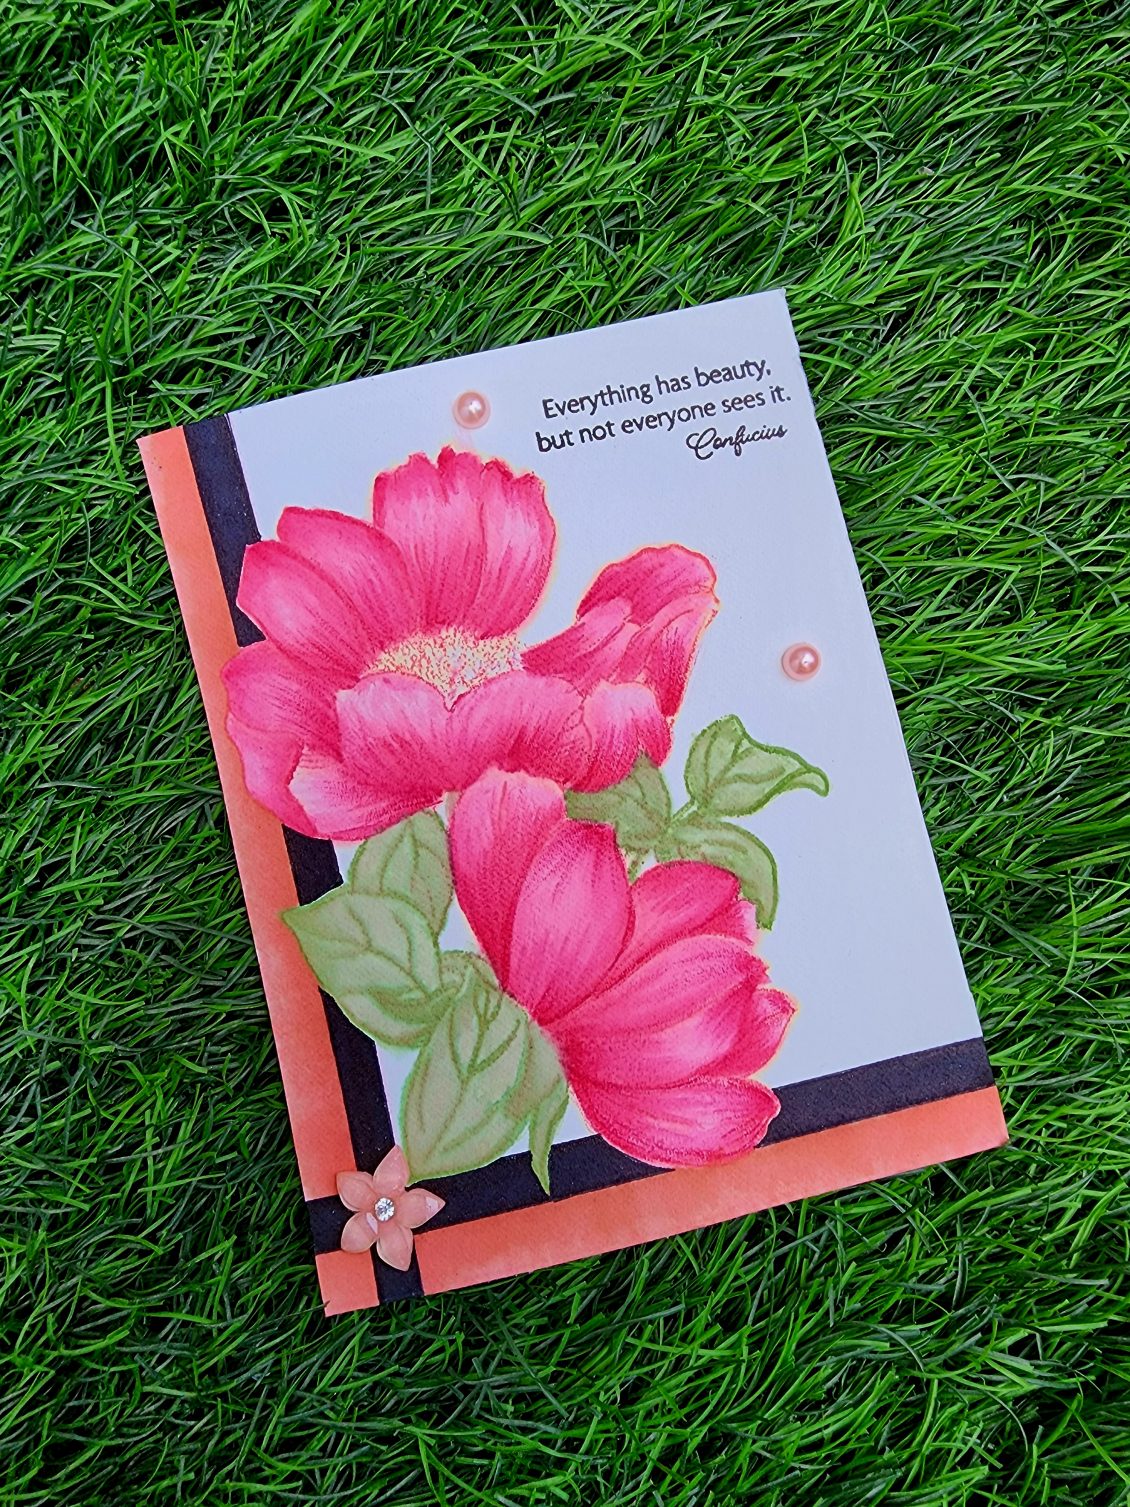
Hey, Good day to u all. No-line water coloring is a technique many of us love the look of but may not know how to achieve, but there is a way to bulk up our no-line skills without even inking up a stamp. That’s the reason why I choose to take this course by Jennifer Rzasa and Ashlea Cornell. This is a perfect class for those who love watercolors! In this class, we are going to do look deeper into various water coloring mediums you can find at Altenew and learn about how to use them for multiple techniques! This is great for those who are wanting to get more out of their current watercolor supplies and get fresh inspirations! I am also submitting this post to the September 2022 Inspiration Challenge. Check out the challenge at https://blog.altenew.com/fall-inspired-card-inspiration-challenge/
INSTRUCTIONS
- Create a “4 1/4 x 5 1/2 ” card base from Watercolor Cardstock .
- Stamp flower from Build-A-Garden: Pristine Peonies in Buttercream Crisp Dye Ink onto Watercolor Cardstock.
- Tap the ink pads on a watercolor palate and use a water color brush to color your flowers and leaves.
- Pick up pigment from Coral Berry Altenew Crisp Dye Ink and apply it onto the base of the petal.
- Next, use clean water to pull the pigment out
- Color all the petals in the same way, skipping the adjacent petal and coloring the next until the first one dries.
- Apply more pigment to areas where you want to show shadow or depth and less where you want to show highlights.
- For the flower center, simply color it with a combination of Buttercream and Coral Bliss
- For the leaves use , Parrot Altenew Crisp Dye Ink for the base and Forest Glades Altenew Crisp Dye Ink for highlights
- Finally, Draw black strips using black artistic marker and fine liner pens .
- To fit the inspiration challenge of September i have added a watercolor layer with Coral Bliss Altenew Crisp Dye Ink adjacent to the black strip.
- Stamp the sentiment on the right most corner with jet black ink.
- Any embellishments of your choice can be added to enhance the look of the card
SUPPLIES
- Sizzix Bigshot die cutting Machine
- Misti stamping tool
- Distress Sprayer / Water Spritzer
- Altenew Watercolor Paper Pad (9”x 12”)
- Build-A-Garden: Pristine Peonies
- Buttercream Altenew Crisp Dye Ink
- Forest Glades Altenew Crisp Dye Ink
- Coral Berry Altenew Crisp Dye Ink
- Coral Bliss Altenew Crisp Dye Ink
- Black Artist Alcohol marker
- Fine Liner Pen Set
- Watercolor Palette – Medium
- Sticker Embellishments
- Watercolor brush
- Guillotine Paper Trimmer
Thank You!
Hope you liked my card. Have a wonderful day and I hope to see you all soon with another project from AECP. Until then happy stamping and thanks for stopping by! If you like what you’ve seen from me, please give me a follow over on my Instagram (@shahicreationz) and/or subscribing to my vlog and YouTube if you haven’t already.
-shahi
AECP: Progressive Cardmaking
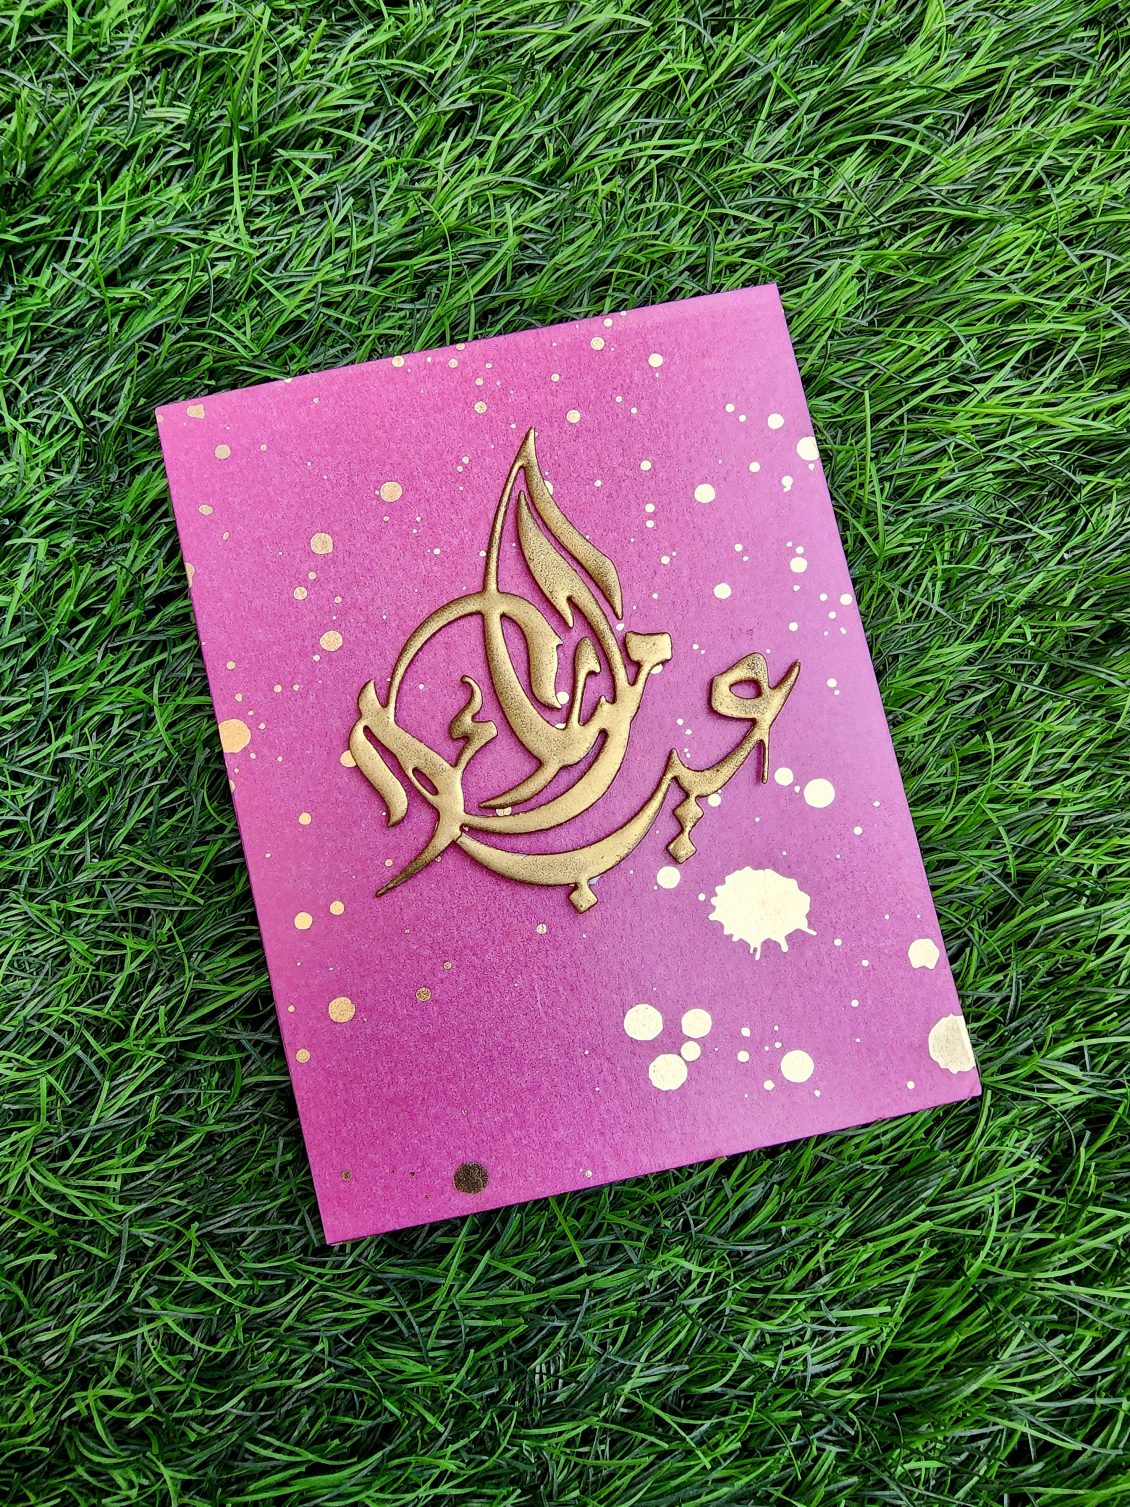
Today I am here with a work based on my latest Altenew Academy class – Progressive Cardmaking with Justine Hovey . I am inculcating 2 of her techniques for my card. The washi tape technique for the background and the Embossing technique for the Sentiment. Trust me, this is one of the most simple and elegant card you can make.
INSTRUCTIONS
- Create a 4 ¼” x 5 ½” card base from Classic Crest Solar White Cardstock.
- Stick Gold Splatter Cosmic Berry Wide Washi Tape over it
- Take a piece of Classic Crest Solar White Cardstock, place Eid Mubarak Die over it and run it through the die cutting machine.
- Brush the die cut image with antistatic powder tool.
- Apply the embossing ink over the top and Cover it with the embossing powder and heat emboss it with a heat gun.
- Stick it to the center of the card using double sided foam tape
SUPPLIES
- Antique Gold Crisp Embossing Powder
- Eid Mubarak Die
- Anti static powder tool
- Heat Gun
- Double sided foam tape.
- VersaMark Watermark stamp pad
- Gold Splatter Cosmic Berry Wide Washi Tape
- Classic Crest Solar White Cardstock.
- Sizzix big shot die cutting machine
TIPS
- Use anti-static powder tool to prevent embossing powder from sticking to unwanted areas while we stamp the image with Versamark
- Point the heat gun straight down to the paper without a slanted angle this way the onset embossing powder will not be blown away leaving you with a sloshy embossed image
- Add extra layers of embossing powder and melt after each layer to get a smooth look.
- Touch it only after few minutes after heating the die cut sentiment or else you can get your finger prints get melted into it .
- Wrap the tape around the paper for extra strength and to ensure that the washi stays in place over time.
Thank You!
Hope you liked my card. Have a wonderful day and I hope to see you all soon with another project from AECP. Until then happy stamping and thanks for stopping by! If you like what you’ve seen from me, please give me a follow over on my Instagram (@shahicreationz) and/or subscribing to my vlog and YouTube if you haven’t already.
-shahi
 CASE your fellow AECP Crafter
  Clean & Simple Boutique Cards
  Easy Die Cutting Techniques
  Graduation card
  Let it shine
Recent Comments