Month: December 2022
AECP Final Workshop (Part 2)
Alhamdulilah…With the greatest blessing from the almighty…..
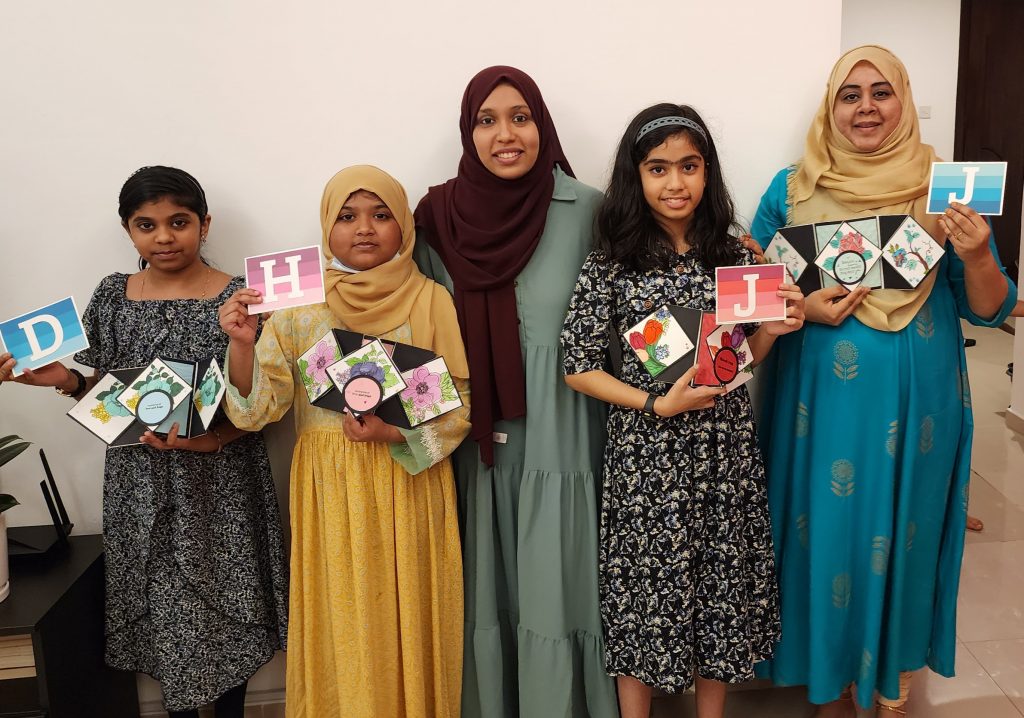
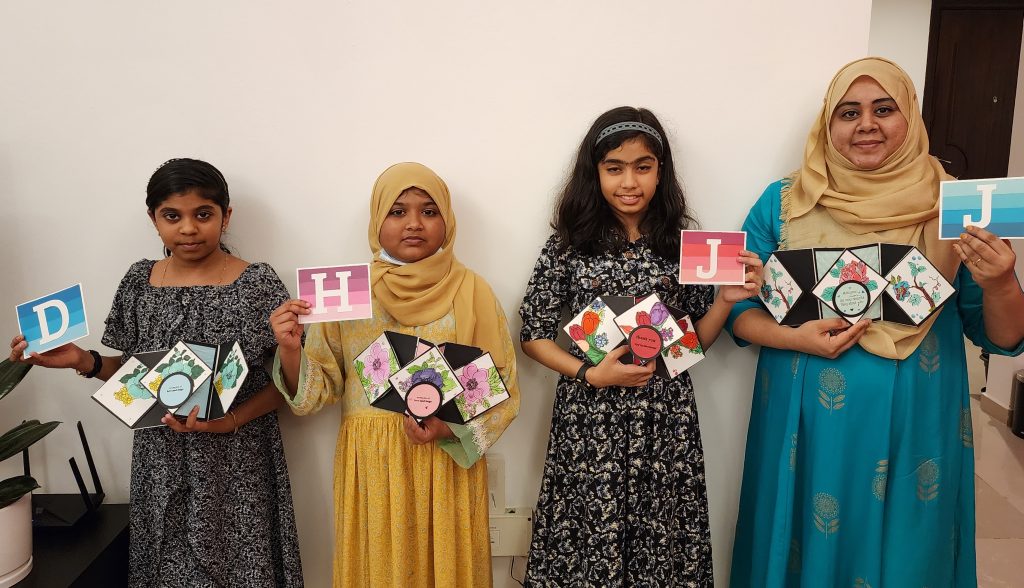
Well…. I finally did it! I am very happy and proud that I managed to organize the final workshop, which is a kind of exam for the Altenew instructor (Altenew Educator Certification Program). I held my workshop with a friend of mine and 3 lovely students to hopefully achieve my goal of being a Certified Altenew Accredited Educator. My crafting journey has benefited greatly from this course, which has enabled me to advance my card-making abilities. From the time I was enrolled into the Altenew Educators program until now, I have gathered a lot of knowledge from all the courses and the incredibly gifted instructors. Every course was well thought out and presented. These lessons gave me the inspiration to start thinking creatively and making cards that were outside of my comfort zone. I am very grateful of the encouragement I received from Erum, Virginia, and everyone in the crafty community, since this kept me going even when finding creative energy was challenging. All of my participants were complete beginners in the world of paper crafting, We were accompanied by Virginia Lu and Erum Tasneem via zoom.
Let’s get started and see how I set up my workshop. For the final workshop I had to
- teach in a 2-hour classroom setting/practice workshop
- 4-10 students in this workshop
- Pre-workshop (via email): planning and details of the workshop
- During the workshop: Zoom or Google Hangout/ Facebook Live (with selected participants) with Altenew team members
- Post-Workshop (via email/blog post): a report of the workshop, classroom projects and reflection on the class.
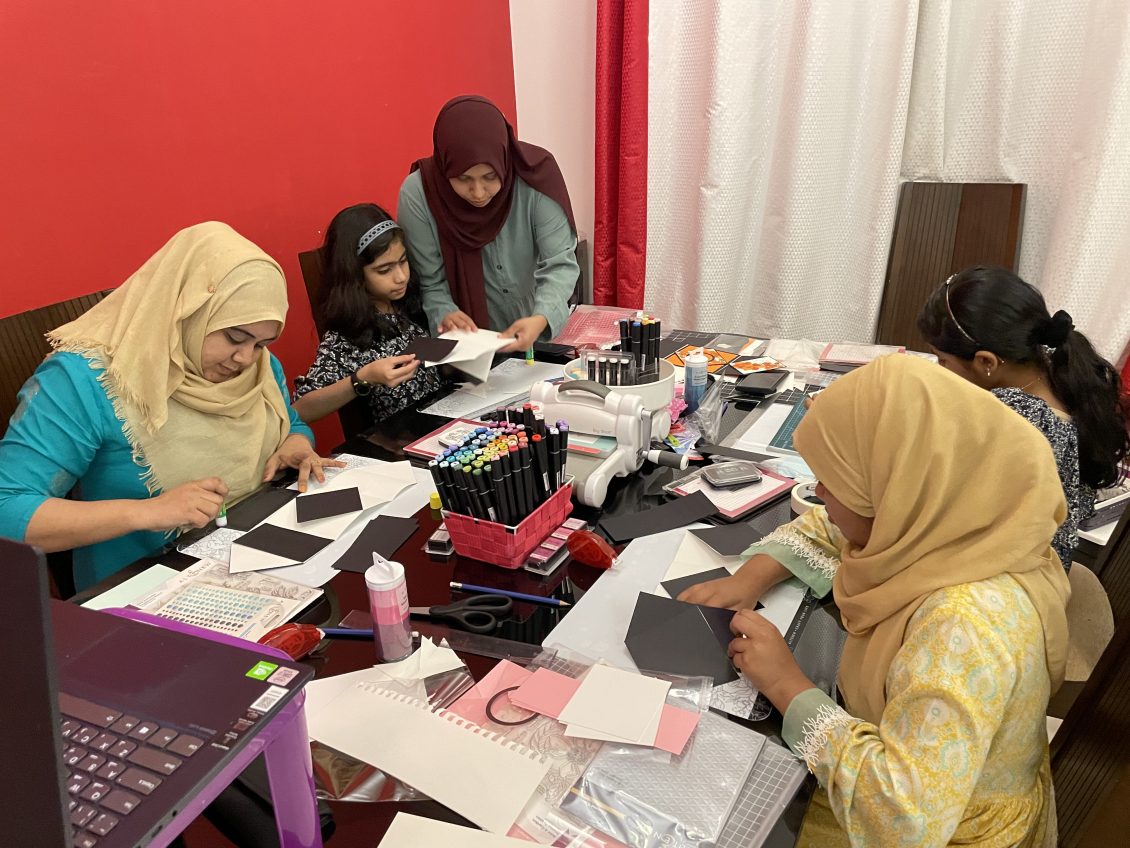
My workshop had to be held at evening here which was night for Erum in Pakistan and early morning for Virginia in Canada. Few days before the appointment date, I had sent an email to my instructors with detailed plans, photos and a list of necessities, as well as a ZOOM link. When designing workshops, there are a ton of factors to take into account. The list of factors includes time, materials, talent levels, time zones, internet connectivity, sound, and on and on. Not that this should discourage anyone from giving it a try in any way. Trust me it’s sooo much fun, As we begin the session, I showed the students, the inspiration products that I made during the creation of my work plan. Then I presented the basic techniques and tricks for using washi tapes, embossing folders, etc. and then we tackled combinations with coloring stencils, artistic markers etc. I also showed what can go wrong and how to use these mistakes to your advantage.
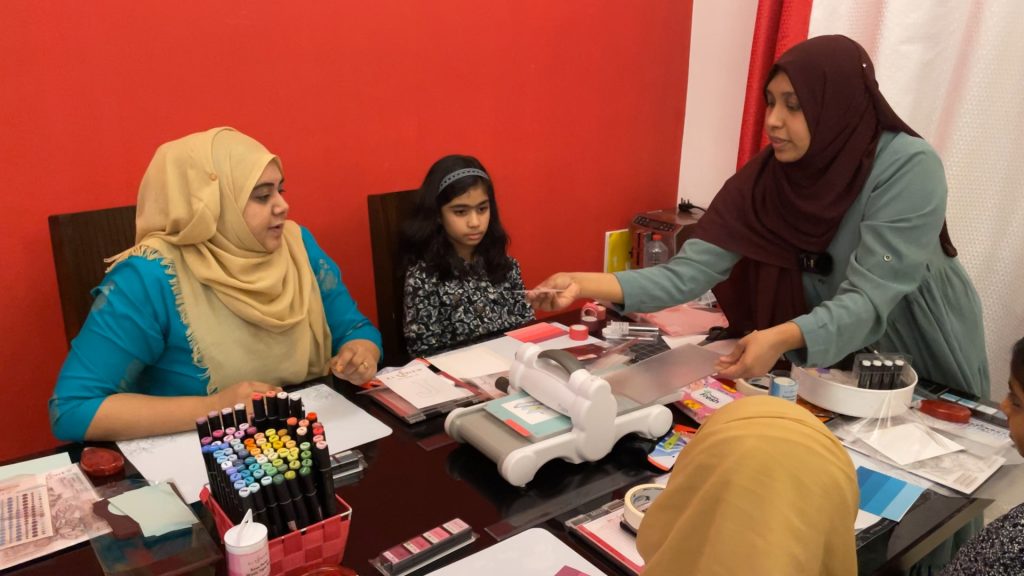
I held my workshop in my dining room. I had prepared a set for each participants. They had their own stamping mat, washi tapes, mini crisp die inks, build a garden stamp sets, stencils, dies etc along with a pack of precut die cuts and cardstocks. I had my supplies arranged on a table near me for the different projects. We practiced trimming, scoring ,stamping, stencil Coloring, embossing, coloring with artistic markers and lot more. The participants had lot of fun using washi tapes. The majority of my participants had never done anything similar before, and I adore how they welcomed being thrown into the deep end. They were astonished beyond belief at what they had created and had a great time!

I want to thank Virginia, Erum and the attendees for a wonderful evening where we shared fresh ideas and had a lot of fun. I’m glad that I could prove that paper crafting is not just for adults but also for our younger generations. Many of participants asked if I could plan another workshop with different interactive cards and techniques. It literally made my day.
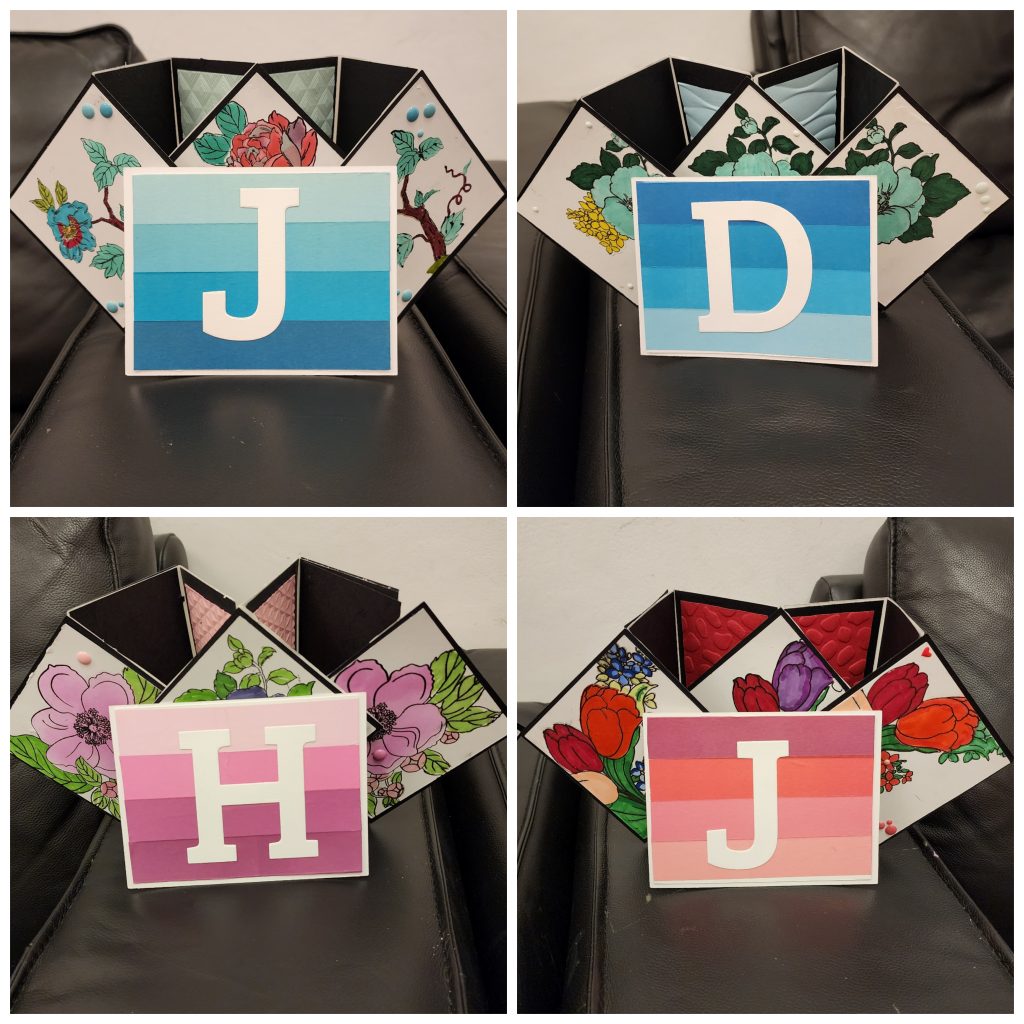
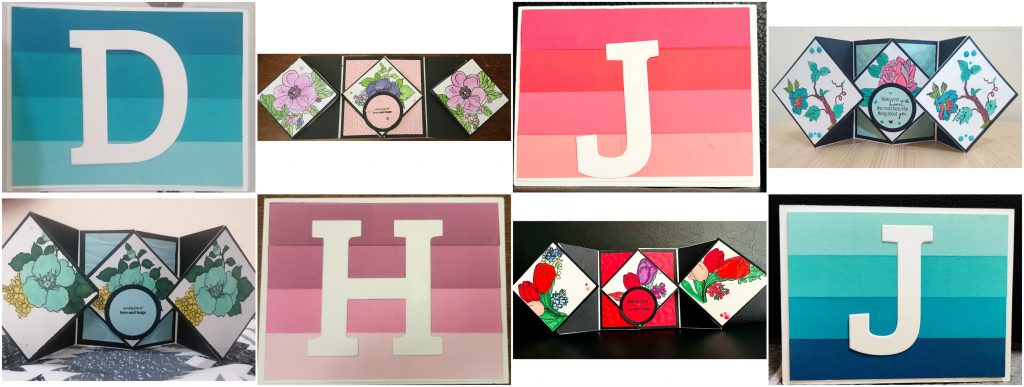
Here are the incredible works done by my participants
And Here I am, with my last post of my AECP program….
Alhamdulilah… I simply want to say thank you to Virginia and Erum for their encouragement and support. They both attending my first Zoom workshop was great. Their helpful criticism has been much welcomed, and it has undoubtedly advanced my skill. I’m excited to investigate and learn new applications for the new items Altenew is creating.
I also must not forget to thank my husband and my daughter who has always been my biggest support system. Without them I wouldn’t have reached where i am.
Thank you for being a part of my Journey.
AECP Final Workshop (Part 1)
| Date of the workshop | 3rd December 2022, Saturday |
| Time | Uae time: 7:30pm Karachi: 8:30pm Canada: 10:30am |
| Venue | My home (Dubai) |
| No of participants | 4 |
| No of cards prepared for the workshop | 2 |
| Lessons taught | To make an Interactive card Using Mega Dies Stamping Techniques Coloring using Stencils Embossing Folder Techniques Dimensions using Enamel Dots |
| Zoom Meeting ID | Join Zoom Meeting https://us02web.zoom.us/j/4342656458?pwd=NmpTUzBFOVdmcXg0MFhkb2UwS2NGQT09 Meeting ID: 434 265 6458 Passcode: 1234 |
Each participant will be given a basket, which contain the following items:
- Stamping Mat
- Pre-cut out for each card
- A set from Summer Days Washi Tape set
- Color Enamel dots
- Altenew mini ink cubes
- Stencil and Stamp set from a Build a garden set
- Embossing folder
- Color Papers
- Classic Crest Solar White Cardstock
- Obsidian Pigment Ink
- Adhesive roller Tape
- Scissors
- Pencil & Eraser
- Self-healing Mat and rotary blade
- Measuring ruler
Other Essentials:
- Classic Crest Solar White Cardstock
- Stamp Cleaner
- Misti Stamping tool
- Die Cutting Machine
- Paper trimmer
- Primary color Artistic Markers
- Purple Tape
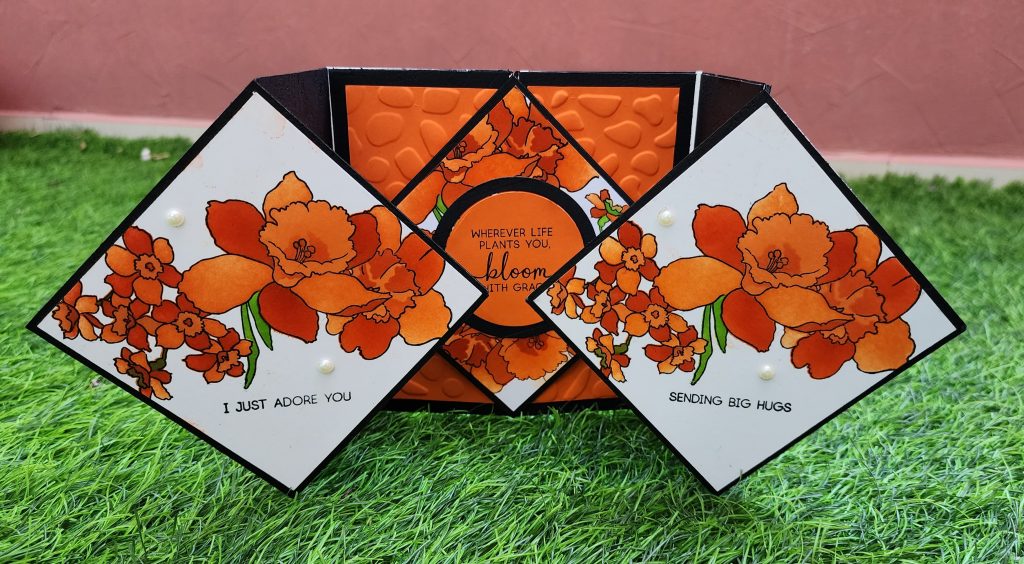
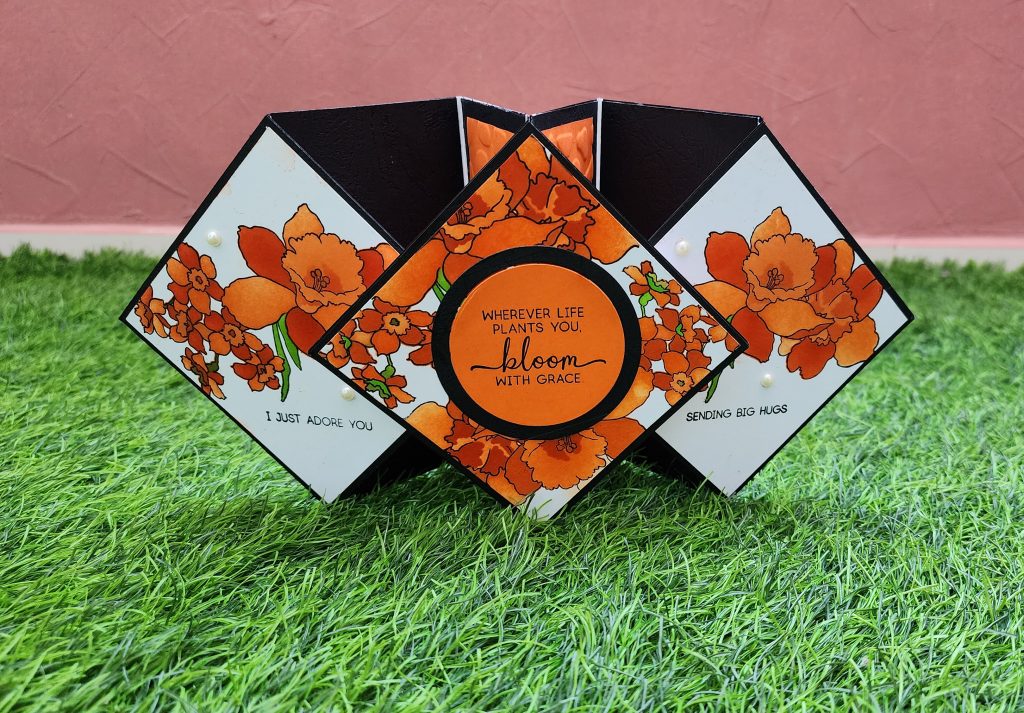
CARD 1: Triple floating diamond card
Card Making Method:
- Take a 12 x 12 cardstock and divide it into half. Then you will get two base cardstocks with dimensions 6 x 12
- Score both of your cards at 3 inches, 6 inches and 9 inches.
- Once you have done your scoring, you have to take each piece and make a mark along the short edge, halfway at three inches on both ends of both pieces. `
- Using a craft knife cut off from that crease line on the left to that bottom mark and from bottom mark to the crease line on the right.
- Repeat the same process on both the ends on the two cardstocks.
- You will end up having two pieces.
- Fold and burnish your score lines
- Make three black base square cards that are 4 ¼ x 4 ¼
- Now to line up those cards, putting both the pieces flat on the deck and then you fold in the nearest triangular piece inwards and line those up to make it like a square.
- Glue down a square cardstocks over the folds.
- If the points of the square are overlapping the folds, then trim down the edges of the card if required. ( 4 1/8)
- Glue up the remaining squares on the triangles on both the sides. Adjust it and Make it fit to dimensions.
- Next, You will need six black panels and four Color themed Panels
- Make your own panels by running your color cardstock paper through your embossing folder.
- Stick them over the main base card.
- You may stick two, color themed pattern paper on both sides of the middle square.
- You will also need three color paper squares of dimensions 4 x4 and three pattern squares or toppers of dimensions 3 ½ x 3 ½
- Make your own pattern paper using your favorite Altenew stamps and colors.
- Cut out two circles using halftone dies. (Bigger circle in black and smaller one in the color theme.)
- Add a greeting sentiment on the smaller circle die cut and paste in on the middle of the square card. Add sentiments on the other square panels too.
- You may add pearls and gems to make your card more beautiful.
- When folded flat, it will fit in an envelope for 6 x 6 card.
Pre-cuts for the card:
- Two base cardstocks with dimensions 6 x 12 scored at 3 inches, 6 inches and 9 inches
- Three black base square cards that are 4 ¼ x 4 ¼
- Four Color papers trimmed 6 x
- Six black panels
- Black Circle
- Color Circle
CARD 2: Washi tape Card

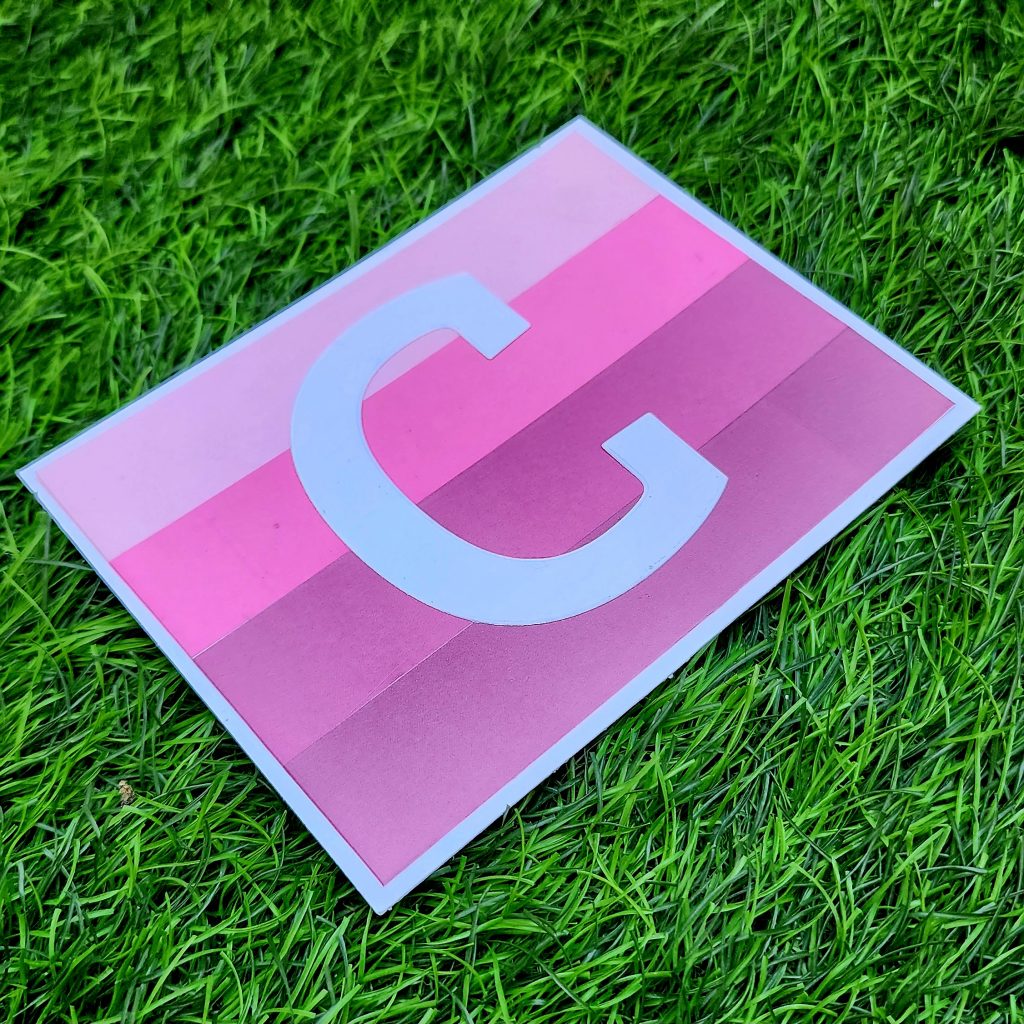
Card Making Method:
- Create a 4 ¼” x 5 ½” base folding card from Classic Crest Solar White Cardstock.
- Create a 4 ” x 5 ¼” card from Classic Crest Solar White Cardstock and stick the four washi tapes (Summer Days Washi Tape) according to the ombre effect
- Take a piece of Classic Crest Solar White Cardstock, place the mega alphabet Die (starting letter of your name) over it and run it through the die cutting machine.
- Stick it to the center of the card
- Once done, you may adhere it to the base card
Pre-cuts for the card:
- 4 ¼” x 5 ½” base folding card
- 4 ” x 5 ¼” Classic Crest Solar White Cardstock
- A5 size Classic Crest Solar White Cardstock
Let’s head on to part 2 for more updates on my upcoming workshop.
 CASE your fellow AECP Crafter
  Clean & Simple Boutique Cards
  Easy Die Cutting Techniques
  Graduation card
  Let it shine
Recent Comments