 CASE your fellow AECP Crafter
  Clean & Simple Boutique Cards
  Easy Die Cutting Techniques
  Graduation card
  Let it shine
Creating handcrafted memories
Let it shine
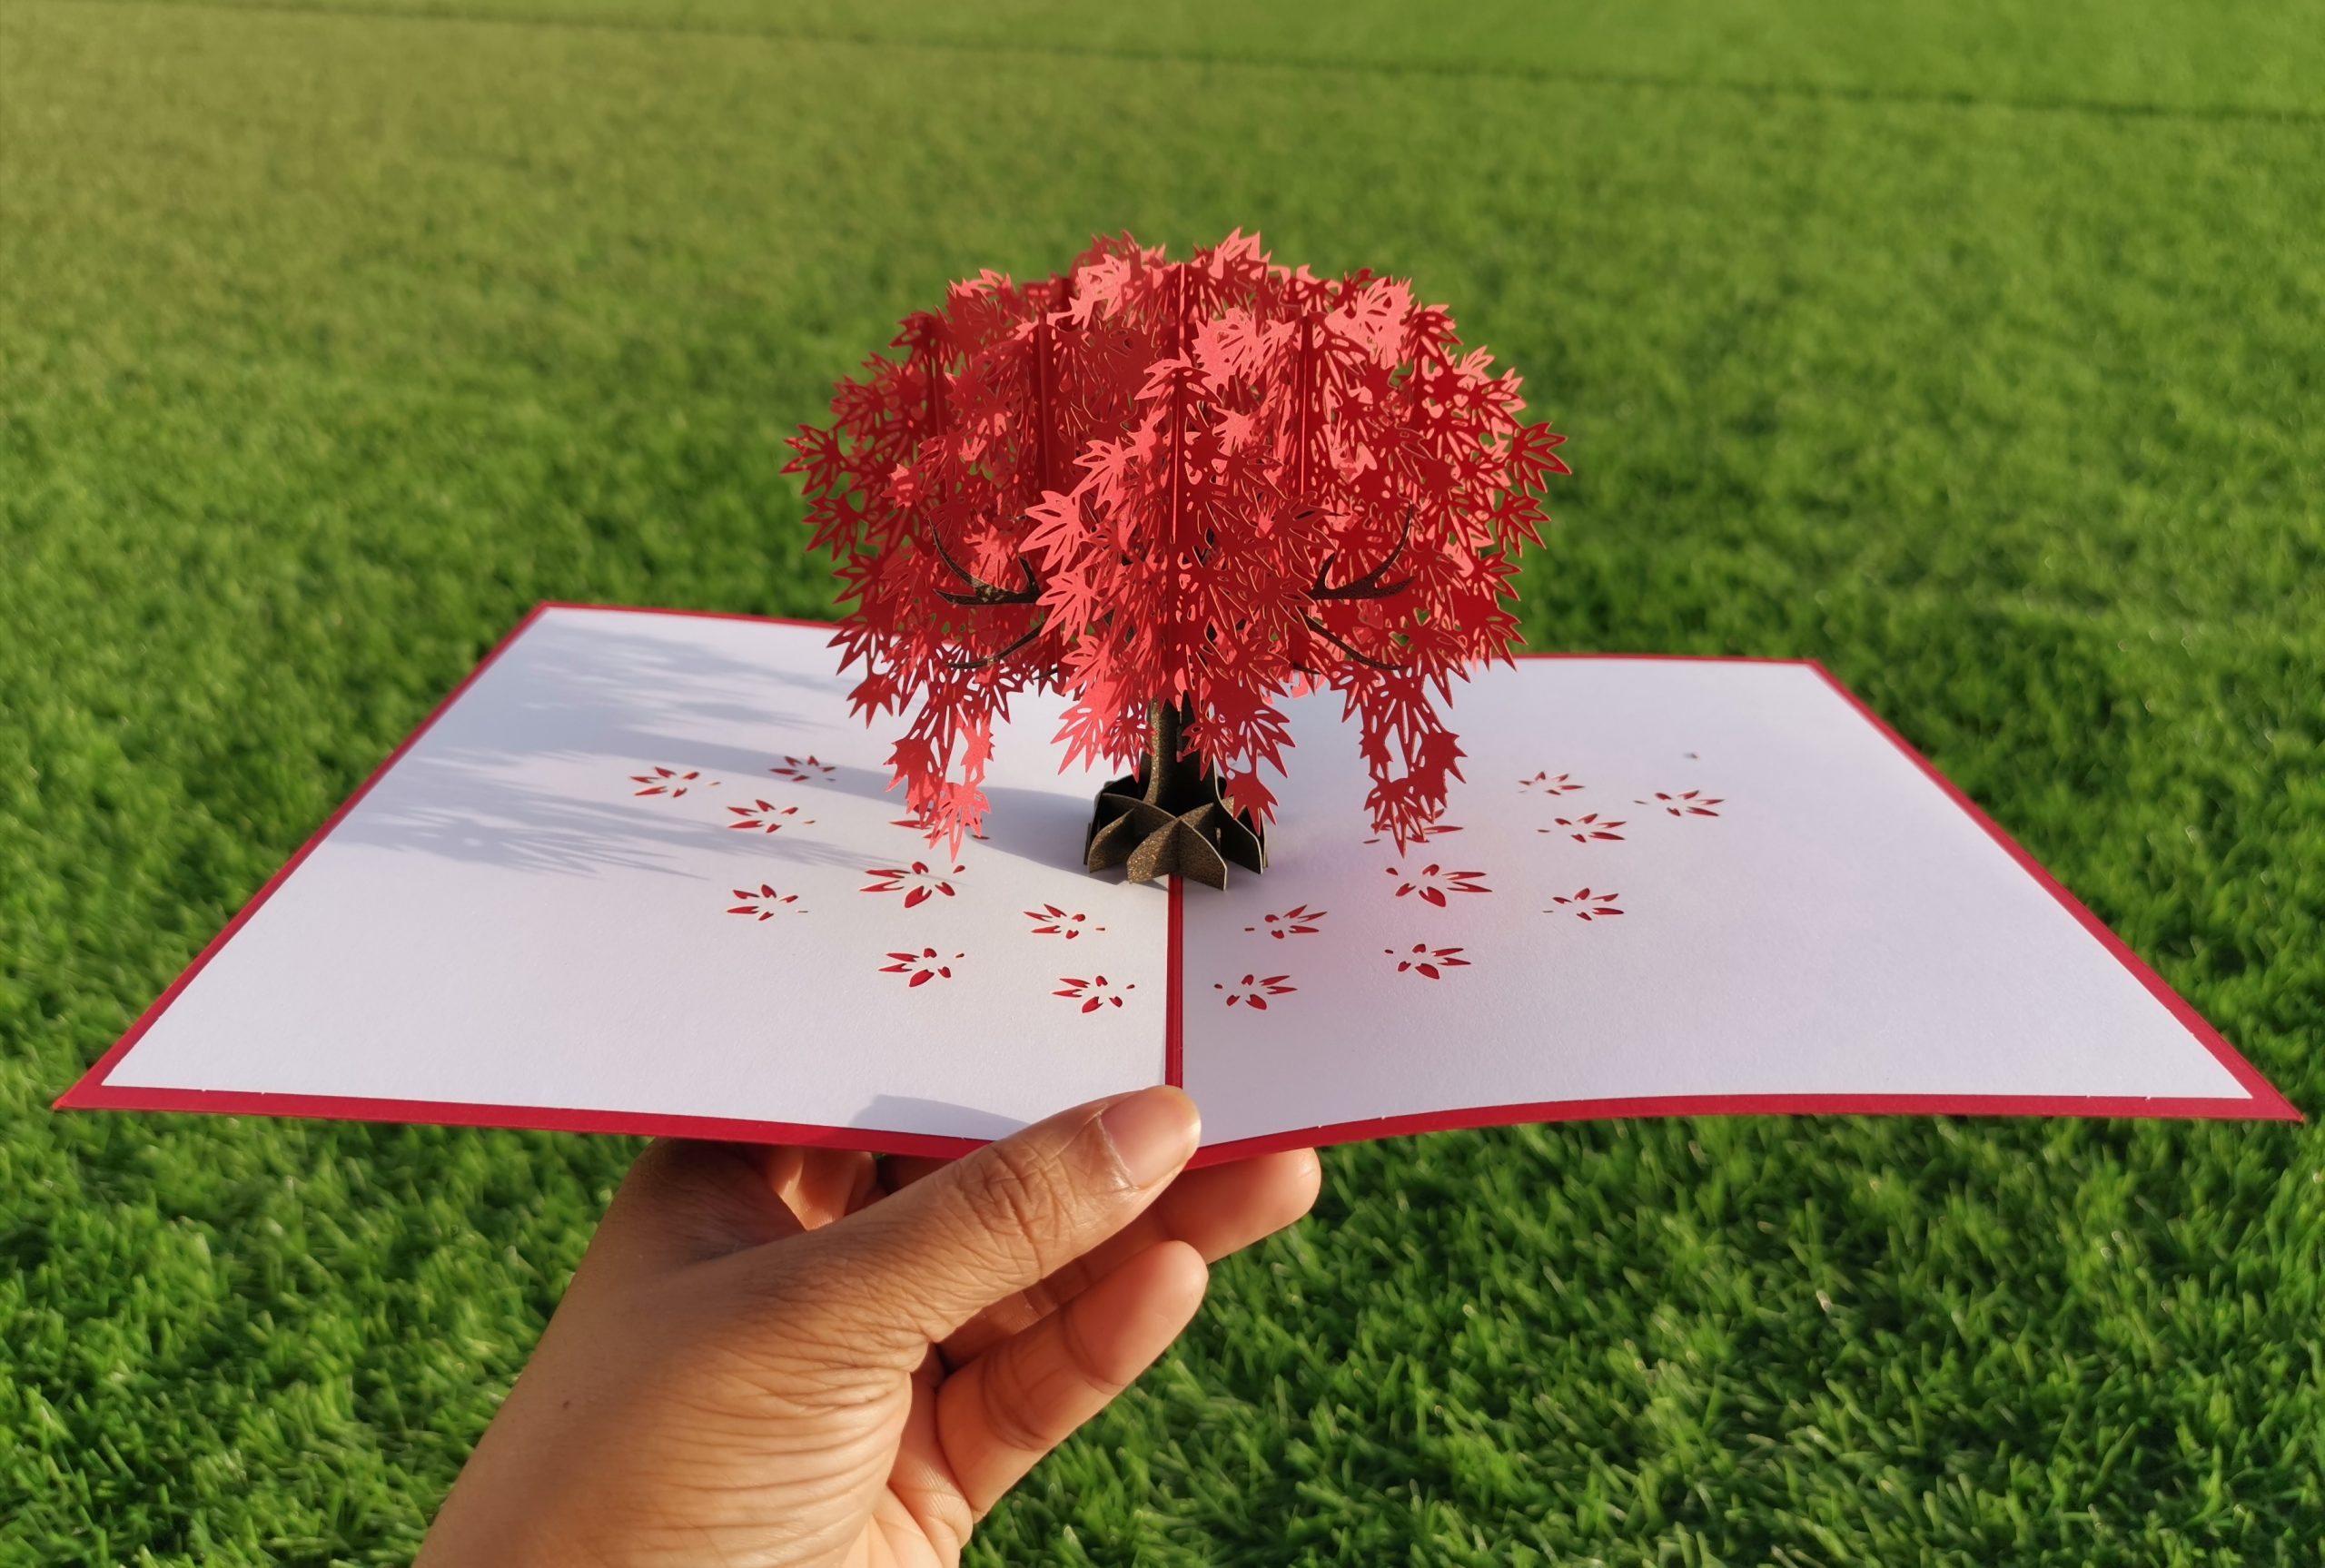
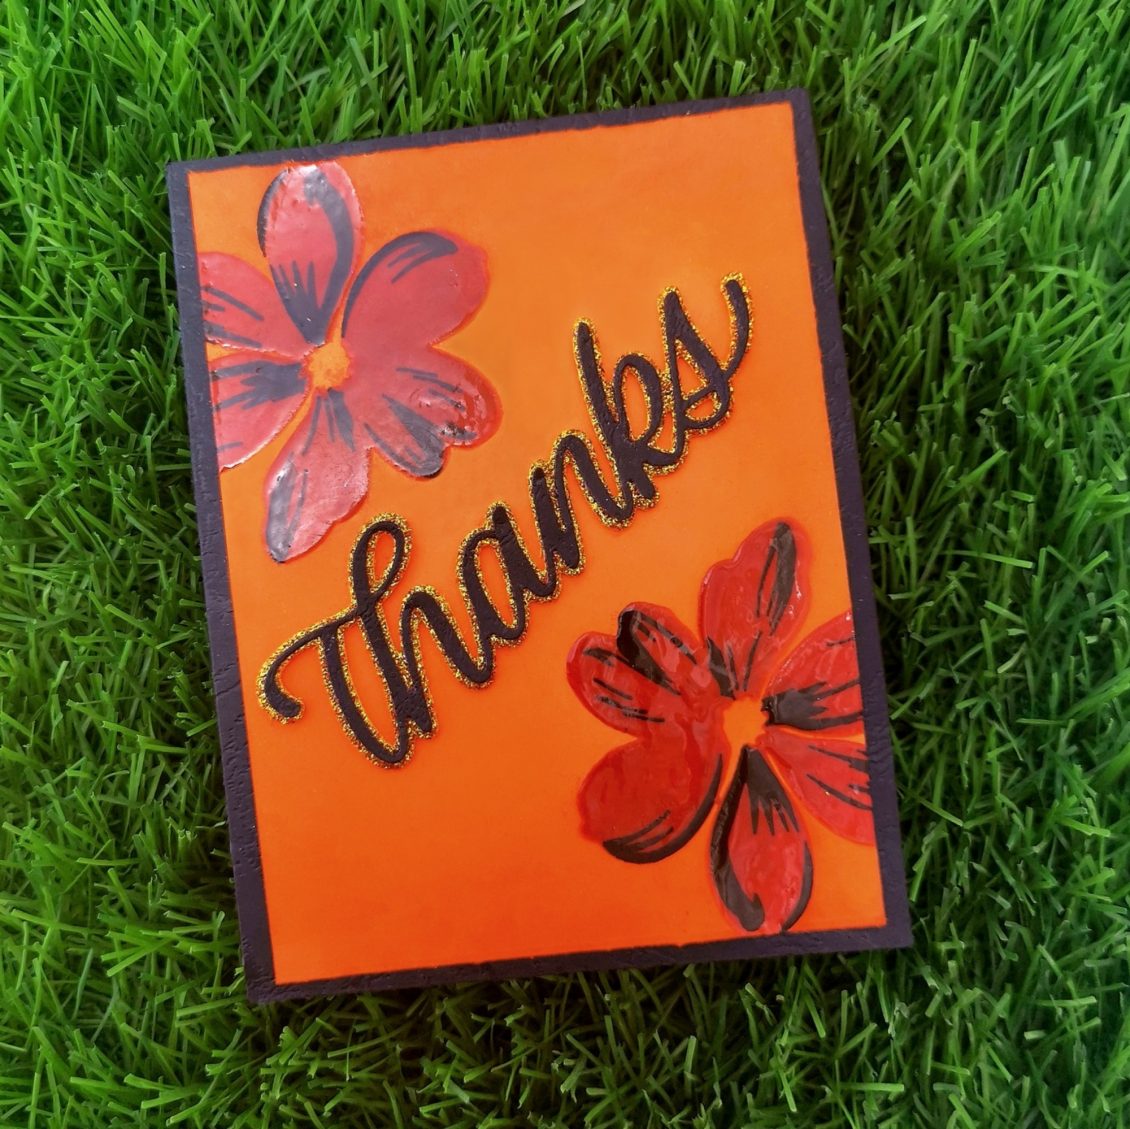
As I complete my projects one by one, of level 1, it’s getting real fun at the Altenew educator certification program. My today’s task is to make a card based on the lesson, Let it shine. This class literally helped me to determine some of the best ways to add shine to my projects and WOW others!
I trimmed a black card stock into 4 1/45 1/2. And placed an orange card stock on it. As it was about the size 3 3/4 *5, there was enough room for the black card stock paper to be seen. I choose the Fabulous Florets Stamp Set from Altenew for this project. So I placed it on my card stock and stamped the top flower with Caramel toffee Altenew crisp die ink and the bottom flower with the Autumn blaze Altenew crisp die ink. The second layer was done with the versafine Onyx black ink.
Then I prepared my card surface with some sort of anti-static powder tool. This fine layer of powder will prevent embossing powder from sticking to areas where you don’t want it to stick. Then I used Versa mark ink. It’s a clear sticky ink that can be used for embossing, or for watermark images. Then I applied some Hero Arts clear embossing powder on my card stock. Embossing powders can make any stamped image shiny and dimensional. And it’s easy to do. There are basic embossing powders, clear and white, that leave a hint of shine.
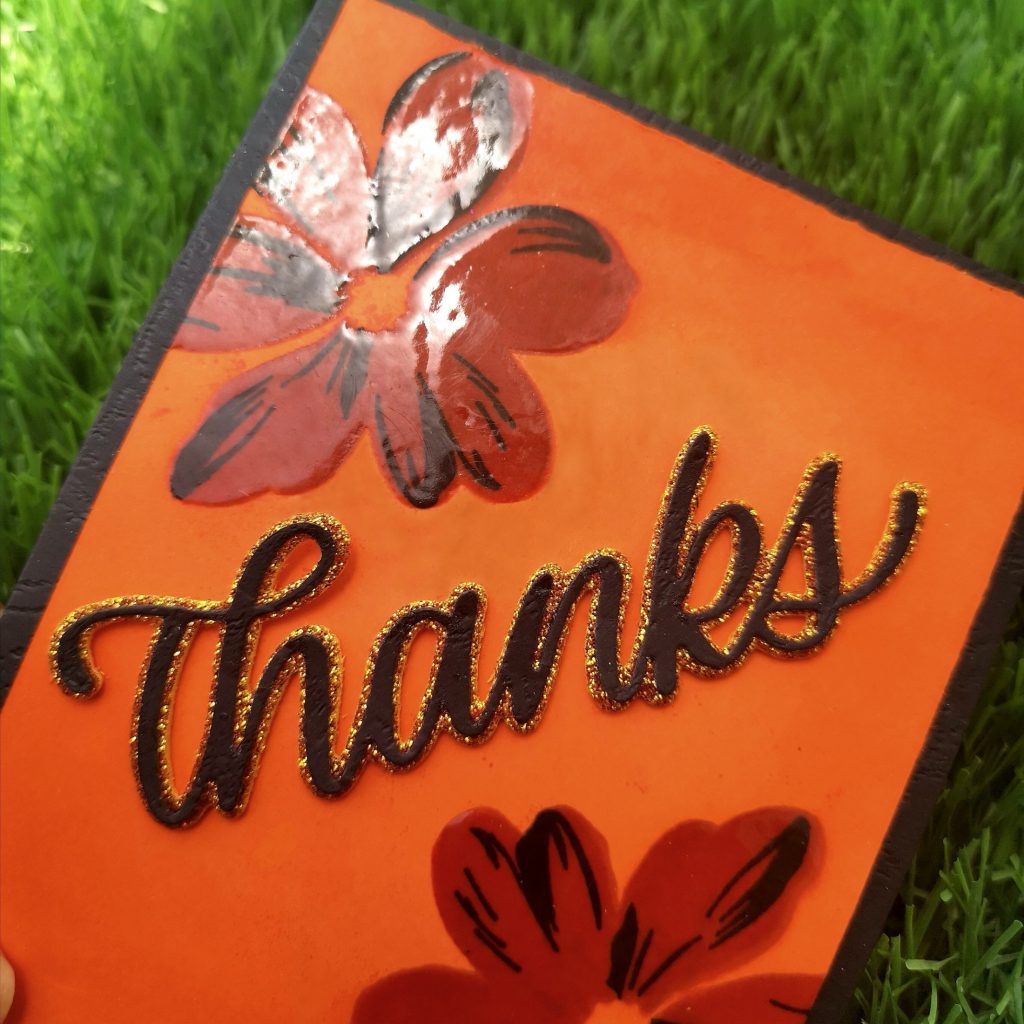
Here, I choose clear embossing powder as I wanted my flowers to shine in its original color which I have stamped. (Orange and black). Before heat setting the embossing powder, I used a dry brush to sweep away any stray pieces of embossing powder. These little specs will expand as they heat and turn into blobs. Quickly brushing away strays will give you great results every time. I allowed my heat gun to heat up to its hottest point before taking it to the paper. This will minimize the amount of time it takes for the powder to melt and will minimize warping. Once the embossing powder is melted, I moved my heat gun. We should not heat it in one place for too long. Once the grainy appearance goes away, and you see a bit of shine, you’re all set to move on.
I had a sudden change in plan while making my card. In fact, in happens most of the time. I never stick on to my planned project. But, isn’t it good? Because you end up making things better. Here I decided to softly blend the corners of the card with the same dieink with which I stamped my flowers at the start of my project.
For the sentiment, I decided to choose the Simon Says Stamp BIG THANKS Shadow Wafer Dies. I die cut the glitter card stock with the base wafer dies using my die cutting machine and the black card stock with the thin front wafer dies. It’s was positioned and stuck in the middle of the card.
Isn’t it so simple. I hope this method will turn out to be an inspiration for you too. Do give it a try to learn this course at https://altenew.com/products/let-it-shine I hope to see you all soon with another project from AECP. Until then, happy stamping and thanks for stopping by!
-shahi
Lemon cupcakes
Ingredients
- 1/2 cup unsalted butter (softened to room temperature)
- 1 cup granulated sugar
- 2 large eggs (kept at room temperature)
- 1 and 1/2 teaspoons pure vanilla extract
- 1 and 1/2 cups all-purpose flour (spoon & leveled)
- 2 teaspoons baking powder
- 1/2 teaspoon salt
- 1/2 cup whole milk
- 1 and 1/2 Tablespoons lemon zest
- 1/3 cup fresh lemon juice
Instructions
- Preheat the oven to 177°C. Line a 12-cup muffin pan with cupcake liners.
- Using a stand mixer fitted with a paddle attachment, beat the butter and sugar together on medium-high speed in a large bowl until creamed, about 2 minutes. Scrape down the sides and bottom of the bowl as needed. Add eggs and vanilla extract, then beat on medium-high speed until combined, about 1 minute. Scrape down the sides and bottom of the bowl as needed. Set aside.
- Whisk the flour, baking powder, and salt together in a medium bowl. Pour the dry ingredients into the wet ingredients, start the mixer on low speed, then slowly add the milk, lemon juice, and lemon zest. Once combined, stop the mixer. Do not overmix this batter.
- Spoon batter evenly into 12 cupcake liners, filling them about 2/3 full. Bake for about 18-22 minutes. A toothpick inserted in the middle will come out clean when they’re done. For around 30 mini cupcakes, bake for about 11-13 minutes, same oven temperature. Remove from the oven and allow to cool completely before frosting. I usually let them cool completely in the muffin pan.
- You may frost the cupcake as per your taste. (optional)
Red Velvet cake
Ingredients
Cake
- 3 cups cake flour
- 1 teaspoon baking soda
- 2 Tablespoons unsweetened natural cocoa powder
- 1/2 teaspoon salt
- 1/2 cup unsalted butter( softened to room temperature)
- 2 cups granulated sugar
- 1 cup vegetable oil
- 4 large eggs( room temperature and separated)
- 1 Tablespoon pure vanilla extract
- 1 teaspoon distilled white vinegar
- liquid or gel red food coloring
- 1 cup buttermilk (at room temperature)
Cream Cheese Frosting
- 450g full-fat block cream cheese (softened to room temperature)
- 1/2 cup unsalted butter (softened to room temperature)
- 4 and 1/2 cups confectioners’ sugar
- 1 Tablespoon heavy cream or milk
- 1 and 1/2 teaspoons pure vanilla extract
- pinch of salt, to taste
Instructions
- Preheat the oven to 177°C. Grease two 9-inch cake pans, line with parchment paper, then grease the parchment paper. (Parchment paper helps the cakes seamlessly release from the pans.)
- Whisk the flour, baking soda, cocoa powder, and salt together in a large bowl. Set aside.
- Using a handheld or stand mixer fitted with a paddle attachment, beat the butter and sugar together on medium-high speed until combined, about 1 minute. Scrape down the sides and up the bottom of the bowl with a rubber spatula as needed. Add the oil, egg yolks, vanilla extract, and vinegar and beat on high for 2 minutes. (Set the egg whites aside.) Scrape down the sides and up the bottom of the bowl with a rubber spatula as needed.
- With the mixer on low speed, add the dry ingredients in 2-3 additions alternating with the buttermilk. Beat in your desired amount of food coloring just until combined. I use 1-2 teaspoons gel food coloring. Vigorously whisk or beat the 4 egg whites on high speed until fluffy peaks form as pictured above, about 3 minutes. Gently fold into cake batter. The batter will be silky and slightly thick.
- Divide batter between cake pans. Bake for 30-32 minutes or until the tops of the cakes spring back when gently touched and a toothpick inserted in the center comes out clean. If the cakes need a little longer as determined by wet crumbs on the toothpick, bake for longer. However, careful not to overbake as the cakes may dry out. Remove cakes from the oven and cool completely in the pans set on a wire rack. The cakes must be completely cool before frosting and assembling.
- To make the frosting, In a large bowl using a handheld or stand mixer fitted with a whisk or paddle attachment, beat the cream cheese and butter together on medium-high speed until smooth, about 2 minutes. Add the confectioners’ sugar, cream/milk, vanilla extract, and a pinch of salt. Beat on low speed for 30 seconds, then increase to high speed and beat for 3 minutes until completely combined and creamy. Add more confectioners’ sugar if frosting is too thin, more milk if frosting is too thick, or an extra pinch of salt if frosting is too sweet. Frosting should be soft, but not runny.
- Using a large serrated knife, slice a thin layer off the tops of the cakes to create a flat surface. Discard or crumble over finished cake. Place 1 cake layer on your cake stand or serving plate. Evenly cover the top with frosting. Top with 2nd layer and spread remaining frosting all over the top and sides.
- Refrigerate cake for at least 30-60 minutes before slicing. This helps the cake hold its shape when cutting.
- Cover leftover cake tightly and store in the refrigerator for 5 days. Frosted cake or unfrosted cake layers can be frozen up to 2-3 months. Thaw overnight in the refrigerator and bring to room temperature before decorating/serving
All about Layering 2
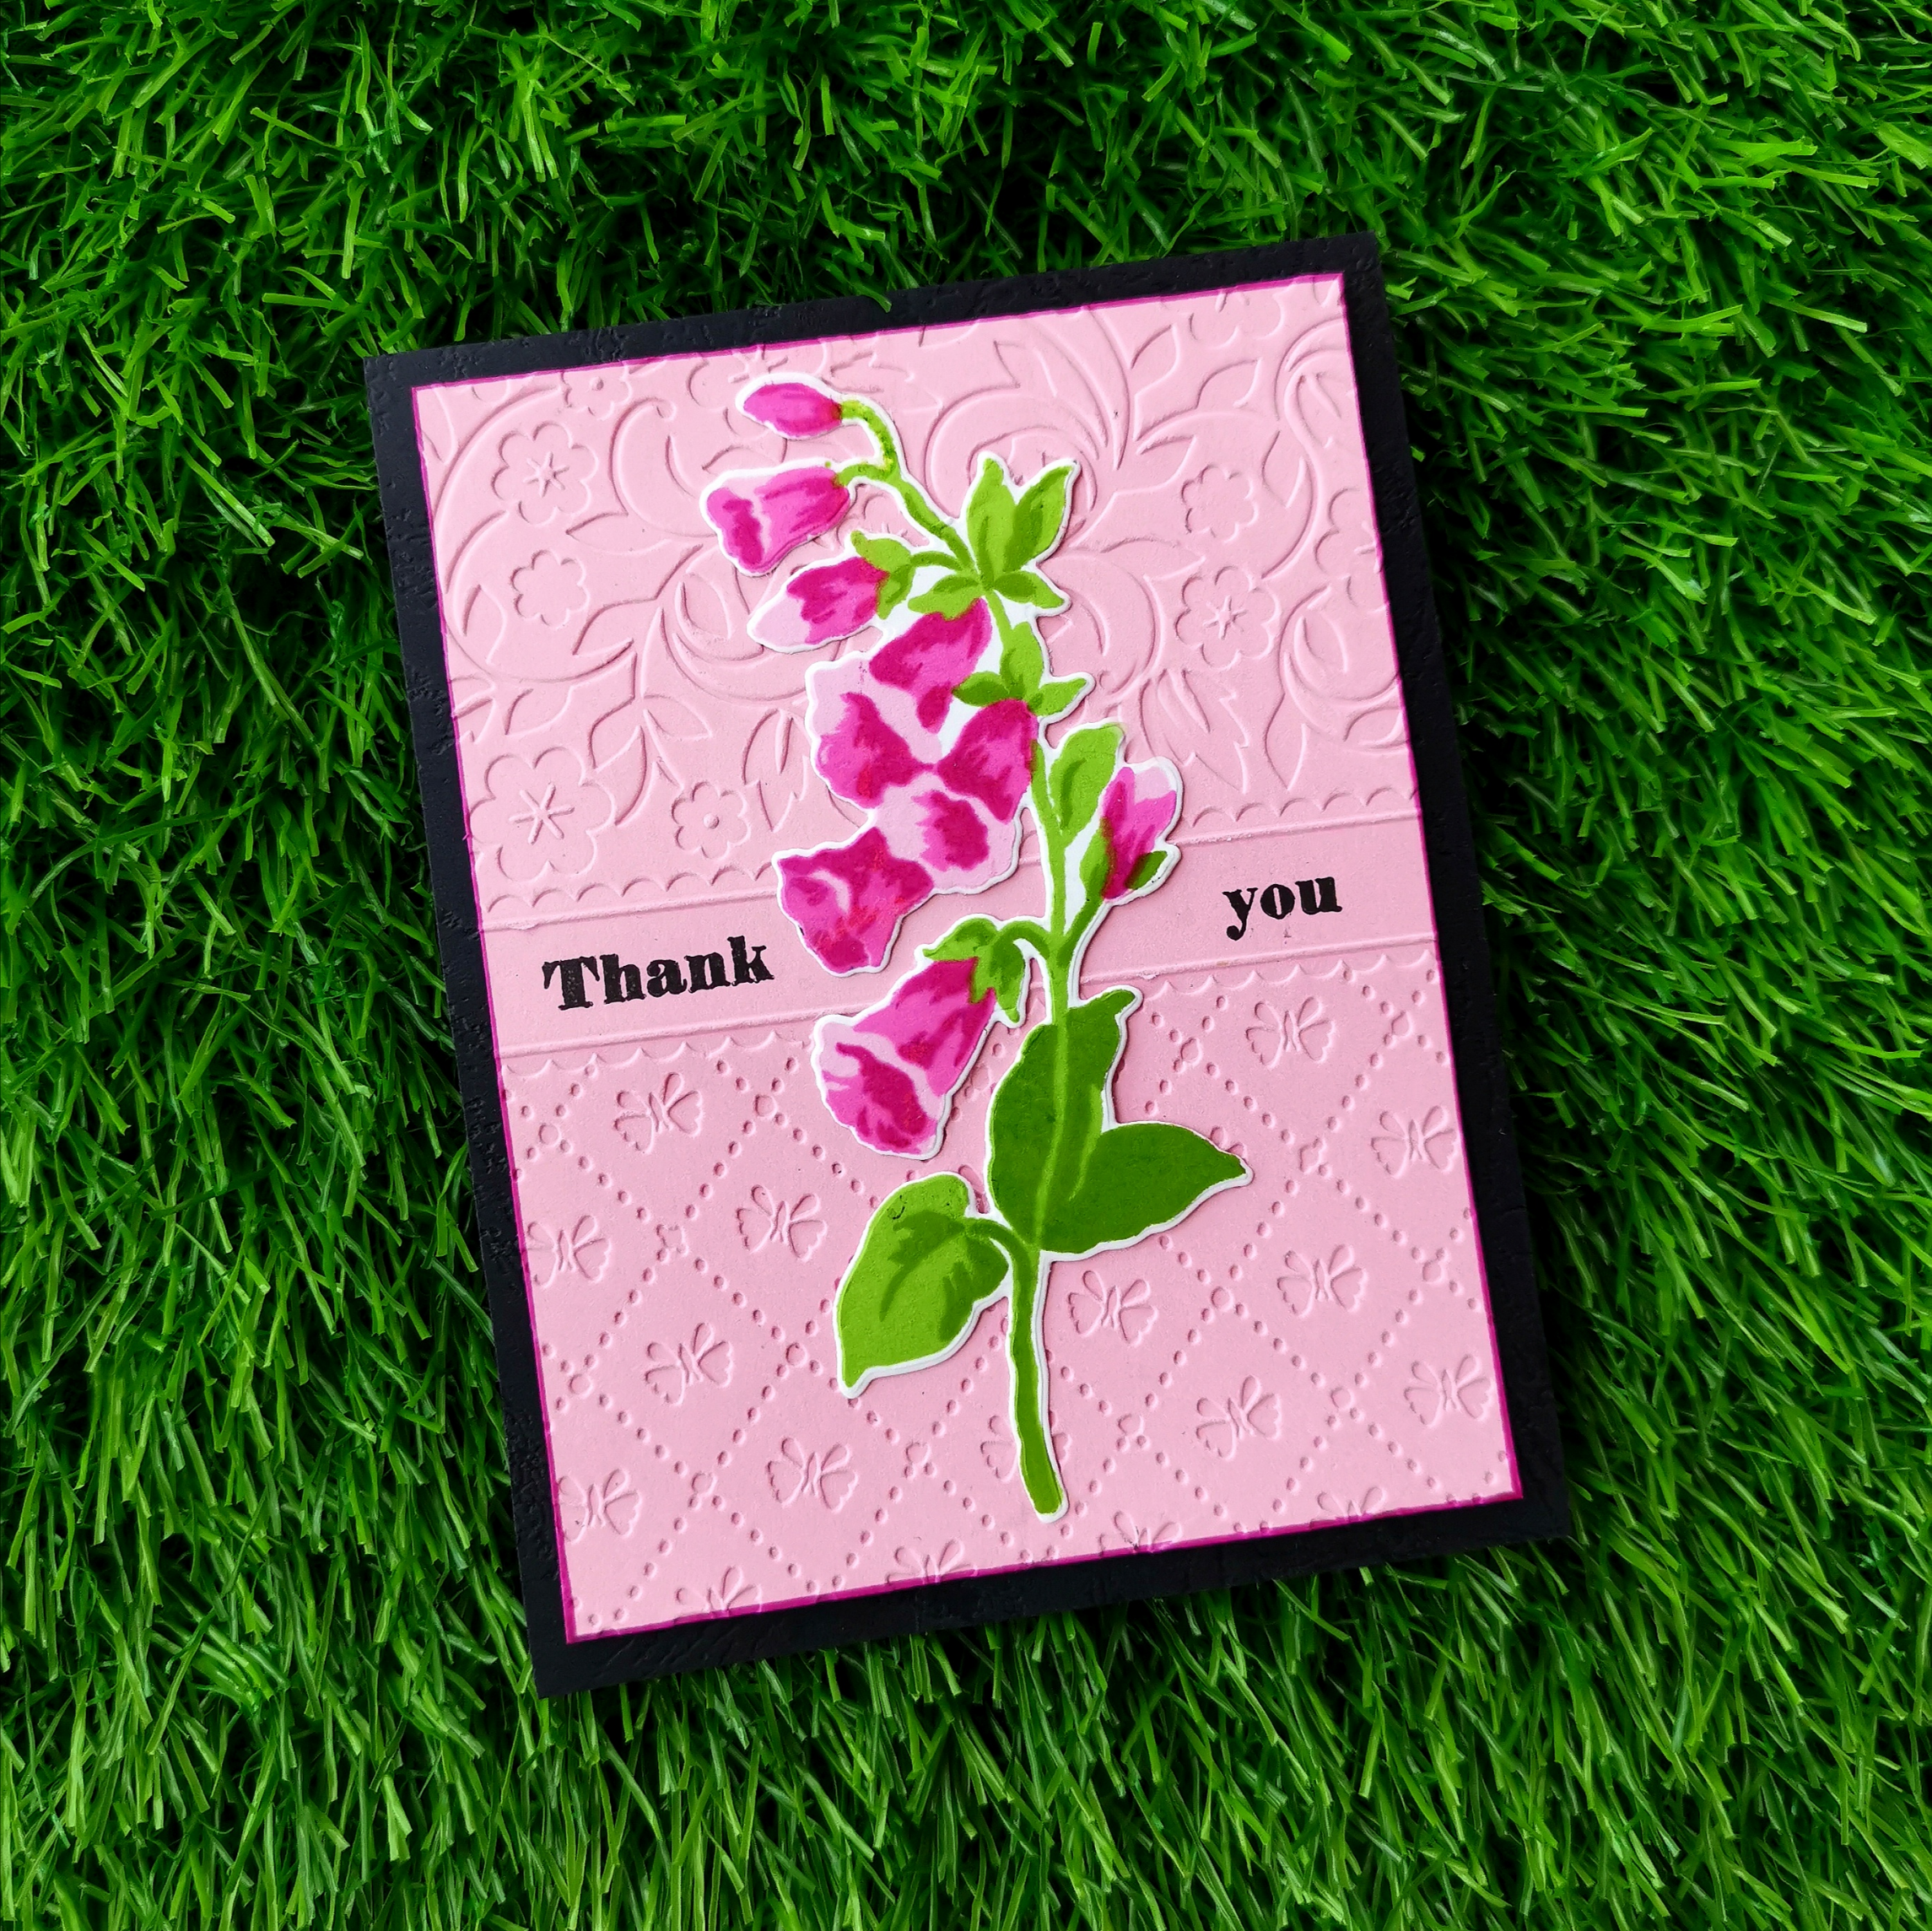
My today’s project mainly focuses on The Build-A-Flower: Canterbury Bells from Altenew. This stamp set contains a beautiful assortment of hanging bell-shaped flowers. Unlike many other Build-A-Flower stamp sets, this set contains the entire flower: stem, leaves, and all.
To create today’s project I initially decided to make a stencil for my stamp set. Take out a black rectangle heavy cardstock which is slightly bigger than my stamp set. Die-cut it through my sizzix big shot die cutting machine. Take out the die-cut piece from it, leaving the inner space empty. The coordinating stencil is right in front of u.
Here for my current project, I die cut a piece of Neenah classic crest solar white cardstock and placed it on the stencil. I decided to use the Mini Misti today, which can help me stamp the flower and leaf several times. That’s the main advantage of using a stamp positioner while stamping layering cards. multiple cards can be stamped out very quickly and easily with it. Then I placed my stencil and the diecut in the Misti stamping tool and placed the base layer of the flower on the door with the misti and then stamped it with altenew Baby Pink crisp die ink from the Spring Bouquet collection.
I did this layer twice to get a better dark impression . while learning about stamping the layering cards, I understood that the trick when stamping multiple layers of the image is that each layer stamp is to be placed in the correct position each time. while making multiple cards it is always better to tuck the card into the corner of the misti and make sure that you do that each time you stamp. It’s much easier if you use it with our DIY stencil because it helps us place the next layer stamps on its accurate position.
You can even cut the cards from the brochures which come along with the altenew stamp set. They can be used as a guide for stamping. If you are someone who struggles with aligning your stamps, then this saves a lot of time for you. Take the stamp and line it up on the stamped image on the guide. You can close the door on the misti and start doing the stamp layering on the cardstock. Before stamping the next layer I made sure that my first layer is good and dry as I think this gives the crisper impression if each layer is dry before stamping the next. Ultimately it’s very easy to align the layers and stamp layering set as on the back of the packaging, as altenew has a guide showing which areas of the two layers to watch out for when we are lining them. Then I stamped the other two layers on stamps accordingly. I used fuchsia for the second layer and magenta for the final one. The leaves were stamped by Deep Iris and Lime.
I wanted to give an embossed look to my card. So I took a pink cardstock and ran it through my sizzix big shot along with an embossing folder which I bought long back from an online store. It had a ribbon-like space in the middle where I stamped a thank you sentiment with the versa fine black ink. Later on, I stuck my Canterbury Bells in the middle of the card. The sentiment was split into two sides for placing my diecut in the middle of the card. I gave a slight border to the card by drawing the corners of the cardstock with a pink sharpie marker. In the end, I gave a black base to my main cardstock. I feel like this enhances the total look of the card. I hope this method will turn out to be an inspiration for you too.
Do give it a try to learn this course at https://altenew.com/collections/altenew-academy-classes/products/all-about-layering-2
I hope to see you all soon with another project from AECP. Until then happy stamping and thanks for stopping by!
-shahi
Easy Ink Blending Techniques
Hi, Sorry it’s been so long since I have posted something about my course. Like all of you, I have been intently following reports of Coronavirus Disease 2019 (COVID-19) and considering the many ways in which its future course might alter our day to day lives. These past few weeks have been a powerful reminder of just how connected we are to one another and how our choices today determine our options tomorrow. As the number of confirmed cases is increasing day by day, I pray that all of you stay safe and healthy. May the almighty God bless this whole humanity with good health. Ameen.
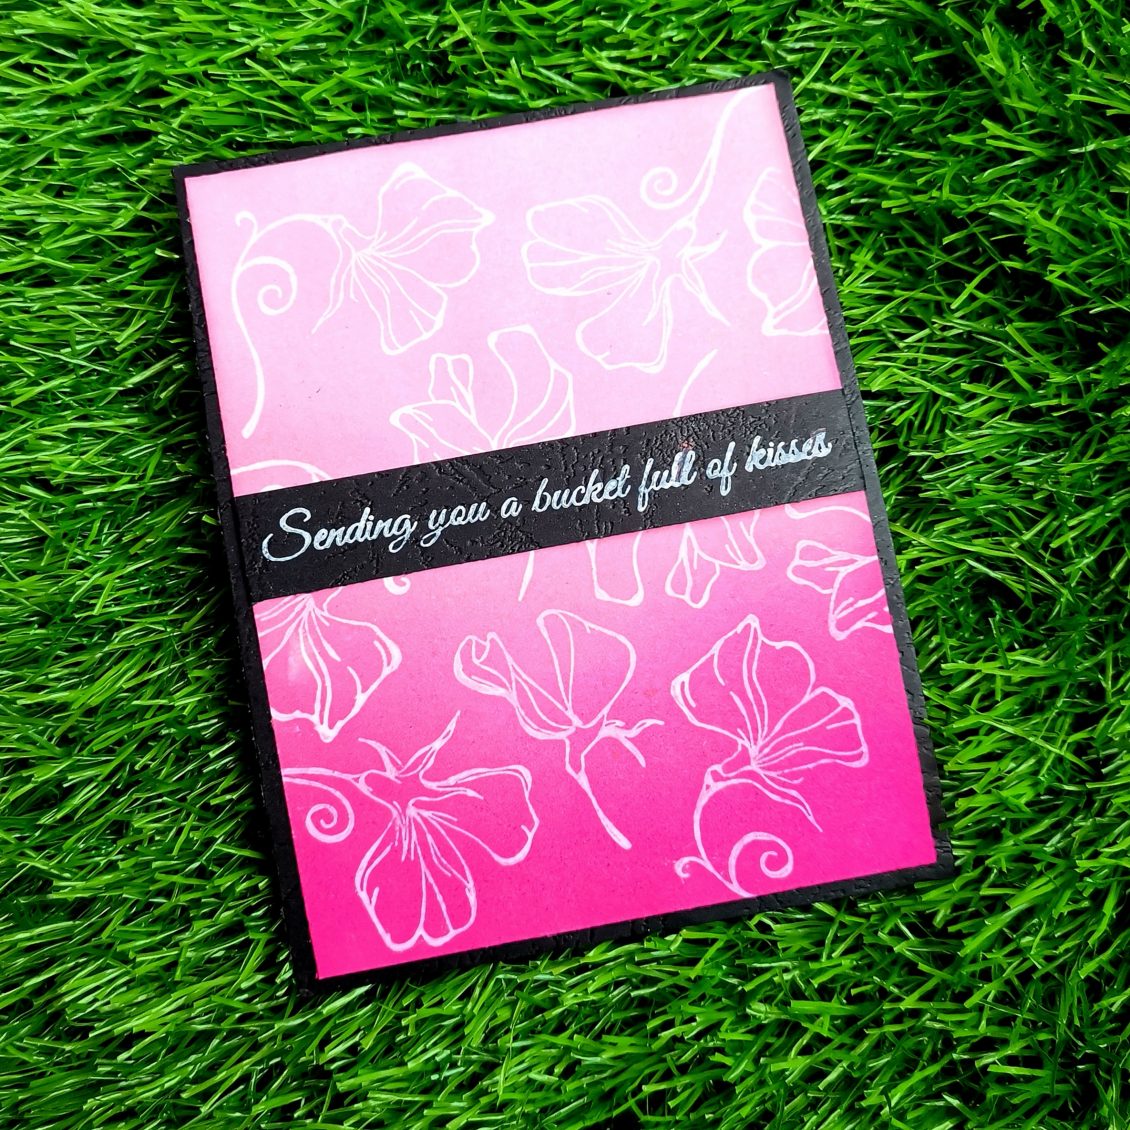
To refresh my mind and thoughts, I decided to enter my craft room today. As I am completing my AECP projects one by one, it’s getting real fun at the altenew educator certification program. My today’s task is to make a card based on the lesson, Easy Ink Blending Techniques.
My plan is to create a pink ombre look on the card base. For putting on that vibrant look, I decided to blend “cherry blossom” crisp die ink collection from Altenew. Darker to lighter color from bottom to top, I blended Razzleberry, Rubellite, Pinkalicious, and Pink Diamond accordingly on my 5 1/4*4 inch Neenah classic crest solar white cardstock.
I didn’t want my cardstock to stay ordinary, I wanted to add some background to it. That’s when my eyes got caught up with the Altenew’s sweetest peas stamp set. I stamped them in various directions all around in my cardstock with Hero Arts unicorn white pigment ink. I wanted to stick a sentiment which completely fills the center of my card. That’s how I came across a sentiment from a stamp set bought online a few years ago. It said, “sending you a bucket full of kisses”. I stamped it on black leather paper with Hero Arts unicorn white pigment ink and trimmed it to a strip. And stuck it on the center of the card with glue.
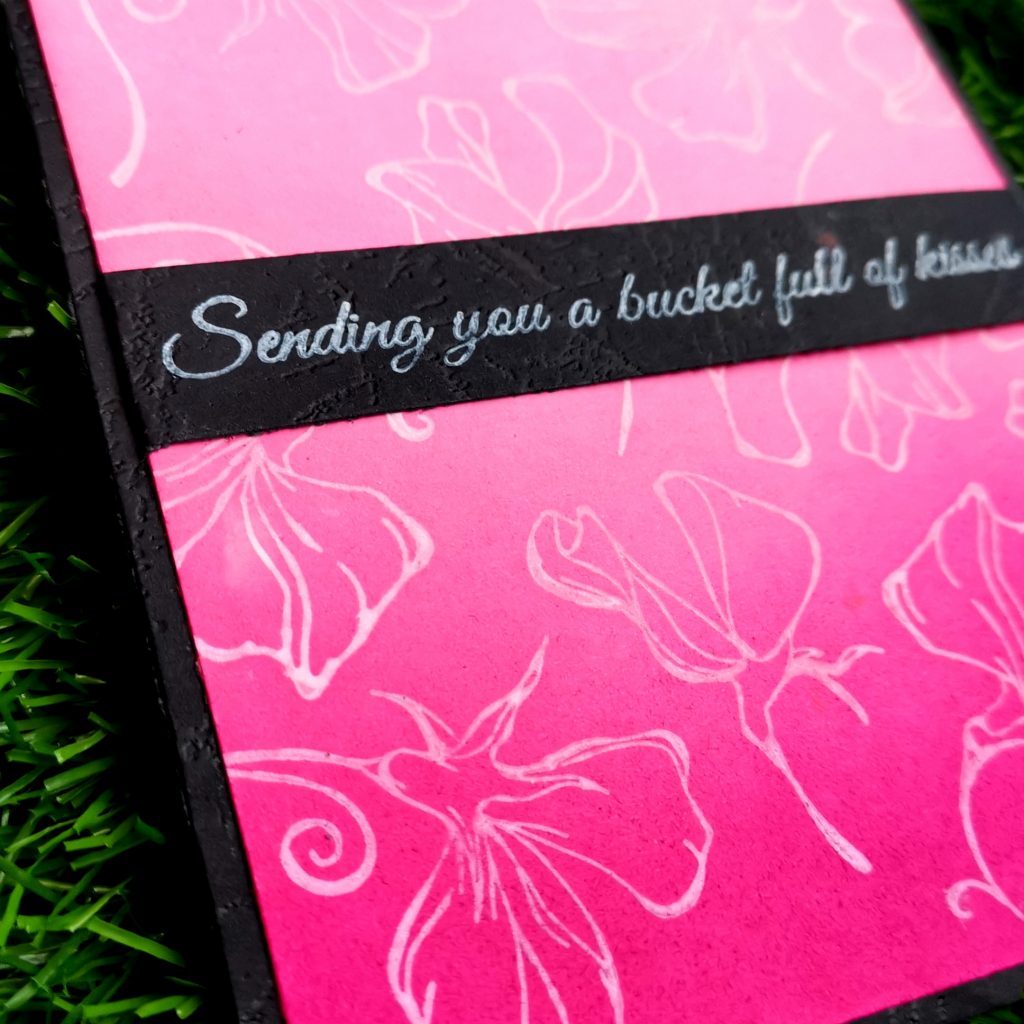
Finally took a 4 1/4* 5 1/2 sized black leather paper and stuck it behind my cardstock. I always like giving a dual-layer to my card. It gives a wall affect to my cards. Isn’t it so simple. I hope this method will turn out to be an inspiration for you too. Do give it a try to learn this lesson at https://altenew.com/products/easy-ink-blending-techniques
I hope to see you all soon with another project from AECP. Until then happy stamping and thanks for stopping by!
-shahi
Seasonal Scene Building
Hi Today, as I got to do a project on creating a Seasonal Scene Building, I was really confused as I didn’t have much stamps on my shelf to help me build a scene. That’s when I decided to take this as a challenge and make a card with the supplies I already have at my craft room.
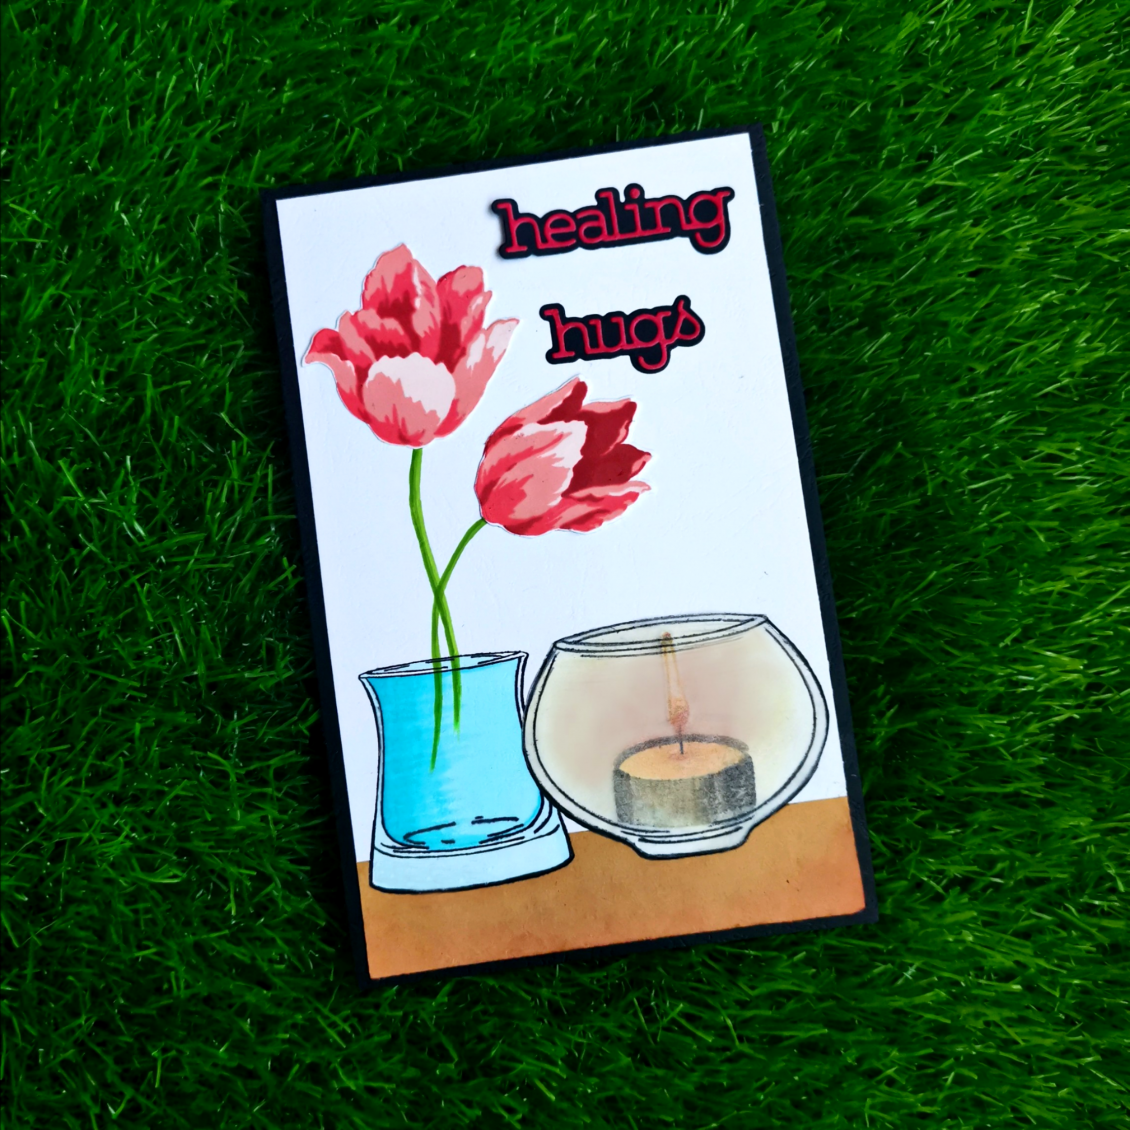
Alhamdulilah, within no time my eyes got stuck with the versatile vases stamp set from Altenew. But how to create a seasonal background with it was my next thought. I didn’t want to create a simple bouquet of flowers in a vase. I wanted to make something creative. The weather was so cold outside and I really loved to lit up a small scented Candle in my craft room. Thinking about it, an idea struck my mind and that’s how I actually ended up making this project.For this project, I used an 8*5 card. I was sure that I should use a longer card because I will have to find space for my vases, flower bouquet, and sentiments.
My first task was to create a base to place my vases in the image. I randomly chose a brown copy paper that was lying down in my cabin. Made it my base. Then I stamped a bowl vase from the versatile vases stamp set. Masking it, towards the left side I stamped a glass vase for my flowers.

I stamped and cropped 2 tulips using the Triumph Tulip- Build a flower stamp set from Altenew. I varied the colors for the tulip using the Red Cosmos Crisp Ink collection from Altenew. (Frosty Pink, Coral Berry, Ruby Red, Grapevine). After drawing the stem using the Frayed Leaf and Forest Glades with the altenew artistic markers, I stuck those tulips to the end of those stems. Then I stamped the candle using the candlelight stamp set from Altenew with their crisp inks ( morning frost, evening Gray, moon rock, lava rock was given for the base and buttercream, honey drizzle, autumn blaze, sunkissed was used for the top part of the light.) inside the bowl vase.
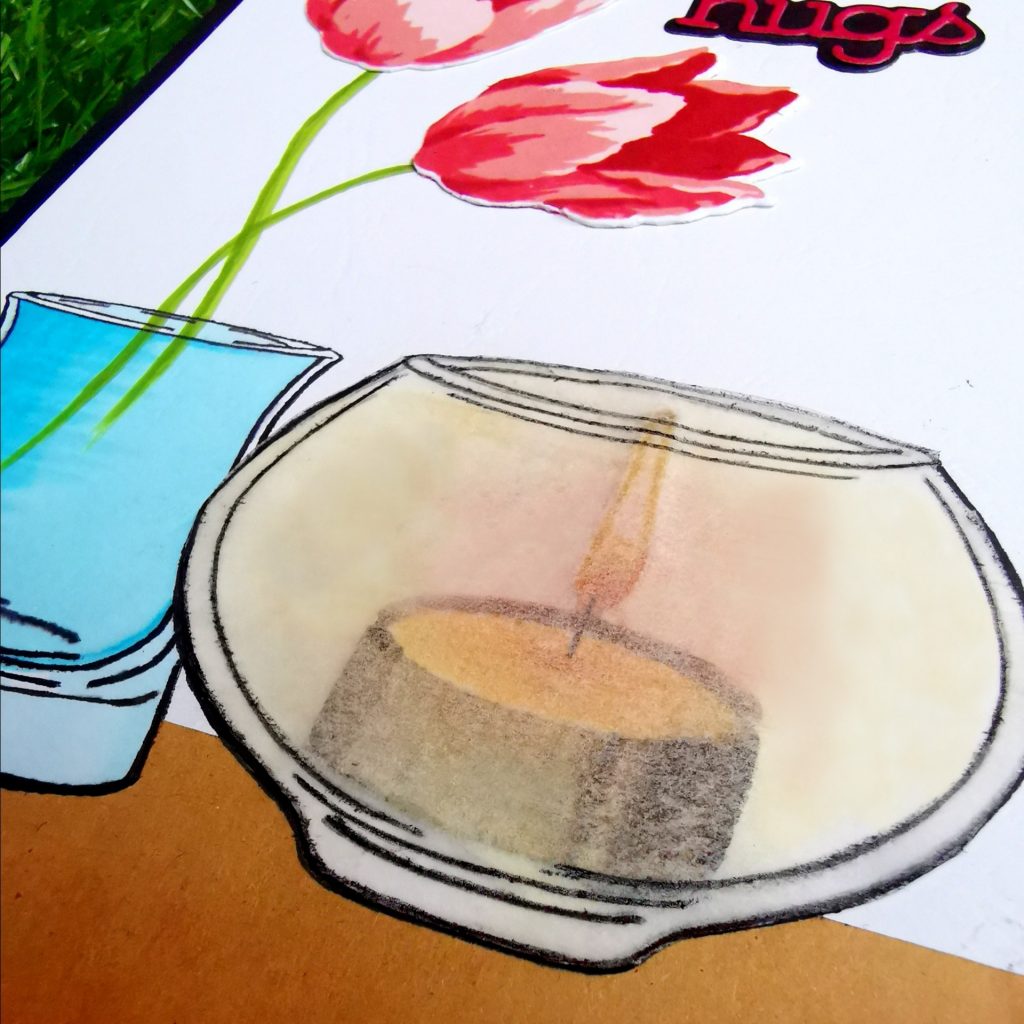
I wanted to have a variation of light rays from the candlelight, so I decided to stamp the bowl vase on vellum. After cropping it through its edges I blended a small shade of orange and red distress ink on it. Placing it on the candlelight and the vase I decided to crop the bottom part of the vases which was stamped on the brown copy paper. Using the same blending brush used on the vellum, I made small blends at the edges of the brown copy paper. Then I colored the glass vase with a blue artistic marker(Ocean Waves). And blended it with a light blue touch five marker.I die-cut my sentiment in a red and black cardstock using the healing hugs wafer dies from Simon says stamp. I stuck it towards the right corner of my cardstock. Adding a 1/4 inch to the card I placed a black cardstock to the base of my white card. It adds to the total gaze of the card.
After doing this course I am confident to face things that are out of my comfort zone in card making. As I said, in the beginning, I was really stuck. But later own I could figure out things in a better way. Such situations make me thank God for making me choose AECP. The tutors at altenew are really such an inspiration ❤
Thanks and I hope to see you at my next post. Until then happy stamping and thanks for stopping by!
-Shahi
Recent Comments