Hi, my dear crafty friends, welcome to my blog. I made today’s card for the Beautiful Details Course by Altenew Academy. Don’t know why, I was procrastinating this class this long. In fact I did take this class weeks back, but had a fear to give it a try. I could really feel that this was completely out of my comfort zone.
INSTRUCTIONS
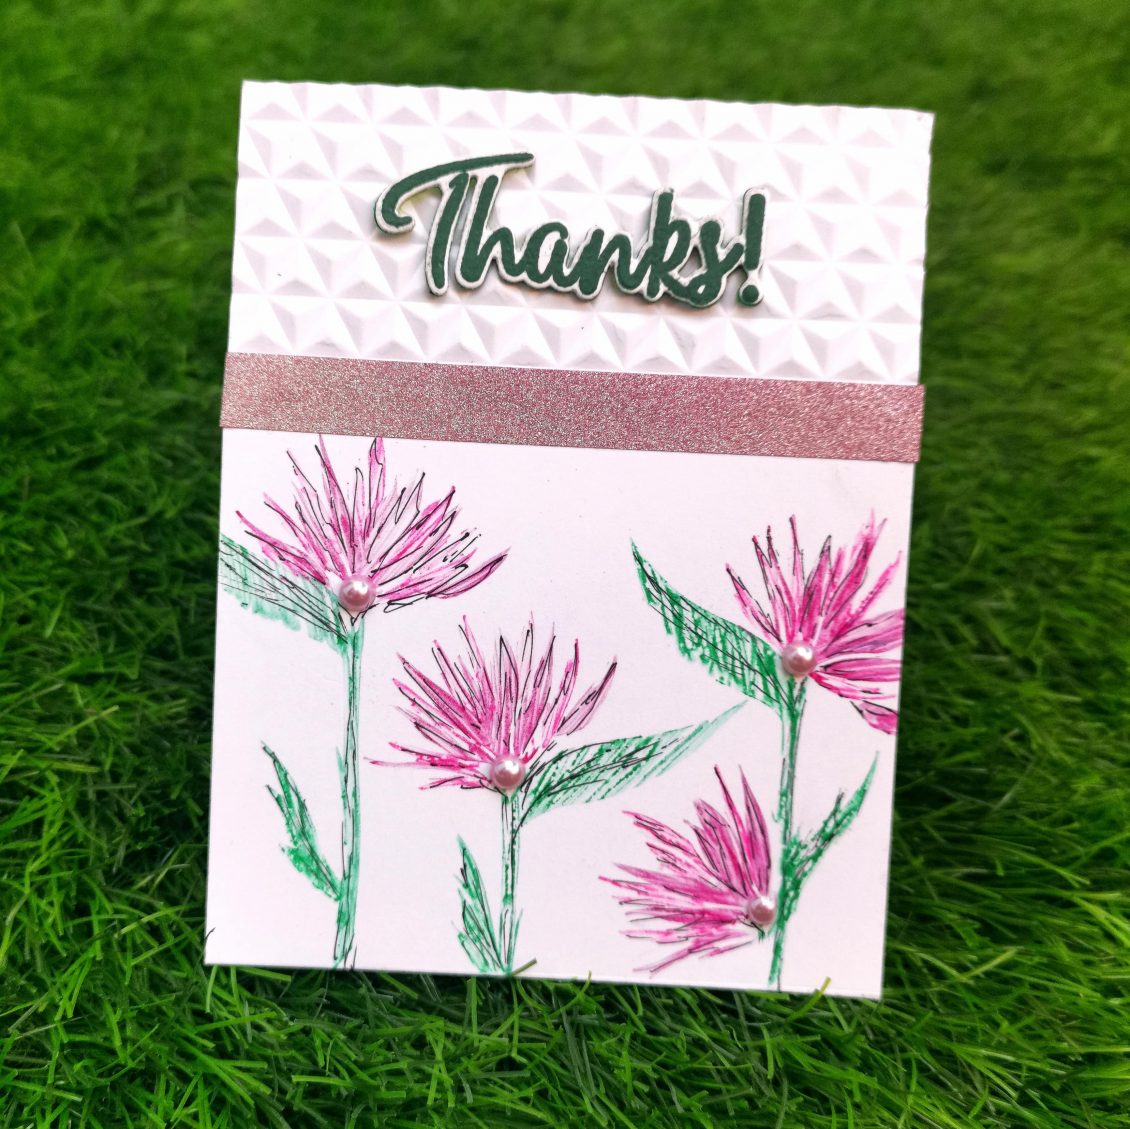
- Create a “4 1/4 x 5 1/2 ” card base from Classic Crest Solar White Cardstock.
- Choose a solid stamp set and color it with a brush marker and using generational stamping
- Use various shades of the similar color and stamp them in various generations
- I have used shades of pink for the flowers
- And a darker shade of green for the leaf and stem.
- Lighter shades of the petals gives a illusion that there are more petals in the back
- I shaded the markers in the same direction, so that it brings a uniform direction to the flowers, stems and leaves
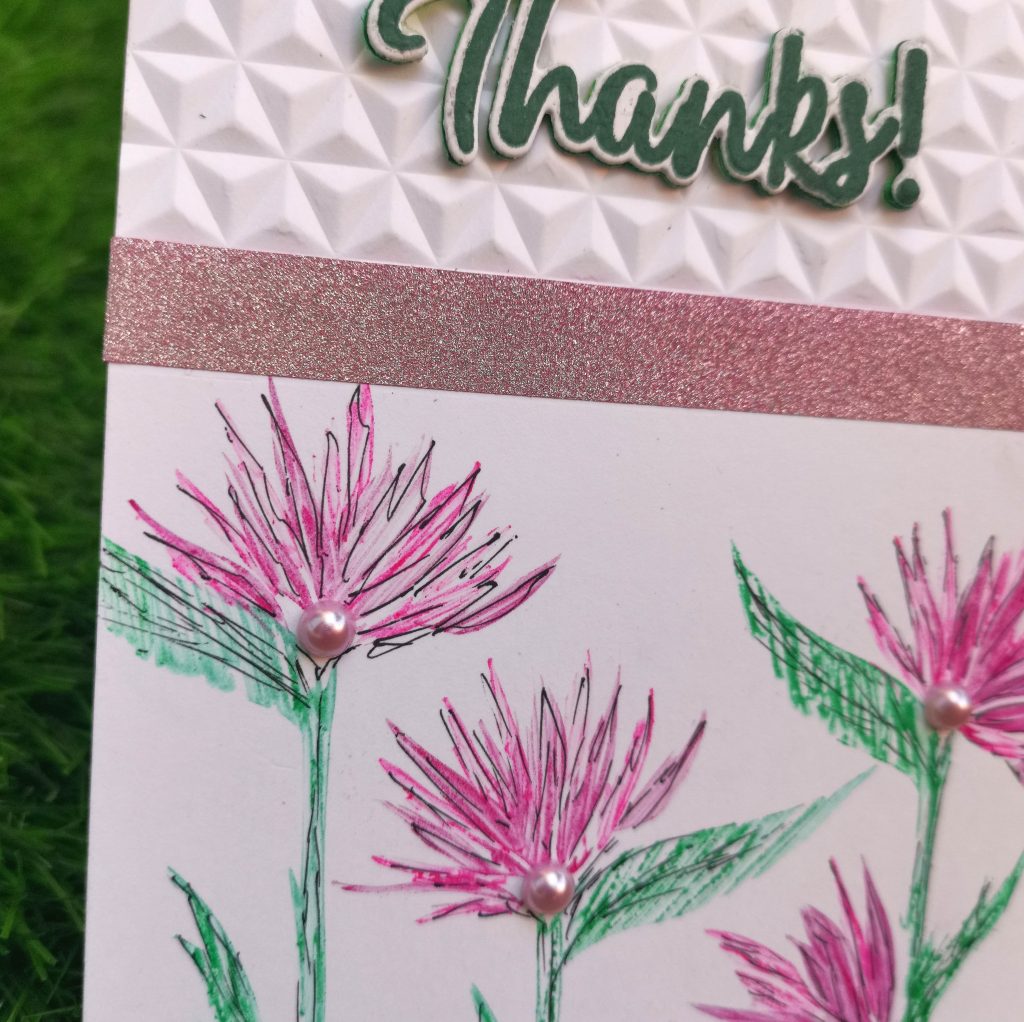
- I liked the flowers as such but decided to add few strokes of black as taught in the class.

- To completely change the look of the card, I ran the top part of the card through my die cutting machine and created a 3d dimension using Diamond stars 3D embossing folder
- Stick a matching shade of washi tape at the end point differentiating the 3 dimensional part and the flowers below.
- As an added interest, I Stuck matching pearl embellishments as the buds of the flowers.
- As the sentiment, I stamped “Thanks” on a classic crest solar white cardstock and die cut it
- Stick that die cut over the top positioning to the center of the center over the 3 dimensional part of the flower.
- Once the stamping is done, we are ready to add the details.
- I liked the flowers as such, so had a fear of going ahead of adding strokes to the flowers.(But wanted to give it a try)
- Add few strokes over the flower using a black ink pen (Here I used a black ball pen)
- The strokes are drawn according to ones personal interest. You may draw it in any shape or sizes. It can be drawn whereever you want.
TIPS
- Remember to leave gaps between the strokes.
- Use a stamping tool to stamp your florals. It makes stamping large solid images so much easier since you can double and triple stamp in various generations
- The included bar magnet can be used to quickly and easily position your cardstock, and the included grid paper makes it easy for you to lay out and align your card’s design.
- Before stamping, use an Anti-Static Pouch tool to remove static from your paper so the powder doesn’t stick where you don’t want it.
- Try other stamp sets and try to see your solid stamps in a new way. There are lot of fun things to be found!
- Try other stamping mediums and stamping techniques for creating the base layer for example markers, kissing technique etc.
SUPPLIES
- Sizzix Bigshot die cutting Machine
- Neenah Paper 4456 Neenah 110lb Classic Crest Cardstock
- Misti stamping tool
- Bird of Paradise Stamp Set
- Evergreen Mixed Media Ink
- Pink Faber castell fiber tip color marker
- Deep pink Faber castell fiber tip color marker
- Sap green Faber castell fiber tip color marker
- Flamingo pearl embellishments
- Glitter washi tape
- Halftone circles stamp set
- Halftone circles die
- Diamond stars 3D embossing folder
Thank You!
Hope you liked my card. Have a wonderful day and I hope to see you all soon with another project from AECP. Until then happy stamping and thanks for stopping by! If you like what you’ve seen from me, please give me a follow over on my Instagram (@shahicreationz) and/or subscribing to my vlog and YouTube if you haven’t already.
-shahi


Shahina! Your project looks fantastic! Thank you for sharing your work to the AECP assignment gallery.